
Tool Library
The Tool Library enables you to select existing tools from the standard Fusion Library, create custom libraries, and create and copy tools and holders. With each tool, you can associate multiple Cutting Data parameters (feeds and speeds).
Using the Tool Library, you can create and manage:
Tools for Milling, Turning, Cutting (waterjet, laser cutter, and plasma cutter), Touch Probes, and Holders.
Libraries of predefined tools and project documents.
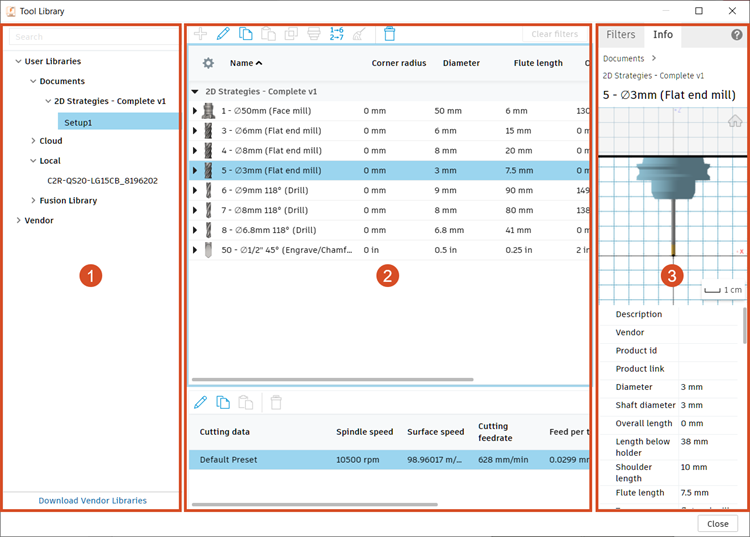
The Tool Library is divided into three general sections:
- Tool libraries
- Tools and tool cutting data
- Filters and tool information
1. Tool libraries
The library panel includes several types of libraries:
The Documents library.
Standard tool libraries such as the Fusion Library and the Vendor libraries. In the Fusion Library, tools are divided by process type, for example, Probes, Holders, Turning, and by units, for example, Holders (Inch) and Holders (Metric).
Note: The availability of Vendor libraries is being gradually rolled out to customers.Personal tool libraries such as the Hub Libraries, the Cloud library, and the Local library.
Note: The availability of Hub Libraries is being gradually rolled out to customers. Hub Libraries are replacing the Cloud library. Learn more about how Hub Libraries work and what's changing.
2. Tools and tool cutting data
The middle panel displays tools in the currently selected library. Here you can:
Customize the list of tool properties displayed in the table columns.
Sort the order of columns.
Resize the column width.
The Cutting data table displays tool presets including customized feed and speed data.
Creating and editing library items
To modify an existing tool, click Edit ![]() . This opens the Select Tool dialog, which lists all the editable properties.
. This opens the Select Tool dialog, which lists all the editable properties.
You can also define a custom tool, starting from a range of preset types. Click New Tool ![]() and select one of the available variants. In the next step, you can adjust the tool dimensions and properties within the Select Tool dialog.
and select one of the available variants. In the next step, you can adjust the tool dimensions and properties within the Select Tool dialog.
3. Filters and tool information
Use Filters to limit the displayed tools by tool category and tool properties. For example, you can filter milling tools by type, diameter, flute length, and more.
The Info tab shows a preview and parameters of a selected tool.
The tool preview displays the shape of the tool. It updates automatically to reflect any changes that you make. The grid scale is shown in the lower right corner of the preview, at the currently selected units. You can modify the unit while editing the tool on the Cutter tab, or for Holders, on the Holder Geometry tab.
3D tool preview
3D tool preview displays tools in a 3D view which updates automatically as you manipulate with the tool. This way, you can see all details when creating or editing tools, such as:
- Milling tools where the cutter is smaller than the holder.
- Turning tools where inserts can be difficult to see if a holder is applied.
The grid scale is available in the lower right corner of the preview, at the currently selected units.
The 3D tool preview is also available when you create or edit a tool.
To view details, manipulate with the tool using:
Tip: To reset the Home view, click Home |
 |