修改键和鼠标键组合的快速参考。
请参见创建和编辑热键。
相机移动键
按住 ![]() +
+![]() (对于 Mac,按住
(对于 Mac,按住 ![]() +
+![]() ):
):
| 操作目标 | 拖动 |
|---|---|
| 旋转(在透视视图中) |
|
| 平移 |
|
| 相机缩放 |
|
标记菜单
按住 ![]() +
+ ![]() (Windows) 或
(Windows) 或 ![]() +
+ ![]() (Mac) 键并按一个鼠标键。
(Mac) 键并按一个鼠标键。
![]() +
+ ![]() + 鼠标左键
+ 鼠标左键![]() (Windows) 或
(Windows) 或 ![]() +
+ ![]() + 鼠标左键
+ 鼠标左键![]() (Mac)
(Mac)
![]() +
+ ![]() + 鼠标中键
+ 鼠标中键![]() (Windows) 或
(Windows) 或 ![]() +
+ ![]() + 鼠标中键
+ 鼠标中键![]() (Mac)
(Mac)
![]() +
+ ![]() + 鼠标右键
+ 鼠标右键![]() (Windows) 或
(Windows) 或 ![]() +
+ ![]() + 鼠标右键
+ 鼠标右键![]() (Mac)
(Mac)
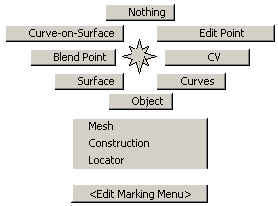
拾取
| 操作目标 | 单击或拖动 |
|---|---|
| 在拾取和取消拾取之间切换 |
|
| 仅拾取 |
|
| 取消拾取 |
|
提示:
在非拾取工具中按住 ![]() 键可以临时切换为拾取模式。
键可以临时切换为拾取模式。
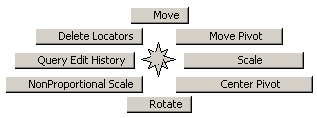
变换
| 若要按以下坐标轴变换... | 单击或拖动 |
|---|---|
| X |
|
| Y |
|
| Z |
|
移动、缩放、旋转或翻转
| 捕捉到... | 按住 | 或单击 |
|---|---|---|
| 曲线、等参曲线、曲面边或面上线。 | |
|
| 栅格交点。 |
|
|
| CV、编辑点、轴心点、标注。 |
|
|
捕捉
提示:
使用鼠标中键 ![]() 仅在水平方向进行捕捉。使用鼠标右键
仅在水平方向进行捕捉。使用鼠标右键 ![]() 仅在垂直方向进行捕捉。
仅在垂直方向进行捕捉。
热键
以下是默认设置。
| 菜单/工具项 | 热键 (Windows) | 热键 (Mac) |
|---|---|---|
| “File”>“Save As...” | |
|
| “File”>“Import”>“File” | |
|
| “File”>“Show Image” | |
|
| “File”>“Exit” | |
|
| “Edit”>“Undo” | |
|
| “Edit”>“Reinvoke Last” | |
|
| “Edit”>“Cut” | |
|
| “Edit”>“Copy” | |
|
| “Edit”>“Paste” | |
|
| “Edit”>“Cut Image” | |
|
| “Edit”>“Copy Image” | |
|
| “Edit”>“Paste Image” | |
|
| “Edit”>“Ungroup” | |
|
| “Edit”>“Group” | |
|
| “Delete”>“Delete Active” | |
|
| “Delete”>“Delete Active Image Layer” | |
|
| “Layouts”>“User Windows” | F9 (Windows) | F4 |
| “Layouts”>“Perspective” | F8 | |
| “Layouts”>“Left” | F6 | |
| “Layouts”>“Back” | F7 | |
| “Layouts”>“Top” | F5 | |
| “Layouts”>“Paint” | F3 | |
| “Display Toggles”>“Model” | F12 | |
| “Render”>“Globals” | |
|
| “Animation”>“Set Keyframe” | |
|
| “Animation”>“Playback” | |
|
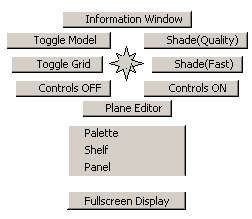
| “Windows”>“Information Window” | |
|
| “Preferences”>“Workflows”>“Default” | |
|
| “Preferences”>“Workflows”>“Paint” | |
|
| “Preferences”>“Workflows”>“Modeling” | |
|
| “Preferences”>“Workflows”>“Visualize” | |
|
| “Pick”>“Nothing” | |
|
| “Pick”>“Object” | |
|
| “Pick”>“Edit Point” | |
|
| “Transform”>“Move” | |
|
| “Paint”>“Clear Canvas Layer” | |
|
| “Paint”>“Toggle Marquee” | |
|
| “Paint Edit”>“New Image Layer” | |
|
| “Paint Edit”>“Merge Below” | |
|
| “View”>“Look At” | |
|
| Display All, Off | |
|
| Display All, Current | |
|
| Display Active, Off | |
|
| Display Active, Current | |
|
| 在“Paint”模式下: | ||
| “Paint”>“Cycle through brush mode” | F | F |
| Brush mode: paint | 1 | 1 |
| Brush mode: eraser | 2 | 2 |
| Brush mode: show | 4 | 4 |
| Brush mode: hide | 3 | 3 |
| Brush mode: smear | 5 | 5 |
| Brush mode: blur | 6 | 6 |
| Brush mode: sharpen | 7 | 7 |
| Size | S | S |
| Radius | R | R |
| Opacity | O | O |
| Rotate | T | T |
| Aspect | P | P |
| Grab color | C | C |
| Cycle through brush snap | Z | Z |
| Reset brush options | X | X |
| Reset clone | L | L |
| Twist canvas | V | V |
| Marquee add | = | = |
| Marquee subtract | - | - |