Checking out a file changes the read-only attribute of the local copy to read/write. Once a file is checked out, it can be edited. Only one member of a team can check out a file at one time. No one else can modify a checked out file until it has been checked back into the vault. Refer to the User Name column to determine who has a certain file checked out. You can check out one file, multiple files, or all files in a folder depending on the options you select in the Check Out dialog box.
- Understand Get Revision and Check Out
- Get/Check Out in the Vault Client
- Get/Check Out in the AutoCAD Vault Add-in
- Get/Check Out in the Inventor Vault Add-in
- Get/Check Out in Vault Office
- Get/Check Out in Other Add-ins
Understand Get Revision and Check Out
The Get Revision and Check Out commands retrieve writeable files from the vault and place them in your working folder, so that you can modify them. Only one user can have a file checked out for editing at one time. If a user needs to get the latest version of a file that has been checked out, use the Refresh command.
- The Get Revision command allows you to check out a specific revision of a file and copy it to your local folder. Note:
The Revision feature is available in Autodesk Vault Workgroup and Vault Professional.
- The Check Out command gets only the latest version of the leading revision of a file. See Understanding Revisions for more information. Note: If you are using Autodesk Vault Basic, the most recent version of the file is retrieved.
To return the file to the vault, you can use the Check In command to confirm your changes and copy your local, modified file into the vault. You can also use the Undo Check Out command. Undo Check Out does not update the vault. All the changes made to the local copy since you last checked out the file are lost.
Get/Checkout Workflows
The Get/Check Out dialog has different options based on the edition of Autodesk Vault. Additionally, certain add-ins have different workflows than the stand-alone client. The different workflows for checking files out of a vault are listed in this section.
Vault Client
Learn About the Get/Checkout Dialog
The Get/Checkout dialog for Vault 2014 has two settings: collapsed and expanded.
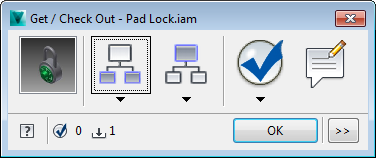
Get/Checkout Dialog Collapsed - Vault 2014
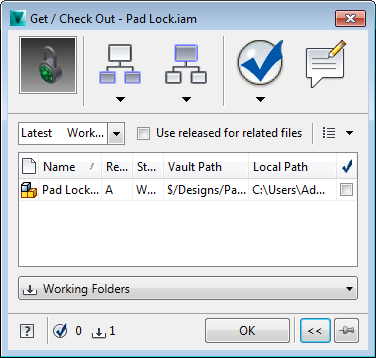
Get/Checkout Dialog Expanded -Vault 2014
 .
. Features of the Get/Checkout Dialog
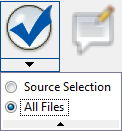
- Source Selection–Selects only the files that were initially highlighted in the main view when you launched the Get/Check Out dialog.
- All Files–Selects all files listed in the Get/Check Out dialog.
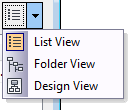
- List View
 View the contents of the Get/Checkout pane in a flat list.
 - Folder View
 View the contents of the Get/Checkout pane in a tree structure.
 - Design View
 View the contents of the Get/Checkout pane as they relate to a design.
|
Feature |
Details |
|---|---|
|
Thumbnail View
|
If only one file is selected, a thumbnail of the file is displayed. If more than one file is selected, a generic thumbnail with multiple documents is displayed. |
|
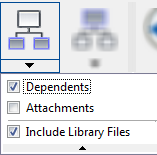
Include Children
|
You can automatically include specified children files for check out whenever you check an object out of the vault. Tip: Hover your mouse over the Include Children Button at any time to see the current inclusion settings.
Click the Include Children button to add the specified children file types to the current list of files. Click the drop-down arrow beneath the Include Children Button to change which children types are included when the button is clicked. You can disable the feature by clicking it again. All include settings are ignored until the button is enabled again. |
|
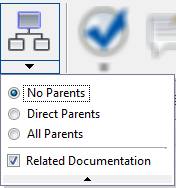
Include Parents
|
You can automatically include specified parent files for check out whenever you check an object out of the vault. Tip: Hover your mouse over the Include Parents Button at any time to see the current settings.
Click the Include Parents Button to add the specified parent file types related documentation to the current list of files. Click the drop-down arrow beneath the Include Parents Button to change which parent types, if any, are included when the button is clicked. You can disable the feature by clicking it again. All include settings are ignored until the button is enabled again. |
|
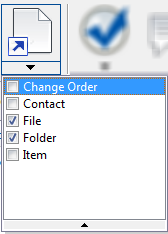
Include Links
Note: This feature is available when an object with links is selected in Vault Workgroup and Vault Professional.
|
You can automatically include specified linked object types for check out whenever you check an object out of the vault. Click the Include Links button to include the objects linked to the object selected for check out. These links could be to other files, folders, items, change orders, or custom objects (in the example, Contact represents a custom object in the vault). Tip: Hover your mouse over the Include Links Button at any time to see the current settings.
Click the drop-down arrow beneath the Include Links button to change which linked objects you want included when the button is clicked. You can disable the feature by clicking it again. All include settings are ignored until the button is enabled again. |
|
Check
|
The Check button provides a fast way to select all of the objects listed for check out. You can also set it so that whenever the button is clicked, only the objects you initially selected when you launched the Get/Check Out dialog are selected. This is a useful feature if you have enabled the Include Children, Include Parents, or Include Links buttons and want a fast way to select everything for check out. Tip: Hover your mouse over the icon at any time to see the current settings.
Click the drop-down arrow beneath the Check button to change your settings for what happens when the button is clicked.
Selection Settings |
|
Comments
|
Click the Comments button to add a description or document the purpose for checking out the selected files. Tip: Hover your mouse over the Comments button to see any comments already recorded.
|
|
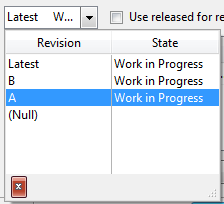
Select Revision
Note: The Revision feature is available in Autodesk Vault Workgroup and Vault Professional.
|
Select the revision that you want to retrieve from the vault on the Revision drop-down menu. If you choose the Latest, then the latest version of the leading revision is retrieved. If multiple files are selected, then the latest version of the leading revision is retrieved. |
|
Use released for related files check box
|
Select this check box to get the released versions of related files that are selected for check out. |
|
View Settings
|
Click one of the view icons in the View Settings drop-down to control how files in the vault are displayed. |
|
Grid Controls
|
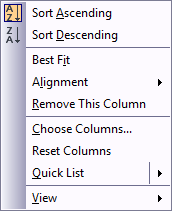
Right-click on the Get/Checkout view pane to customize how files are displayed, including which columns are included, how files are aligned, and how files are sorted. Refer to Custom Grid Options for more information. |
|
Selected for Check Out Column
|
Indicates which objects are currently selected for check out. |
|
Object Selection Counters
|
At the bottom of the dialog are two icon references that tell you how many files are selected for Check Out |
|
Pin Dialog in Expanded Mode
|
When the dialog is expanded, it does not retain that mode when next opened. Click the Pin button |
|
Expand to Show Details
|
Click the expand button to toggle between collapsed and expanded view of the Get/Checkout dialog. |
|
Working Folders Drop-Down Menu
|
You can select whether to use the default working folder or select another folder to store the local copies of the objects that you download. You can also select no working folder. |
Get/Check Out (Vault Basic)
- Right-click on a file or folder and select Get/Checkout.
The Get/Check Out dialog displays in collapsed or expanded view, depending on whether you have pinned
 it in the expanded view. The collapsed view is default.
 - Enable the Include Children button if you want dependent files also available for check out. The Include Children settings can be changed by clicking the arrow beneath the button and making changes to the settings.Tip: Hover your mouse over the icon at any time to see the current settings.
- Enable the Include Parents button if you want parent files also available for check out. The Include Parents settings can be changed by clicking the arrow beneath the button and making changes to the settings.Tip: Hover your mouse over the icon at any time to see the current settings.
- Enable the Check button if you want to quickly select all of the files from steps 2 through 4. If Source selection is enabled instead, then just the files and folders you originally selected for check out are selected. You can configure whether this button gets all of the files or just the original selection set by clicking the arrow beneath the button and making changes to the settings.Tip: Hover your mouse over the icon at any time to see the current settings.
- Optional. Leave a comment about the reason for the checkout by clicking the Comment button.
- If you want to simply get the latest version of the selected files and folders, click OK.
If you want to see all of the files listed with the Include Children and Include Parents buttons enabled, or if you want to manually select files for checkout, click the Expand button
 to see the complete list and make your selections.
 If you have selected only one file for check out and you want to specify the version of the file, click the Expand button
 and select the version from the Version drop-down list.
 - Click OK.
Perform these steps to get/checkout files and folders in Vault Basic.
The selected files are copied from the vault to your local folder if Working Folders is selected. You can now edit the files.
Get/Check Out (Vault Workgroup)
- Right-click on a file or folder and select Get/Checkout.
The Get/Check Out dialog displays in collapsed or expanded view, depending on whether you have pinned
 it in the expanded view. The collapsed view is default.
 - Enable the Include Children button if you want dependent files also available for check out. The Include Children settings can be changed by clicking the arrow beneath the button and making changes to the settings.Tip: Hover your mouse over the icon at any time to see the current settings.
- Enable the Include Parents button if you want parent files also available for check out. The Include Parents settings can be changed by clicking the arrow beneath the button and making changes to the settings.Tip: Hover your mouse over the icon at any time to see the current settings.
- Enable the Check button if you want to quickly select all of the associated files for check out as well as the initial selection set. If Source selection is enabled instead, then just the files or folders you originally selected for checkout are selected. You can configure whether this button gets all of the files or just the original selection set by clicking the arrow beneath the button and making changes to the settings.Tip: Hover your mouse over the icon at any time to see the current settings.
- Optional. Leave a comment about the reason for the check out by clicking the Comment button.
- If you want to simply get the latest version of the leading revision of the selected files or folders, click OK.
If you want to see all of the Vault objects listed with the Include Children, Include Parents, or Include Links buttons enabled, or if you want to manually select objects for checkout, click the Expand button
 to see the complete list and make your selections.
 If you have selected only one file for checkout and you want to specify the revision of the file, click the Expand button
 and select the revision from the Revision drop-down list.
 - Enable the Use released for related files check box to get the released versions of all selected related files.
- Click OK.
Perform these steps to get/checkout files and folders in Vault Workgroup.
The selected Vault objects are copied from the vault to your local folder if Working Folders is selected. You can now edit the files.
Get/Check Out (Vault Professional)
- Right-click on a file, folder, or custom object and select Get/Checkout.
The Get/Check Out dialog displays in collapsed or expanded view, depending on whether you have pinned
 it in the expanded view. The collapsed view is default.
 - Enable the Include Children button if you want dependent files also available for check out. The Include Children settings can be changed by clicking the arrow beneath the button and making changes to the settings.Tip: Hover your mouse over the icon at any time to see the current settings.
- Enable the Include Parents button if you want parent files also available for check out. The Include Parents settings can be changed by clicking the arrow beneath the button and making changes to the settings.Tip: Hover your mouse over the icon at any time to see the current settings.
- Enable the Include Links button if you want to include the specified linked object types for check out as well. Note: This feature is available when an object with links is selected in Vault Professional.The Include Links settings can be changed by clicking the arrow beneath the button and making changes to the settings.Tip: Hover your mouse over the icon at any time to see the current settings.
- Enable the Check button if you want to quickly select all of the associated files for check out as well as the initial selection set. If Source selection is enabled instead, then just the files, folders, or custom objects you originally selected for checkout are selected. You can configure whether this button gets all of the files or just the original selection set by clicking the arrow beneath the button and making changes to the settings.Tip: Hover your mouse over the icon at any time to see the current settings.
- Optional. Leave a comment about the reason for the check out by clicking the Comment button.
- If you want to simply get the latest version of the leading revision of the selected files, folders, or custom objects, click OK.
If you want to see all of the Vault objects listed with the Include Children, Include Parents, or Include Links buttons enabled, or if you want to manually select objects for checkout, click the Expand button
 to see the complete list and make your selections.
 If you have selected only one file for checkout and you want to specify the revision of the file, click the Expand button
 and select the revision from the Revision drop-down list.
 - Enable the Use released for related files check box to get the released versions of all selected related files.
- Click OK.
Perform these steps to get/checkout files and folders and custom objects in Vault Professional.
The selected Vault objects are copied from the vault to your local folder if Working Folders is selected. You can now edit the files.
Video–Check a File Out of the Vault
This video shows you the steps for checking out a file in the Autodesk Vault client.
AutoCAD Add-in
Learn About the Get/Checkout Dialog
The Get/Checkout dialog for Vault 2014 has two settings: collapsed and expanded.
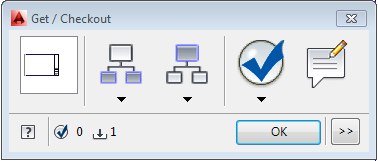
Get/Checkout Dialog Collapsed - AutoCAD Vault Add-in 2014
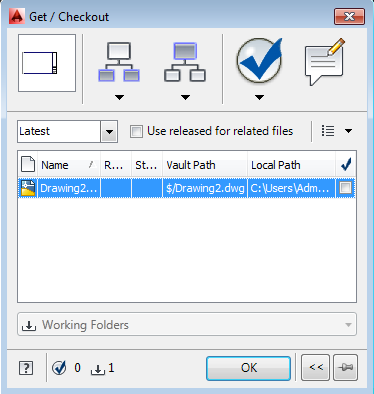
Get/Checkout Dialog Expanded - AutoCAD Vault Add-in 2014
 .
. Features of the Get/Checkout Dialog
- Source Selection–Selects only the files that were initially highlighted in the main view when you launched the Get/Check Out dialog.
- All Files–Selects all files listed in the Get/Check Out dialog.
- List View
 View the contents of the Get/Checkout pane in a flat list.
 - Folder View
 View the contents of the Get/Checkout pane in a tree structure.
 - Design View
 View the contents of the Get/Checkout pane as they relate to a design.
|
Feature |
Details |
|---|---|
|
Thumbnail View
|
If only one file is selected, a thumbnail of the file is displayed. If more than one file is selected, a generic thumbnail with multiple documents is displayed. |
|
Include Children
|
You can automatically include specified children files for check out whenever you check an object out of the vault. Tip: Hover your mouse over the Include Children Button at any time to see the current inclusion settings.
Click the Include Children button to add the specified children file types to the current list of files. Click the drop-down arrow beneath the Include Children Button to change which children types are included when the button is clicked. You can disable the feature by clicking it again. All include settings are ignored until the button is enabled again. |
|
Include Parents
|
You can automatically include specified parent files for check out whenever you check an object out of the vault. Tip: Hover your mouse over the Include Parents Button at any time to see the current settings.
Click the Include Parents Button to add the specified parent file types related documentation to the current list of files. Click the drop-down arrow beneath the Include Parents Button to change which parent types, if any, are included when the button is clicked. You can disable the feature by clicking it again. All include settings are ignored until the button is enabled again. |
|
Include Links
Note: This feature is available when an object with links is selected in Vault Workgroup or Vault Professional.
|
You can automatically include specified linked object types for check out whenever you check an object out of the vault. Click the Include Links button to include the objects linked to the object selected for check out. These links could be to other files, folders, items, change orders, or custom objects (in the example, Contact represents a custom object in the vault). Tip: Hover your mouse over the Include Links Button at any time to see the current settings.
Click the drop-down arrow beneath the Include Links button to change which linked objects you want included when the button is clicked. You can disable the feature by clicking it again. All include settings are ignored until the button is enabled again. |
|
Check
|
The Check button provides a fast way to select all of the objects listed for check out. You can also set it so that whenever the button is clicked, only the objects you initially selected when you launched the Get/Check Out dialog are selected. This is a useful feature if you have enabled the Include Children, Include Parents, or Include Links buttons and want a fast way to select everything for check out. Tip: Hover your mouse over the icon at any time to see the current settings.
Click the drop-down arrow beneath the Check button to change your settings for what happens when the button is clicked.
Selection Settings |
|
Comments
|
Click the Comments button to add a description or document the purpose for checking out the selected files. Tip: Hover your mouse over the Comments button to see any comments already recorded.
|
|
Select Revision
Note: The Revision feature is available in Autodesk Vault Workgroup and Vault Professional.
|
Select the revision that you want to retrieve from the vault on the Revision drop-down menu. If you choose the Latest, then the latest version of the leading revision is retrieved. If multiple files are selected, then the latest version of the leading revision is retrieved. |
|
Use released for related files check box
|
Select this check box to get the released versions of related files that are selected for check out. |
|
View Settings
|
Click one of the view icons in the View Settings drop-down to control how files in the vault are displayed. |
|
Grid Controls
|
Right-click on the Get/Checkout view pane to customize how files are displayed, including which columns are included, how files are aligned, and how files are sorted. Refer to Custom Grid Options for more information. |
|
Selected for Check Out Column
|
Indicates which objects are currently selected for check out. |
|
Object Selection Counters
|
At the bottom of the dialog are two icon references that tell you how many files are selected for Check Out |
|
Pin Dialog in Expanded Mode
|
When the dialog is expanded, it does not retain that mode when next opened. Click the Pin button |
|
Expand to Show Details
|
Click the expand button to toggle between collapsed and expanded view of the Get/Checkout dialog. |
|
Working Folders Drop-Down Menu
|
You can select whether to use the default working folder or select another folder to store the local copies of the objects that you download. You can also select no working folder. |
Get/Check Out (Vault Basic)
- Click Check Out on the Vault Ribbon.
The Get/Check Out dialog displays in collapsed or expanded view, depending on whether you have pinned
 it in the expanded view. The collapsed view is default.
 - Enable the Include Children button if you want dependent files also available for check out. The Include Children settings can be changed by clicking the arrow beneath the button and making changes to the settings.Tip: Hover your mouse over the icon at any time to see the current settings.
- Enable the Include Parents button if you want parent files also available for check out. The Include Parents settings can be changed by clicking the arrow beneath the button and making changes to the settings.Tip: Hover your mouse over the icon at any time to see the current settings.
- Enable the Check button if you want to quickly select all of the files from steps 2 through 4. If Source selection is enabled instead, then just the files and folders you originally selected for check out are selected. You can configure whether this button gets all of the files or just the original selection set by clicking the arrow beneath the button and making changes to the settings.Tip: Hover your mouse over the icon at any time to see the current settings.
- Optional. Leave a comment about the reason for the checkout by clicking the Comment button.
- If you want to simply get the latest version of the selected files and folders, click OK.
If you want to see all of the files listed with the Include Children and Include Parents buttons enabled, or if you want to manually select files for checkout, click the Expand button
 to see the complete list and make your selections.
 If you have selected only one file for check out and you want to specify the version of the file, click the Expand button
 and select the version from the Version drop-down list.
 - Click OK.
The selected files are copied from the vault to your local folder if Working Folders is selected. You can now edit the files.
Get/Check Out (Vault Workgroup and Vault Professional)
- Click Check Out on the Vault Ribbon.
The Get/Check Out dialog displays in collapsed or expanded view, depending on whether you have pinned
 it in the expanded view. The collapsed view is default.
 - Enable the Include Children button if you want dependent files also available for check out. The Include Children settings can be changed by clicking the arrow beneath the button and making changes to the settings.Tip: Hover your mouse over the icon at any time to see the current settings.
- Enable the Include Parents button if you want parent files also available for check out. The Include Parents settings can be changed by clicking the arrow beneath the button and making changes to the settings.Tip: Hover your mouse over the icon at any time to see the current settings.
- Enable the Include Links button if you want to include the specified linked object types for check out as well. Note: This feature is available when an object with links is selected in Vault Professional.The Include Links settings can be changed by clicking the arrow beneath the button and making changes to the settings.Tip: Hover your mouse over the icon at any time to see the current settings.
- Enable the Check button if you want to quickly select all of the associated files for check out as well as the initial selection set. If Source selection is enabled instead, then just the files you originally selected for checkout are selected. You can configure whether this button gets all of the files or just the original selection set by clicking the arrow beneath the button and making changes to the settings.Tip: Hover your mouse over the icon at any time to see the current settings.
- Optional. Leave a comment about the reason for the check out by clicking the Comment button.
- If you want to simply get the latest version of the leading revision of the selected files, folders, or custom objects, click OK.
If you want to see all of the related files with the Include Children, Include Parents, or Include Links buttons enabled, or if you want to manually select objects for checkout, click the Expand button
 to see the complete list and make your selections.
 If you have selected only one file for checkout and you want to specify the revision of the file, click the Expand button
 and select the revision from the Revision drop-down list.
 - Enable the Use released for related files check box to get the released versions of all selected related files.
- Click OK.
The selected files are copied from the vault to your local folder if Working Folders is selected. You can now edit the files.
Inventor Vault Add-in
The following options are available when checking out a file with the Inventor Vault Add-in:
- Get Revision allows the user to specify which revision is retrieved from the server. Note:
The Revision feature is available in Autodesk Vault Workgroup and Professional.
- Check-out, also known as a Quick Check-Out, allows the user to check out the latest version of the latest revision of files or files that have been edited out of turn. Files that do not meet these requirements are not displayed as options for checkout with this command.
You also have the options to apply the vault operation to any children, or parents of the file.
The following vaulting options are available when a file is checked out:
- Check In checks your updated file into the vault, storing your changes to Vault Folder.
- Undo Check Out cancels changes both in Vault and in your local Folder. The file or folder can return to the way it was before you checked it out if you select the Replace Local Copy option.
To Perform a Quick Checkout
- In the Vault browser, select the file that you want to check out. You can also select multiple files by pressing the Control or Shift keys.
- Right-click the selection, and then select Check Out or select Check Out from the Autodesk Vault ribbon. The Check Out dialog box is displayed.
- If you want to check in parents or children of the selected files, click Settings. Enter a comment in the Comment box describing why you want to check out the file, if appropriate.
- Click OK to check out the files. the vault places the files in your local folder. You can now edit the files.
To Get a Particular Revision of a File
- In the Vault browser, select the file that you want to check out.
- Right-click the selection, and then select Get Revision or select Get Revision from the Autodesk Vault ribbon. The Get/Check Out Files dialog box is displayed.
- Select the revision that you want to check out from the Select Revision list.
- If you want to give related files with a released status priority, select the Released Biased for Related Files check box.
- If you want to check out children of the selected files, click Settings. Enter a comment in the Comment box describing why you want to check out the file, if appropriate.
- Click OK to check out the files. The vault places the files in your local folder. You can now edit the files.
The Revision feature is available in Autodesk Vault Workgroup and Professional.
Vault Office
You can check out one file, multiple files, or all files in a folder depending on the options you select in the Check Out dialog box.
- Select .
For Office 2007 and Office 2010, select Check Out from the Vault ribbon.
Other Add-ins
Checking out a file copies the file version or revision in the vault to your local working folder. Once a file is checked out, it can be edited. Only one member of a team can check out a file at one time. No one else can modify a checked out file until it has been checked back into the vault.
Launch the Autodesk Vault client application to see who has a file checked out. The person to whom a file is checked out will be listed in the User Name column.
You can check out one file, multiple files, or all files in a folder depending on the options you select in the Check Out dialog box.
The following options are available when checking out a file in Vault Workgroup and Vault Professional.
- Get Revision allows the user to specify which revision is retrieved from the server.
- Check Out, also known as a Quick Check-Out, allows the user to check out the latest version of the latest revision of files or files that have been edited out of turn. Files that do not meet these requirements are not displayed as options for checkout with this command.
All Vault editions have the option of checking out any children of the file as well.
Once you are finished editing a file, you can check the file back into the vault to store your changes or Undo Checkout to cancel any changes and return the file to the Vault as the version it was before you checked it out.
Check a File out of a Vault
- Click Check Out on the Autodesk Vault ribbon.
- Navigate to the file that you want to check out and select it.
- If you want to check out children of the selected files, click the Include Dependants icon.
- Click OK to check out the files. The vault places the files in your local folder. You can now edit the files.
The Get/Checkout File dialog is displayed.
Get a Revision from a Vault
- Click Get Revision on the Autodesk Vault ribbon.
- Select the revision of the file that you want to check out from the Select Revision list. If you want to give related files with a released status priority, click Released Biased for Related Files
 .
. - Select the check box for the files that you want to check out.
- If you want to check out children of the selected files, click the Include Dependants icon.
- Click OK to check out the files. The vault places the files in your local folder. You can now edit the files.
The Revision feature is available in Autodesk Vault Workgroup and Vault Professional.
The Get/Checkout File dialog is displayed.





 and how many files are available for Check Out
  in the Get/Checkout pane.