The Slate Material Editor toolbar gives quick access to a number of commands. Some of the commands are also available from the Slate Material Editor menus. The toolbar also has a drop-down list that lets you choose among named Views.
 Keyboard Shortcut Override Toggle must be turned on.
 Interface
-
 Select Tool
 -
Activates the Select tool. (Select is always active unless you have chosen one of the modal navigation tools such as Zoom or Pan.)
Keyboard shortcut: S
Menu choice: Select
 Select Tool
 -
 Pick Material from Object
 -
After you click this button, 3ds Max displays an eyedropper cursor. Click an object in a viewport to display its material in the current View.
Menu choice: Material
 Pick from Object
 -
 Put Material to Scene
 - This is available only when you have a copy of a material that has the same name as a material applied to objects, and you have edited the copy to change the properties of the material. Choosing Put Material To Scene updates the objects that have the older material applied to them.
-
 Assign Material to Selection
 -
Assigns the current material to all objects in the current selection. See To apply a material to objects in a scene.
Keyboard shortcut: A
Menu choice: Material
 Assign Material to Selection
 -
 Delete Selected
 -
In the active View, deletes the selected nodes or wires.
Keyboard shortcut:

Menu choice: Edit
 Delete Selected
 -
 Move Children
 -
When on, moving a parent node moves the child nodes along with the parent. When off, moving a parent node doesn’t change the children’s position. Default=off.
Keyboard shortcut:
 +C
+C Temporary shortcut:
 +
+ +drag moves a node with its children, but doesn’t turn on the Move Children toggle.
 Menu choice: Options
 Move Children
 -
 Hide Unused Nodeslots
 -
For a selected node, toggles display of the unused slots when the node is open. When
 on, unused nodes slots are hidden. Default=off.
 Keyboard shortcut: H
Menu choice: View
 Hide Unused Nodeslots
 -
 Show Map in Viewport
 -
The control for showing maps in viewports is a flyout with four possible states:
-
 Show Shaded Map in Viewport [off]: Uses the 3ds Max software display and disables viewport display of all maps for the active material.
 -
 Show Shaded Map in Viewport [on]: Uses the 3ds Max software display and enables viewport display of all maps for the active material.
 -
 Show Realistic Map in Viewport [off]: Uses the hardware display and disables viewport display of all maps for the active material.
 -
 Show Realistic Map in Viewport [on]: Uses the hardware display and enables viewport display of all maps for the active material.
For details, see Viewport Display of Materials.
For a legacy viewport driver (not Nitrous), if a map node is active when you click this button, and the map is assigned to more than one material (or more than one component of the same material), the Slate Material Editor opens a pop-up menu that lets you choose the material for which the map will be displayed or hidden in viewports.
Note: If you are using a legacy viewport driver instead of Nitrous, these options read "Standard" and "Hardware" rather than "Shaded" and "Realistic," as they did in versions of 3ds Max prior to 3ds Max 2012. -
-
 Show Background in Preview
 -
This button is enabled only when you have selected a single material node.
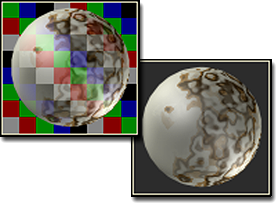
Turning on Show Background In Preview adds a multicolored checkered background to the Preview window for that material. The pattern background is helpful when you want to see effects of opacity and transparency.

Left: Background on
Right: Background off
-
 Material ID Channel
 - This button is a flyout that lets you choose a Material ID value.

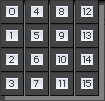
Zero (0), the default, indicates that no Material ID channel is assigned. A value from 1 to 15 means to apply a rendering effect or Video Post Effect that uses this channel ID to this material.
(You can also choose the Material ID value from the right-click menu for a material or map node.)
- Layout flyout
-

This flyout lets you choose the orientation of automatic layout in the active View.
-
 Lay Out All - Vertical (The default.) Click to lay out all nodes automatically in a vertical pattern.
 -
 Lay Out All - Horizontal Click to lay out all nodes automatically in a horizontal pattern.
Keyboard shortcut: L (The orientation depends on which button is active on this flyout.)
Menu choice: View
 Lay Out All (The orientation used by the menu choice depends on which button is active on this flyout.)
 -
-
 Lay Out Children
 -
Automatically lays out the children of the currently selected node. This does not change the position of the parent node.
Keyboard shortcut: C
Menu choice: View
 Lay Out Children
 -
 Material/Map Browser
 -
Toggles display of the Material/Map Browser. Default=on.
Keyboard shortcut: O
Menu choice: Tools
 Material/Map Browser
 -
 Parameter Editor
 -
Toggles display of the Parameter Editor. Default=on.
Keyboard shortcut: P
Menu choice: Tools
 Parameter Editor
 -
 Select by Material
 -
This button is enabled only when you have selected a single material node for a material that is used in the scene.
Select By Material allows you to select objects based on the active material in the Material Editor. Choosing this command opens the Select Objects dialog, which works like Select From Scene. All objects that have the selected material applied to them are highlighted in the list.
Note: Hidden objects don't appear in this list, even if the material is applied to them. However, in the Material/Map Browser, you can choose Browse From: Scene, turn on By Object, and then browse from the scene. This lists all objects in the scene, hidden and unhidden, along with their assigned materials. - Named View drop-down list
-

This drop-down list lets you choose the active View from a list of named Views.