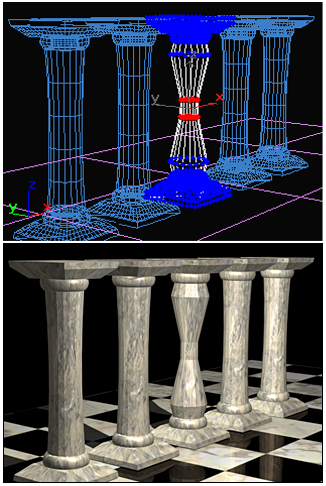
To achieve highly detailed modeling effects, you can directly transform, modify, and align the geometry of objects at the sub-object level.
Sub-objects are the pieces that make up objects, such as vertices and faces. You can also access and transform the sub-object components of modifiers.
The particular geometry or gizmo available at sub-object level depends on the object type or modifier. For details on sub-objects for each object type, see Edit Modifiers and Editable Objects. For information on modifier sub-objects, see the topic for the modifier in question.

The middle column is modified at a sub-object level by scaling vertices.
Play this to see some examples of sub-object editing:
Selecting Sub-Objects
In selecting sub-object geometry, use standard techniques:
- To select a vertex, edge, or face/polygon/element, click it.
- To add to the sub-object selection, hold down
 and click, or drag to specify a region.
 - To subtract from the sub-object selection, hold down
 and click, or drag to specify a region.
 (Select Object) on the main toolbar.
 Following is a general procedure in setting up an object for sub-object selection. See Edit Modifiers and Editable Objects for more information.
- Convert the object into an editable object such as an editable mesh, editable spline, editable poly, and so on. (Some modifiers you can apply to the object, such as Edit Mesh, Mesh Select or Spline Select, also have sub-object levels.) For example, to convert an object to editable poly format, follow this procedure. Tip: Work in a wireframe viewport so you can see the geometry.
- On the modifier stack display, click
 (the plus-sign icon to the left of the name of the modifier or editable object). This expands the object's hierarchy, showing the names of the sub-object levels at which you can work.
 - On the stack display, choose the kind of sub-object geometry you want to work with: for example, Vertex, Face, or Edge. Each sub-object selection level has rollouts with their own sets of options.
The sub-object level is highlighted in the list.
- Use standard selection techniques (see preceding) to select sub-object geometry, from a single sub-object to the entire object. By default, the sub-object selection highlights in red.
Once you’ve made a sub-object selection, you can press  to lock the selection while you’re working with it.
Storing Sub-Object Selection Sets
The surface formats (mesh, poly, and so on), automatically remember the most recent selection for each sub-object level: vertex, edge, and so on (there is overlap in some cases, such as poly edge and border). These selection sets are saved with the file. With sub-object selections, you have these options:
- Choose one of the selection sets to pass geometry up the stack to other modifiers. Only one selection set is active at a time.
- Change to one of the other selection sets at any time by activating its sub-object level.
- Use named selection sets for sub-object selections you want to reuse.
In modeling a character head, for example, you might have a number of different vertex selections for forehead, nose, and chin. Such selections can be difficult to re-create, so using named sets gives you easy access to the original selection when you want to rework a particular area.
Using Sub-Object Selections
Once you make a sub-object selection of geometry, you can do any of the following:
- Apply any options supplied for the kind of object and the selection level.
- Apply standard transforms: Move, Rotate, Scale. For more information, see Transforming a Sub-Object Selection, following.
- Apply object-space modifiers (Bend, Taper, and Twist, for example) to perform useful modeling operations.
- Apply object-space modifiers (UVW Map or Smooth, for example) to perform useful surfacing operations.
- Bind a space warp to the selection. The rest of the object is unaffected by the warping.
- Use the toolbar commands Align, Normal Align, and Align To View with face selections.
Transforming a Sub-Object Selection
Using an editable mesh, poly, patch, or spline, you can directly transform any sub-object selection. However, “Select” modifiers like Mesh Select and Spline Select enable only selection.
To transform a sub-object selection made with a Select modifier:
- Add an XForm modifier to the stack, following (or somewhere above) the Select modifier.
- In the stack, open the Select modifier and make a sub-object selection.
- Choose XForm in the stack. You then transform the XForm gizmo, which applies the transform to the selection.
Cloning Sub-Object Geometry
Using  +transform with a selection of vertices or faces displays the Clone Part Of Mesh dialog. This lets you choose whether to clone to a separate object or an element. Click the desired option, optionally giving the cloned object a new name, then click OK.
- If you choose Clone To Object, the cloned copy becomes a plain mesh object, entirely separate from the original object. The new object is given the name in the field to the right of the Clone To Object radio button.
- If you choose Clone To Element, the selection is cloned in its new position and remains part of the original object.
Animating Sub-Object Geometry
When you work with an editable mesh or poly object, you can directly transform and animate a sub-object selection. In effect, the selection works like any other object.