Provide access to parameters for sun and sky objects that are part of the active Daylight system.
Daylight systems use light in a system that follows the geographically correct angle and movement of the sun over the earth at a given location. You can choose location, date, time, and compass orientation. You can also animate the date and time. In addition, you can animate Latitude, Longitude, North Direction, and Orbital Scale.
The light in a daylight system has two components: sunlight and skylight. For each of these, you can choose a different pair of 3ds Max Design objects.
-
mr Sun and mr Sky
(The default.) The mr Sun and mr Sky lights are photometric lights, and are specifically intended for use with the mental ray Sun And Sky solution, and the mental ray renderer.
When you use mr Sun and mr Sky, it is appropriate to use an mr Physical Sky environment map, Final Gather and an mr Photographic exposure control.
-
IES Sun and IES Sky
The IES Sun and IES Sky lights are also photometric lights. It is appropriate to use them if you are creating a rendering that uses a radiosity solution with exposure control, in conjunction with the scanline renderer.
-
Standard light and Skylight
The Standard light and Skylight are not photometric. It is appropriate to use them only if your scene uses standard lighting (the Sunlight system with its Directional light works for this, too), or if you are using light tracing.
Creating a Daylight System
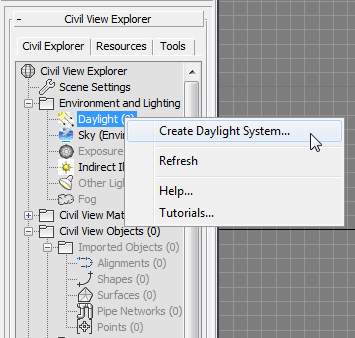
The easiest way to add a Daylight system to your Civil View scene is to right-click the Daylight node on the Civil View Explorer, and choose Create Daylight System.

After choosing this option, 3ds Max Design prompts you to create an mr Photographic exposure control. Click Yes to add the exposure control, then drag in the viewport to set up the compass and sun light for the Daylight system. See Sunlight and Daylight Systems.
Setting the Geographic Location and the Time and Date
When you first create a Daylight system, the default creation parameters are set to midday (noon) on the summer solstice (June 21). The default geographic location is San Francisco. 3ds Max Design automatically calculates the geographically correct angle and movement of the sun over the earth at a given location at a certain time and date.
To change these defaults, make sure the sun light object is selected, then go to the 3ds Max Design  Motion panel. You can change the time and date in the Control Parameters rollout
  Time group. You can change the geographic location by clicking Get Location in the Location group on the same rollout.