About Desktop Reels
Media to be used in creative finishing and editing operations on the Desktop is organized into reels for easy access. Individuals reels may be copied, moved, and deleted as well as have their visibility turned on and off. Only a single group of reels can be displayed in Desktop Reels view at any one time.

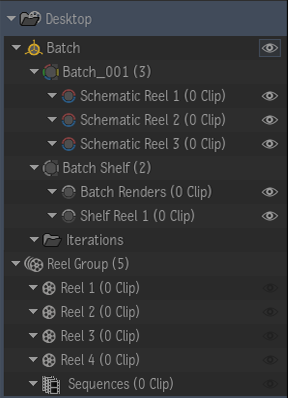
There are three types of Desktop reels available to help organize media:
- Schematic reels containing sources used in Batch process trees. Located under a parent Batch group.
Additional schematic reels may be created if needed by right-clicking the Batch group or reel and selecting New Schematic Reel.
- Shelf reels, where media can be organized and accessed in Batch without cluttering up schematics and their process trees. The Batch Renders reel is a shelf reel provided as the default destination for all clips rendered via the Render node; however further shelves may be added or deleted as desired.
Additional shelf reels may be created if needed by right-clicking the reel and selecting New Shelf Reel.
- Reel Group reels, where media can be organized outside of Batch but still on the Desktop. A Reel Group and the Sequences reel are central to the
Connected Conform workflow.
To automatically include a Reel group on the Desktop in new projects, enable Create Reel Group in the User Interface Preferences.
Viewing Reels
The contents of reels are best displayed using Desktop Reels view in the Viewing panel. To enable Desktop Reels view, do one of the following:
- From the View Mode box, select Desktop Reels.
- On the Desktop, double-click a Batch group or Reel group. If the desired reels are in a Batch group, that specific group must be active.
The reels are displayed in the Viewing panel.

In the Media panel, click the eye icon beside each reel to toggle its visibility.
If the number of visible reels exceeds the maximum displayable in the Viewing panel, additional reels are hidden automatically. In the Media panel, the eye icon will turn black to show that visibility has been turned off by the system. Clicking a hidden reel when there is no space to display it will also turn the eye icon black. To view automatically hidden reels, first turn off the visibility of a corresponding number of reels in the Viewing panel.
The currently-displayed group of reels can be quickly switched from directly in the Viewing panel. To do this:
- Click the eye icon displayed on the right side of the transport menu for the reel located at the bottom of the Viewing panel, or immediately above any pinned reels (for more information on pinning reels, see the following section).

- Select the desired Batch or Reel group from the drop-down menu.
The selected group is shown in the Viewing panel.
To change the order of the reels in Reels view:
- Click and hold the Move button at the far right of the transport menu for the reel to be moved.
- Drag and drop the reel to its new position on the Desktop.
Pinning Reels
Reels from any type of group can be pinned to the bottom of the Viewing panel. A pinned reel remains in place even if the current Batch group or Reel group is changed. This can be useful, for example, for keeping a particular reel in view while browsing through other reels for material to assemble. All pinned reels have a small white pin icon displayed to their right.

To pin a reel:
- In the Media panel, make sure the reel to be pinned is shown and not part of an already-selected group.
- Click the grayed-out pin icon to the right of the reel name and content details.
The reel is pinned to the bottom of the Viewing panel. If there are other pinned reels showing, the reel will be pinned above.
When pinned, a reel displays a drop-down menu marked by the pin icon. Use this menu to swap the pinned reel for another within the same group.
The order in which the pinned reels are shown in the Viewing panel reflects their order in the Media panel. To change the order in which pinned reels are shown, simply change their order in the Media panel by dragging and dropping them.
Priority is given to pinned reels. If more reels are displayed than the maximum number of reels allowed, other reels are hidden accordingly. As a displayed reel gets hidden, the eye icon to its right turns black.
Renaming Reels
Reels can be renamed for better organization. To rename a reel, do one of the following:
- In the Media panel, right-click the reel and select Rename.
- In the Desktop Reels view, select the name of the reel, the enter a new one.
- With the cursor over the item to rename, press N.
Adding Reels
New reels can be added directly in the Viewing panel while in Desktop view.
To add a new reel:
- Click the reel icon at the left of the transport menu to add a reel immediately below the selected reel.

- Ctrl-click the reel icon to add a reel immediately above the selected reel.
Clearing and Deleting Reels
Reels can be cleared and deleted directly in the Viewing panel when in Desktop Reels view. Individual clips can also be deleted.
To clear the entire contents of a reel:
- With the cursor over the reel, press Shift+D.
To delete a reel or specific contents:
- With the cursor over a clip, press D to delete that clip only.
- With the cursor over a blank area in the reel, press D to delete the entire reel.
Reels and Reel Groups in Libraries
When in a library, a reel behaves like a folder, but can only contain clips. A Reel group in a library is like a Reel group on the Desktop, and contains multiple reels.
To copy a reel or group from a library, do one of the following:
- Drag and drop the reel or reel group to the desired location on the Desktop. If a reel group, only the reels themselves are copied.
- Drag and drop the reel on top of another reel to add the contents of the dropped reel.
Reel Groups
Reel groups are essential to the Connected conform workflow.
- Only a Reel group can have a Sequences reel. This reel is used to store sequences imported for conforming AAF, EDL, or XML sequences.
Note: By default, every new Reel group has a Sequences reel. To have Sequences reel only appear on demand, disable the preference Create Sequences Reel , found in .
- Create additional Sequences reel within a Reel group using the option from the contextual menu.
- It is possible to work with multiple Reel groups. In this case, you can define the active Reel group by clicking the Reel group's icon, or use
Set As Current Reel Group in the Reel group Contextual Menu. The
current Reel group icon is yellow.
Note: A newly created Reel group is automatically set as the Current Reel group.
- Use the Active Sequence Reel button to navigate between the reels of the currently active Reel group; it only displays reels with opened sequences within that Reel group. When you select reel, the timeline displays every opened sequence within that reel.

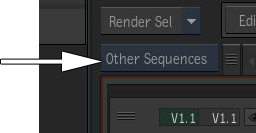
The Other Sequences option displays all the open sequences that are not in a Reel group.
- Reel groups can be created in Media Library and on the Desktop. If no Reel group exists when importing an AAF, EDL, or XML from Conform, one is automatically created in the Desktop area of the Media Panel.
Note: Reel group can be copied in a Shared Library but cannot be used for any conform operation from this location.
- When you import a sequence with the option Save Sources Separately enabled, the sources imported are stored in a new reel, the Source Reel. The sequence is always imported in the Sequences Reel.
- Whenever a new Sequences reel is created, it is added as the last reel of the selected Reel group.
- In Conform view, if you enable the Save Sources option in the Conform tab, or the Save Sources Separately option in the Import options, the sources are saved in a Sources reel within the Reel group.