- Click
 .
. Alternatively, you can select the Enhanced Custom Column Grid tool on the Design Tool Palette.
- In the Column Grid dialog box, click the Radial radio button.
- Click the Radial tab.
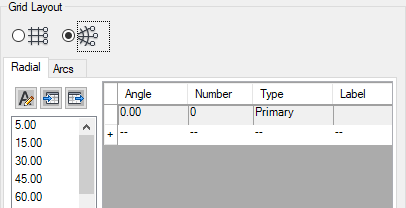
- To add the first bay to the grid, determine the desired angle (for example 15°) and click the corresponding value in the value list on the left. Tip: You can either directly edit the bay angle value after entering it, or you can edit the list of preconfigured default values.
- For a grid with regular angles, you have two options of generating grid Bays:
- Under Number, enter the number of grid bays you would like to see in the grid. This will generate the specified number of identically angled bays. This is the quickest way, but it does not allow you set different grid numbering types for individual lines, or change the width of one specific bay after insertion.
- Click on the right side of the last row. This adds a new row with the same settings as the last one. Tip: You can also select a whole row (click on the left side of the row), right-click, and use the copy-and-paste commands.
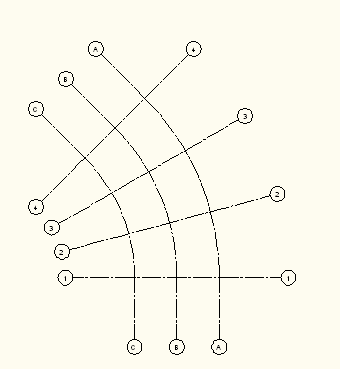
- Under Type, select if the grid line limiting the bay should be labelled as primary grid line or secondary grid line. By default, primary grid lines are chosen. Note: The Label column is a read-only column showing you the grid label for the associated grid line. You can change the labeling of the grid under Bubble Parameters below.
- Enter a value for the inner radius of the grid.
- Define if the grid should be developed in clockwise or counter-clockwise direction.
- Proceed to the Arcs tab and add grid bays there with the same method.
- If needed, set further properties for your grid:
- Press Enter and insert the grid in the drawing.
This will result in grid bay spacing.