
Processing parameter (PRM) files contain the thermal and mechanical response performed by a small moving source model for a specific set of processing parameters and a specific material. These files are the key component that drives part scale simulations.
Upon installation, the processing parameters library includes sample PRM files for common processing conditions and the materials included with Local Simulation:
- AlSi10Mg
- Inconel 625, 718, and 718 Plus
- Ti-6Al-4V
- Cobalt Chrome
- Stainless Steel 17 - 4 PH
- DMG Mori Lasertec30 Ti-6Al-4V 50 μm
- 4340 Alloy Steel
- Additive Industries MetalFAB1 Inconel 718 40 μm
- EOS Inconel 718 M290
- Renishaw 500Q print settings for AlSi10Mg 30 μm, Inconel 625 30 μm, Inconel 718 60 μm, and Ti6Al4V 60 μm conditions
When a Local Simulation project is saved, producing a TIVUS file, any associated PRM files, custom or generic, are saved in the project.
There are three types of PRM files, identified with different icons:
 – for stress and distortion analysis
 – for lack of fusion and hotspot analysis
 – for combination of stress, distortion, lack of fusion, and hotspot analysis
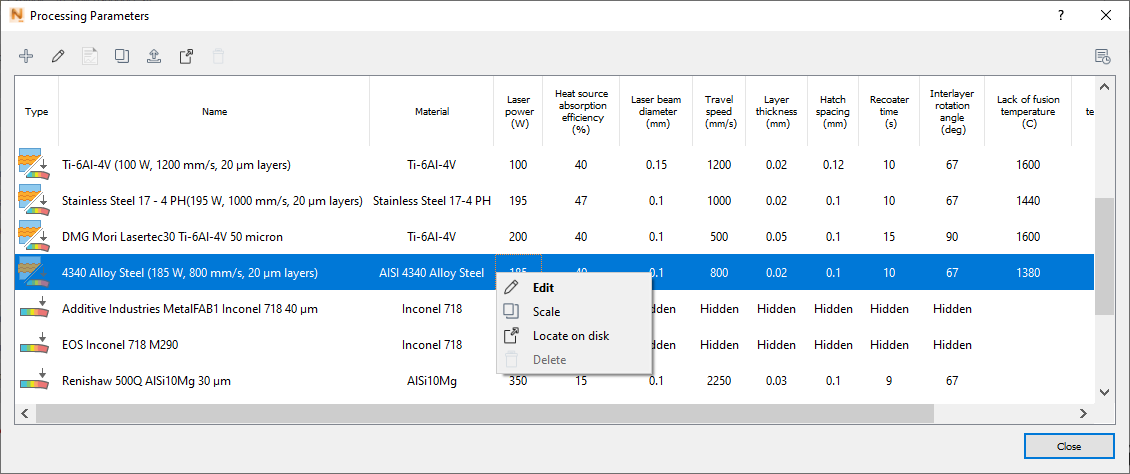
The Processing Parameters dialog allows you to manage the library of PRM files, using the right-click menu shown above, and the small icons across the top of the dialog. Left to right, the icons are used as follows:
 – Create a new PRM file. Select this to create a new PRM file using custom parameters. Upon starting the PRM generation process, a PRM entry will be created in the Processing Parameters library. However the resulting PRM will not be available in the
Machine Dialog until the PRM generation has completed successfully.
– Create a new PRM file. Select this to create a new PRM file using custom parameters. Upon starting the PRM generation process, a PRM entry will be created in the Processing Parameters library. However the resulting PRM will not be available in the
Machine Dialog until the PRM generation has completed successfully.
 – Edit the selected PRM file. This allows for the creation of new PRM files based upon existing or failed PRM simulations. Choosing Edit will import all the Process Parameters, Material Properties, and Simulation Settings from the original PRM creation.
 – View the log file for a selected PRM file, if available. This command does not apply to generic, scaled, or imported PRM files.
 – Create a new scaled PRM file, based on the selected PRM file.
 – Import a PRM file into the library.
 – Open the directory that contains the selected PRM file; same as the menu option
Locate on disk.
– Open the directory that contains the selected PRM file; same as the menu option
Locate on disk.
 – Delete the selected PRM file and associated files. The generic PRM files supplied with
Local Simulation cannot be deleted.
– Delete the selected PRM file and associated files. The generic PRM files supplied with
Local Simulation cannot be deleted.
 – Open the
Job Manager. The Job Manager also provides an icon for opening the PRM log file.
– Open the
Job Manager. The Job Manager also provides an icon for opening the PRM log file.