Defining Strokes
You define a stroke by creating the stroke in a viewport, then choosing the command that the stroke defines. The next time you perform the stroke, the command will be executed.
- Hold down Ctrl and the middle mouse button and drag in a viewport to create the shape of an unused stroke. > Define Strokes dialog
- Hold down the middle mouse button alone or with Shift, Alt, or both, and drag in a viewport to create the shape of an unused stroke. > Define > Define Strokes dialog
 Utilities panel > Utilities rollout > More button > Utilities dialog > Strokes > Draw Strokes > Hold down the left mouse button alone or with Shift, Alt, or both, and drag in a viewport to create the shape of an unused stroke. > Define > Define Strokes dialog
You can define strokes to work in conjunction with the Shift key, the Alt key, or both Shift and Alt.
You can define strokes with either the left or the middle mouse button. If you want to use your middle mouse button to define and use strokes, you must first turn on Customize menu > Preferences > Preference Settings dialog > Viewport Preferences > Mouse Control group > Stroke. To define and use strokes with the left mouse button, choose Utilities panel > Utilities rollout > More button > Utilities dialog > Strokes Utility > Draw Strokes, then draw the strokes.
In the Define Stroke dialog, you can see how the strokes are analyzed by examining the grid under Stroke to Define. When you complete the drawing of a stroke, a nine-square grid is centered around the stroke and fit to its extents. The inner segments of the grid are assigned unique letters. Where the stroke crosses a segment, the letter associated with that segment is added to the stroke name. Thus, the direction and the shape of the stroke matter, but the size of the stroke has no effect.
The stroke is always centered within the grid. If you draw a stroke vertically from top to bottom, the stroke is named HK because it crossed the segments labeled H and K, in that order. Had you drawn the stroke from bottom to top, it would have been named KH.
Multiple Strokes for One Command
You can define more than one stroke for the same command. For example, you might assign a U-shape stroke to Undo, but find that you sometimes draw a J shape when attempting the U. By assigning both the U and the J strokes to Undo, you don't have to worry about missing that stroke.
The Command Should Operate On group of options is important. If the command applies to selections, leave this option set to Single Object At Start Of Stroke, or change it to All Objects In The Selection Set. However, if the command doesn't apply to selections, such as Orbit or Activate Grid Object, change it to No Objects -- Just Execute The Command.
Commands with Special-Purpose Methods
Some commands have particular stroke methods associated with them.
Make Camera Active
Point at a single camera (not the target), draw the stroke, and that camera becomes active in the viewport in which you draw the stroke.
Change Light Color
You can stroke this command over one or more lights. The color selector appears, so you can change the color of the selected lights.
Light On/Off Toggle
Stroke over a light to toggle it on and off. If you stroke over two or more lights, all the lights are set to a common state, either all on or all off.
Set Constraints
Displays a small dialog with the available axis constraints. Double-click to change the axis constraints for the current transform mode.
Move Mode (Set Constraints)
Switches to Move transform mode and displays a small dialog with the available axis constraints. Double-click to change the axis constraints for the current transform mode.
Rotate Mode (Set Constraints)
Switches to Select and Rotate mode and displays a small dialog with the available axis constraints. Double-click to change the axis constraints for the current transform mode.
Scale Mode (Set Constraints)
Switches to Select and Scale mode and displays a small dialog with the available axis constraints. Double-click to change the axis constraints for the current transform mode.
Review Strokes
Displays the Review Strokes dialog.
Stroke Preferences
Displays the Stroke Preferences Dialog.
Procedures
To define a stroke using the Ctrl key:
- Hold down the
Ctrlkey while drawing a stroke. - If the stroke already exists, a message asks you if you want to replace the old stroke. Click Yes.
- on the Define Stroke dialog that appears, assign the stroke.
To define a stroke by example:
- Draw a stroke that doesn't exist.
- A Stroke Not Found message appears. Click Define.
- In the Define Stroke dialog that appears, assign the stroke.
Interface
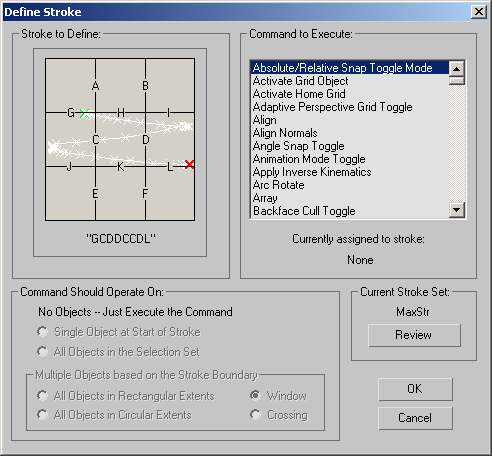
Stroke to Define group
Displays the name of the stroke and displays the stroke you just drew as a series of white Xs connected by white lines. A green X represents the start of the stroke and a red X represents the end. The labeled grid shows you how it recognizes the stroke. Where the stroke crosses the labeled segments in the grid, a letter is added to the name of the stroke.
Command to Execute group
Lists all commands to which you can assign a stroke. Select a command and click OK to assign the stroke displayed in the grid to the selected command. Depending on the type of command you choose in this list, various options become available in the Command Should Operate On group.
Some commands have special-purpose methods associated with them. See Commands with Special-Purpose Methods.
Currently assigned to stroke
Displays the name of the stroke currently assigned to the selected command. If you pressed Shift or Alt when the stroke was drawn, they're added to the name. For example: "Shift + HK" or "Alt + HK."
Command Should Operate On group
Provides a number of options that specify which objects (if any) are affected by the command. These options are enabled or disabled depending on the type of command you've selected in the list window.
No Objects Just Execute the Command
This text is displayed when you choose a command that's not specific to selected objects, such as Orbit. When you select a command that can be applied to selected objects, the following options become enabled:
- Single Object at Start of Stroke Causes the command to act on the object beneath the first stroke point in the active viewport.
- All Objects in the Selection Set Causes the command to act on all objects in the current selection set.
Multiple Objects Based On The Stroke Boundary
Choosing one of the options in this group lets you use the stroke itself to select multiple objects and then apply the command.
- All Objects in Rectangle Extents Selects all objects defined by the rectangular bounding of the stroke.
- All Objects in Circular Extents Selects all objects defined by the largest circle that fits within the rectangular bounding of the stroke.
Window/Crossing When you choose either of the previous two options, these two options become available. Window selects only those objects entirely within the rectangular or circular region. Crossing selects all objects within or crossing the region.
Current Stroke Set group
Displays the name of the current stroke set, so you can review the strokes defined in that set. You can create and save a number of different stroke sets. See Stroke Preferences Dialog.
Review
Click to display the Reviewing and Editing Strokes, in which you can choose from a list of defined strokes and then see the stroke itself. You cannot edit strokes this way. To view, change, and delete strokes, draw the Review Strokes stroke (by default, a horizontal line from left to right).