Note: This stage assumes that you have started
InfoWorks ICM and that the
Explorer window is open, showing the
Adding a bridge network icon. You should complete the previous stages before starting this stage. If you want to work with the prepared example data, load the appropriate version of the network. For instructions on how to load the database, see
Opening the Example Database.
 Back to
previous stage.
Back to
previous stage.
- Ensure that the Adding a bridge network and the DTM ground model are both open on the GeoPlan. Alternatively, if you have not completed the previous steps, please use the provided Adding a bridge- step 4 completed network as a starting point (in step 5 we illustrated how to view bridges and bridge data in InfoWorks ICM and did not make any changes therefore there was nothing to commit in step 5).
- Ensure the
Job Control window is visible. If not, click on the
Job control window button (
 ) of the
Docking Windows Toolbar. The Job Control Window displays the order and status of scheduled simulations.
) of the
Docking Windows Toolbar. The Job Control Window displays the order and status of scheduled simulations.
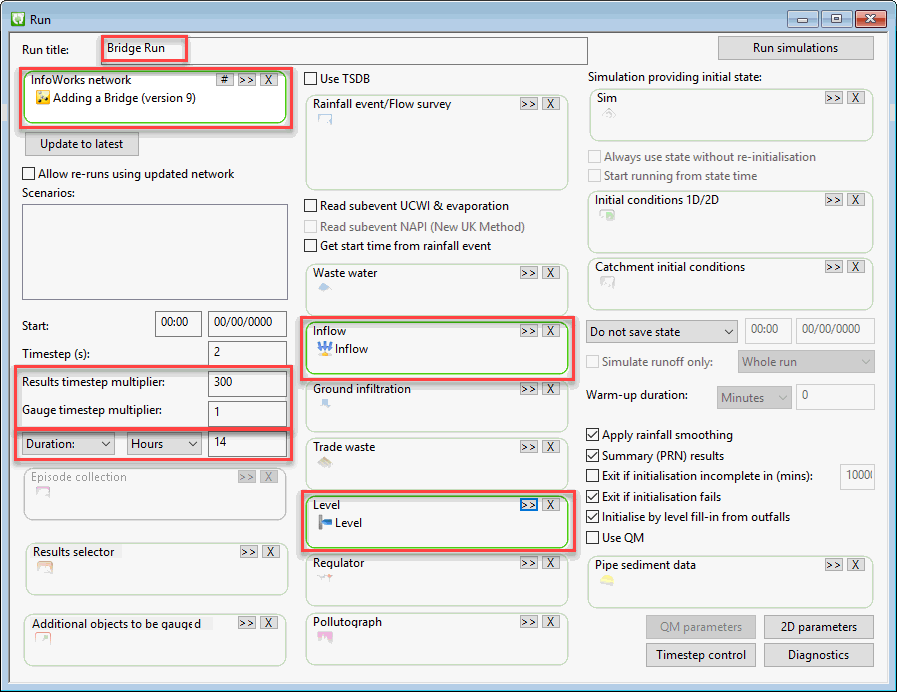
- Create a new run and define the run parameters as shown below:
- In the Explorer window, right-click on the Model Group tree item and select New InfoWorks | Run to create a new run. The Schedule Hydraulic Run View dialog is displayed.
- In the the
Schedule Hydraulic Run View dialog:
- Enter a name in the Run title (Bridge Run)
- Drag and drop your network (Adding a bridge or Adding a bridge- step 4 completed) in the InfoWorks Network drop target.
- Drag and drop the
Inflow hydrograph (set up in the
River tutorial) in the
Inflow drop target.
- If you have completed the River tutorial, both the Inflow and Level hydrograph will be available to pick in your database tree view in the Explorer window.
- If not, they can be copied from the provided transportable database. Open the transportable database by selecting File | Open | Open transportable database.
- In the new
Explorer window that gets displayed with the contents of the transportable database, click on the
 button to expand the Model Group.
- Right-click the Inflow hydrograph and select Copy from the popup menu.
- In the Explorer window of your current database, right-click on your Model Group tree item and select Paste: Inflow (with children).
- The Inflow hydrograph is copied in your database.
- Drag and drop the Level hydrograph (set up in the River tutorial) in the Level drop target. Please refer to the bullet point above for instructions on how to copy this hydrograph object from the provided transportable database in case you have not gone through the River tutorial.
- Set the Timestep to 1 second and the Results timestep multiplier to 300.
- Set the Simulation time as 14 hours.
- Use all other suggested defaults throughout.
- Click Run simulations.
- In the Schedule Job(s) dialog, choose which computer will carry out the simulation (This Computer) and leave the other parameters as they are (store results locally and start the simulation now). Click OK to start.
- Once the simulation has completed (the simulation icon in the Explorer window will turn from blue to green and the Job Control window will show a green row with a status of Succeeded for the simulation) you can look at and analyse the results by dragging and dropping the DWF simulation onto the main window.
The simulation has created a large number of results, which you can now inspect. The results of a simulation can be investigated in different ways and the tools available to do so are similar regardless of the network. Please refer to the Viewing Simulation Results topic of the River tutorial for more information.
 Back to Bridge Tutorial
main page.
Back to Bridge Tutorial
main page.