
Use Channel to create a closed “C” shaped spline. You have the option to specify the interior and exterior corners between the vertical web and horizontal legs of the section.
-
 Create panel >
  (Shapes) > Extended Splines > Object Type rollout > Channel

Example of Channel
Procedures
To create a channel:
- Go to the Create panel and turn on (Shapes).
- Open the Shapes List and select Extended Splines.
- Click Channel.
- Drag and release the mouse button to define the outer perimeter of the channel.
- Move the mouse and then click to define the thickness of the walls of the channel.
Interface
Rendering and Interpolation rollouts
Most spline-based shapes share these parameters. For details, see Rendering rollout and Interpolation rollout.
Creation Method rollout
The Channel shape offers the standard creation-method choice: Center or Edge. For details, see Creation Method rollout.
Keyboard Entry rollout
Creates a Channel spline from the keyboard. Use the X/Y/Z settings to specify the center point, and the remaining parameters to specify the dimensions, then click Create. After creating the spline, you can use the Parameters rollout controls to adjust its settings (see following).
Parameters rollout
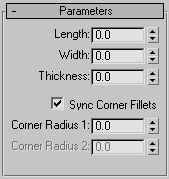
- Length
-
The height of the vertical web of the channel.
- Width
-
The width of the top and bottom horizontal legs of the channel.
- Thickness
-
The thickness of both legs of the angle.
- Sync Corner Fillets
-
When on, Corner Radius 1 controls the radius of both the interior and exterior corners between the vertical web and horizontal legs. It also maintains the thickness of the channel. Default=on.
- Corner Radius 1
-
The exterior radius between the vertical web and horizontal legs of the channel.
- Corner Radius 2
-
Controls the interior radius between the vertical web and horizontal legs of the channel.
Note: Take care when adjusting these settings. There are no constraining relationships between them. Therefore, it's possible to set an inside radius (Corner Radius 2) that is greater than the length of the web or width of the legs.