Open and View Sheets
When you open a sheet from the sheets list, there are various toolbars and options to assist navigation, find the information you need, and markup the sheet.

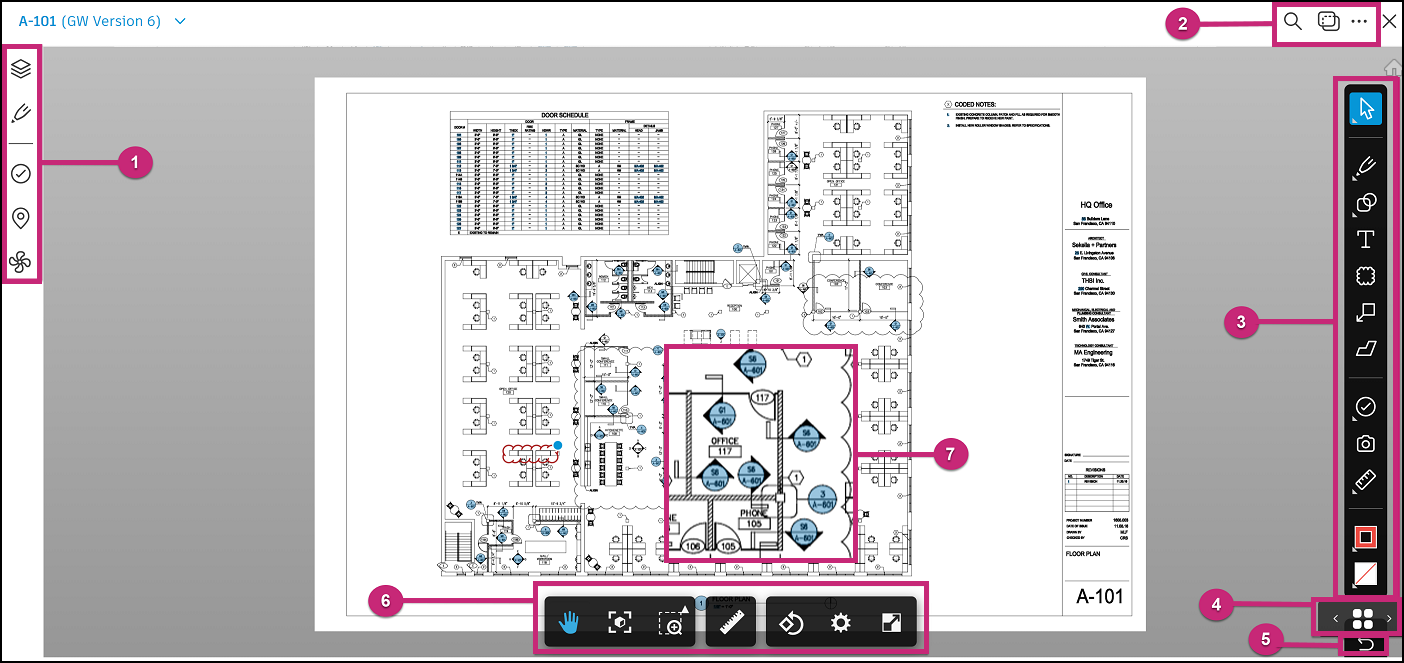
The following sections correspond with the numbered areas in the previous image.
1. Navigation Toolbar
The navigation toolbar on the left contains:
| Icon | Description | |
|---|---|---|
| Layers | View the layers in your sheet. | |
| Markups | View, filter, and sort the manually created markups on the sheet. To create and style new markups, see Create and Style Markups. | |
| Issues | View, search, filter, export issues added to the sheet. See Issues List View in Sheets for more details. | |
| Locations | Shows the locations which are added to the sheet. Project administrators and location administrators can also define the location area directly on the sheet. | |
| Assets | View and track assets added as markups to the sheet. |
2. Search, Compare, Export, Print, Share
- Search: Click
 and enter a keyword to search the sheet's content.

- Compare: Click
 to compare two versions of the same sheet or two different sheets.
Click the More menu  for the following options:
- Export: Export a PDF of the sheet and choose which published and unpublished markups to include.
- Share: Share the sheet with project members, anyone, and another project.
- Print: Printing works similar to any standard document printing software.
- Shortcuts: Details a list of keyboard shortcuts to create and edit markups.
3. Markups Toolbar
Add markups to sheets, including photos and issue, and add reference links to add supporting information. To learn about the markups toolbar and how to create, publish and style markups, see Sheets Markups.
4. Next and Previous Sheet
You can navigate to the next or previous sheet in the sheets list without exiting the viewer.
Click  at the bottom right of the screen.
- Right Arrow: Next sheet
- Left Arrow: Previous sheet
- Center grid: Displays all the sheets in the project.
5. Undo and Redo
If you've made any changes since you opened the sheet, for example added or deleted a markup, you can click the  icon to undo or redo.
6. Viewing Toolbar
| Icon | Name | Description |
|---|---|---|
 |
Pan | Default option allowing you to click and drag the sheet around the screen. |
 |
Fit to View | Centers and fits the whole sheet within the viewer. |
| Zoom Window | Click the arrow to see the Zoom or Zoom Window options. With Zoom Window, you can drag a box to zoom a selected area or window on the model. | |
 |
Measure | Use the tools to measure distance, angles, or area. You can also calibrate using a known measurement, and specify the units and precision settings. |
 |
Rotate page | Click to rotate the file 90 degrees counterclockwise. |
 |
Settings | Use the tabs on the Settings dialog box to customize the viewer. You can edit the performance and display settings, navigational tools, visual quality, and change the image environment and lighting. A description of each setting is displayed on the dialog box. |
| Full Screen | Makes the sheet fullscreen. |
7. Automatic Callouts
After you've published sheets, the system will check the content of those sheets for any sheet number callouts which match other sheets in the project. If the sheet numbers match, the callouts will be automatically converted to a link which enables you to click and jump to the referenced sheet.
You can also edit autocallouts with the same options as manually created markups.
