
Vertices Settings
Vertices settings are available for all surface shapes, except for flat.
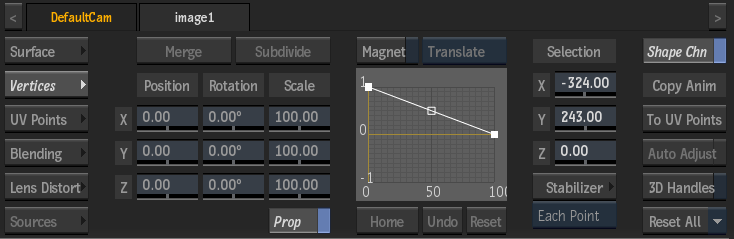
Merge button
Click to merge the extended bicubic surface sections (can be clicked multiple times).
Subdivide button
Click to subdivide the extended bicubic surface into more sections (can be clicked multiple times).
See Subdividing an Extended Bicubic.
X Position field
Displays the position of the selected surface points along the X axis. Editable.
Y Position field
Displays the position of the selected surface points along the Y axis. Editable.
Z Position field
Displays the position of the selected surface points along the Z axis. Editable.
X Rotation field
Displays the rotation of the selected surface points along the X axis. Editable.
Y Rotation field
Displays the rotation of the selected surface points along the Y axis. Editable.
Z Rotation field
Displays the rotation of the selected surface points along the Z axis. Editable.
X Scale field
Displays the scale of the selected surface points along the X axis. Editable.
Y Scale field
Displays the scale of the selected surface points along the Y axis. Editable.
Z Scale field
Displays the scale of the selected surface points along the Z axis. Editable.
Proportional Scale button
Enable to scale the surface points proportionally.
Edit Track button
Enable to edit tracking data directly from the image window without having to switch to the Animation channel. Make sure the Auto Key is enabled, so as not to lose any keyframe modifications.
Magnet button
Enable to transform a range of surface points. Use in conjunction with the Magnet Transformation box.
See Transforming Multiple Points.
Magnet Transformation box
Select a transformation type to use when Magnet is enabled.
Magnet Curve Editor
Displays the weighted polarity from the centre to the edge of the magnet.
Magnet Curve Home button
Resets the position of the magnet curve after panning.
Magnet Curve Undo button
Undoes a change to the Magnet Curve Editor.
Magnet Curve Reset button
Resets the Magnet Curve Editor.
Vertex Position X field
Displays the position of the vertices on the X axis. Editable.
Vertex Position Y field
Displays the position of the vertices on the Y axis. Editable.
Vertex Position Z field
Displays the position of the vertices on the Z axis. Editable.
Stabilizer button
Opens the Stabilizer menu to apply stabilizing data to selected surface vertices.
Tracking Mode box
Select whether to track each selected vertex or UV point individually (Each Point) or grouped via two proxy trackers, and from which parameters from the proxy trackers extrapolate the movement (Pos/Scale, Pos/Rot, Pos/Rot/Scale).
With Perspective tracking, you can further select whether to enter the Stabilizer with four trackers associated to the 4 Corners of the perspective surface (4 Corners), or use an unlimited number of trackers to track the Perspective transformation of the vertices or UV points (Perspective).
- Each Point: Perform the tracking using a tracker for each selected vertex or UV point.
- Pos/Rot: Perform the tracking using two proxy trackers that extrapolate the position of the selected vertices or UV points, based on the detected position and rotation motion.
- Pos/Scale: Perform the tracking using two proxy trackers that extrapolate the movement of the selected vertices or UV points, based on the detected position and scale motion.
- Pos/Rot/Scale: Perform the tracking using two proxy trackers that extrapolate the movement of the selected vertices or UV points, based on the detected position, scale and rotation motion.
- 4 Corners: Associates a tracker to each corner of your image (equivalent to a four-point track on a bilinear surface).
- Perspective: Allows you to add as many trackers as you want and position them in the same plane as your surface, to cover as much of the perspective transformation as possible.
Shape Channel button
Enable to use the Shape channel in the Animation Editor. Disable to use individual channels.
See Reshaping Using the Animation Editor.
Copy To UV Points button
Click to copy vertex data to the UV point animation channels.
Auto Adjust button
Enable to scale adjacent tangents automatically. Auto Adjust creates a smooth curve between points in the deformation. If you want to work on a specific area of the image without affecting other tangents, disable Auto Adjust.
3D Handles button
Enable to allow Z buffering of the vertices. By default, the vertices are always visible, regardless of their position in Z space in relation to other media.
Reset Selection box
Select whether to reset selected points, tracking data, or the shape of the surface. Click Reset All to reset all data.