
Creating a Selective Matte From AOV Data Passes
The 3D AOV menu of the Selective object extracts a Matte out of an AOV data pass.
For example, you can use the Distance mode to extract only the far plane of a scene, and then process it like you would a Keyer or a GMask, using a Physical Bokeh or a MasterGrade Matchbox.
The different types of 3D AOV are as many types of 3D data keyers. While a classical keyer performs its segmentation by operating in the colour space of an image, the 3D AOV menu performs its image segmentation using spatial information. For this to work, you must provide the 3D AOV extraction mode with the matching spatial information. You provide this information by connecting to the Surface a texture map with the required data.
You can use all these methods in a single Selective node, or only some of them. They always combine in the following sequence:
- The Selective Keyer is first applied on the whole image.
- The 3D AOV matte then constrains the result of the Keyer.
- The result of the Keyer + 3D AOV matte is then blended with result of Matte Input + GMasks blend to create the final matte. You control the type of blending from the Selective (Controls
 Blending).
Mask Blending. In this blend operation, the Input Matte is the Background, and the GMasks are added in the order displayed in the Priority Editor.How to Segment the Image
The 3D AOV menu offers different types of image segmentation, with different set of options. Each type requires a specific map to be attached to the parent surface: it's this map that contains the data used to create the segmentation.
Example: Adding the map required by the Distance image segmentation:
Select the Selective.
In the Selective object menu, open the 3D AOV menu.
Select Distance from the 3D AOV Mode menu.
Click Create Map.
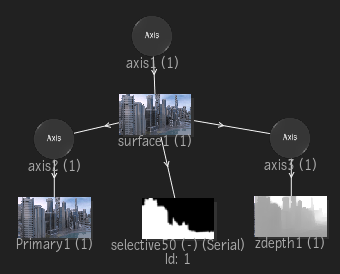
A Z-Depth map is attached to the parent surface, with its analysis mode set to Global Analysis. Global Analysis uses machine learning-based algorithms to create depth information. Or you can substitute you own depth map if you already have one.
Display Show Overlay.Image Segmentation types and their associated maps
| Image Segmentation | Effect | Required Map |
|---|---|---|
| Distance | Creates a type of decaying matte segmentation that focuses on the Near or Far plane of a scene. This mode offers different Types of decay algorithms to control the slope that defines the transition section. | Z-Depth |
| Motion | The Motion mode isolates part of the Motion data using direction and motion min/max fields, and then create a matte out of it. The Motion mode requires access to Motion Vector data. The data can come from a Motion Vector texture map (if connected to the Surface) or from the Action Motion Vector output (if connected to the Camera). | Motion Vectors |
| Near/Far | Sets a centre matte segmentation defined by the Near and Far clipping planes, similar to how a 3D camera is defined. Falloff controls how smooth the transition is to and from the defined area. | Z-Depth |
| Normals | Creates a matte segmentation defined by the normals angle value as well as a threshold allowing you to include a range of normals in the chosen direction. Angle and radial identify the angle direction of the normals. Threshold allows you to include a range around the defined normals angle direction. | Normal |
| Primitive | Use a primitive to precisely extract an object from the depth, something that cannot be done with other depth-based segmentation tools. Isolate a part of the Depth data using a procedural shape (sphere or cube). | Z-Depth |
| Range | Creates a central matte segmentation as defined by an Origin point and a Range size. Falloff controls how smooth the transition is to and from the defined area. | Z-Depth |
Use Primitives to Constrain Z-Depth
Use the image segmentation Primitive mode to define a Z-depth volume using a cube or a sphere.
The Primitive mode requires Z-Depth data. If the selective is connected to a Surface, the depth data comes from the Z-Depth map of the surface. If the selective is connected to the camera, the depth data comes from the Action Z-Depth output.
To display the primitive in the viewport:
- Press F9 to display the Selective Result view.
When the primitive doesn't circumscribe any depth information, the edge of the shape is grey.
When the primitive circumscribes depth information, the edge of the shape is yellow.
To move the shape in X or Y, switch the cursor to Translate mode (T).
To rescale the shape, switch the cursor to Scale mode (E).
To move the center of the shape to the depth of a specific pixel:
- Switch the cursor to Translate mode (T).
- While holding Shift, drag the manipulator around the scene: see how the center of shape snaps to the depth of the pixel.