
Navigating Selectives
Two methods allow you to quickly navigate selectives, without having to use the Action Schematic: the Selectives Managers, and the HUD.
Navigating with the Selectives Manager
The Selective Manager allows you to create, select, copy, and delete Selective nodes and their effects. The Selective Manager is displayed in the Controls menu of a Selective node.
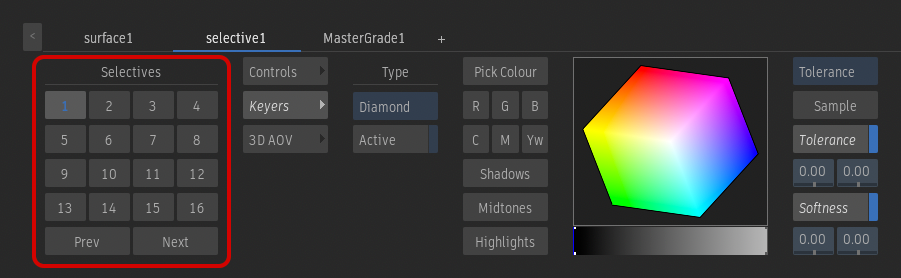
Whenever you add a selective to a surface or a camera, it is assigned an ID, a number between 1 and 48. That ID is displayed in the Selective node's Unique ID field, in the Controls tab. This is the ID used in the Selectives Manager, as well as in the HUD.
You navigate to a Selective by clicking its number in the Selective Manager. A blue number in the Manager indicates a Selective is assigned that ID.
| To: | In the Selective Manager: | Context Menu Option: | Notes: |
|---|---|---|---|
| Create a new Selective. | Click a grey ID. | This new Selective is automatically assigned a Colour Correct SFX. | |
| Select a Selective. | Click its number in the Selective Manager. | Blue numbers are assigned Selectives. Dark grey numbers are hidden Selectives. | |
| Delete a Selective. | Alt+click an ID. | Delete Branch | Deletes the Selective and children effects. |
| Hide a Selective. | Select a Selective, and press H. | View / Render > Hide / Show | The Selective's ID turns dark grey when hidden. |
| Create a new Selective with a specific Matchbox. | Space+click a grey ID. | Adds a selective, and then displays the Selective FX browser. | |
| Assign a Selective a new ID. | With the Selective selected, Ctrl+Shift+click the new ID. | Move | The target number cannot already be assigned a Selective. |
| Add a Selective FX to an existing Selective. | Space+click its ID. | Add Selective FX or Add Matchbox | |
| Copy a Selective to another Selective. | With the Selective selected, Shift+click the target Selective's ID. | Replace All Pastes information from the clipboard. | Copies the contents of the original Selective to that ID, including node values and every child effect. |
| Copy only the effects from a Selective to another Selective. | With the Selective selected, Space+Shift+click the target Selective's ID. | Replace Effects Pastes information from the clipboard. | The FX of the target Selective are replaced by those of the original Selective. The values of the node of the target Selective are not changed. |
| Drag and drop only the effects from a Selective to another Selective: | Space+drag & drop from one Selective to another. | ||
| Copy only the values of a Selective node to another Selective. | With a Selective selected, Alt+Shift+click the target Selective's ID. | Replace Selective Pastes information from the clipboard. | Overwrites the target node with those of the original Selective. The children effects are unaffected. |
| Add a GMask to a Selective | Right-click | Add GMask Link | |
| Duplicate a Selective and its children | Duplicate Branch | ||
| Resets the Selective and its children nodes | Reset Branch | ||
| Add effects from another selective | Append Effects | Pastes the Selective information from the clipboard. Only Matchbox shaders are added to the existing shaders. The Selective is left alone. |
HUD
Closely related to the Selectives Manager is the Selectives HUD. Use this HUD to navigate between the Primary, Selective and Output stages of the Surface and the Camera processing pipelines. Use the context menu on the HUD elements to assign GMask and Matchbox effects to a specific Selective from within the viewport, without using the Schematic.
The HUD displays the order of the processing pipeline: it reflects the Priority editor. It consists of the following elements.
Primary
Primary is only available when a Surface is selected, and refers to that surface Diffuse map.
Select Primary to focus on the Diffuse map of the surface and displays its Matchbox effects in the lower right of the UI.
Numbers
The numbers represent the Selectives attached to the surface or the camera: each number is the Unique ID of a Selective node.
Select a number to display the Selective settings in the lower left of the Action UI, and the parented effects in the lower right.
Output
Depending on what is currently selected, Output represents either the camera or the surface.
Select Output to display the Matchbox effects attached directly to the Surface or the Camera node, in the lower right of the UI.