
Cuts
In the Motion Blend window, a cut is a section of a take’s animation. You can edit and blend cuts to create a take.
Each cut has its own color that corresponds to the color of its ghost, pose, and root. If a preceding cut blocks a cut on another track entirely, the cut displays in gray. Gray cuts are not included in the Result track and no blending occurs. When blends are created in the Result track, the colors of the blending cuts merge.
By default, cuts have the same length as the track’s take, which is represented by the blue bar on each track. There are two ways to change the length of your selected cut:
Drag the Start and End Cut handles (A and B).
Double-click the Start and End Cut time codes to enter a specific number (C and D).
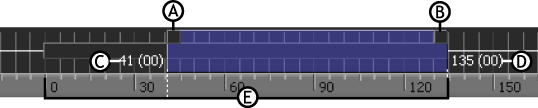
A. Start Cut handle B. End Cut handle C. Start Cut time code D. End Cut time code E. Blue bar representing the length of the take
You can also move a cut independently of the take in one of the following ways:
- Drag the cut left or right.
- Translate the track using the T field in the Take box. See Producing an exact translation.
A standard blend is created when two cuts partly overlap, creating an area where the animation of both cuts is mixed. Blends appear in the Result track.
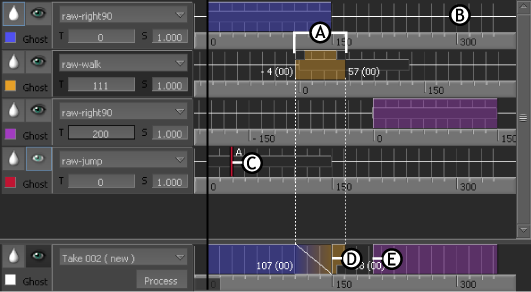
A. A cut B. White line representing the blending object C. A pose D. A blend E. A gap where interpolation occurs
Interpolation occurs in a gap between two cuts in the Result track. The data in the space between the cuts is interpolated from the last position of a cut to the first position of the next cut.
To move the cut back to its default length and location over the take’s track, click Reset Cut or Reset All Cuts.