
Walkthrough for creating and loading a configuration using the Graphical Toolpath Editor
Custom configurations can be created from scratch or by modifying an existing configuration. This walkthrough explains the entire procedure from loading a machine workspace, assuming you have never set up a machine workspace before, to defining a configuration.
Jump to:
Adding a machine
- Choose
Home >
 My Machines.
- Click Add Machine.
- In the opening dialog, search and find the SLM 125HL machine and click Add to My Machines. This closes the dialog.
- Click Open.
Selecting and modifying a configuration
Netfabb does not have an option to create a new, empty configuration from scratch. The regular way path to a new and adjusted configuration is to clone an existing one. For strategies, however, such an option exists.
Select and change the configuration
- In the context view, and here in the Machine configuration section, click Change.
- Select a default configuration of the Simple (Default) type, such as AlSi10Mg Defaults (30µm, 100W), and click Edit.
- When prompted to create a duplicate, click Yes.
- In the top-right corner of the dialog, click Change type and choose the Diagram type. Click Yes when prompted to confirm the change.
Adding and modifying a strategy
- In the right-hand-side part of the opening dialog, click
 Create new build strategy next to the drop-down menu to create a new build strategy.

- Provide a name for the new strategy and click OK.
- Click the
 hatchfilling filter from the row of
Configuration editor toolbar.
hatchfilling filter from the row of
Configuration editor toolbar.
- Click in the white space of the diagram to drop the hatchfilling block.
- Click
 Create connection and click the
original block, followed by the
hatchfilling block. This will create a connection between the two blocks.
Create connection and click the
original block, followed by the
hatchfilling block. This will create a connection between the two blocks.
- Right-click the
hatchfilling block you just placed and choose
Set as result.
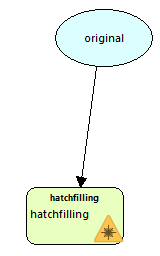
- Right-click all other blocks, original, support, and the solidsupport block and choose Set as result for each.
- On the right panel, choose the Results tab.
- For each entry, adjust the
Hatchstyle appropriately.
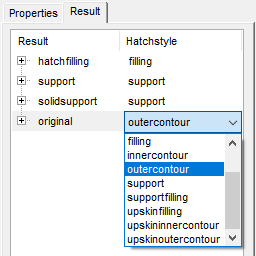 Tip: To adjust parameters like Laser speed for this hatchstyle, expand any entry that uses it and modify the values. Note that this changes the parameter for all results that use this hatchstyle.
 - To change the order in which the results are rendered and exposed, click, drag, and drop the entries into the desired order. Entries at the top are exposed earlier.
Configuring the configuration for the target buildroom
- Switch to the Global settings tab.
- Check the available settings and adjust to match your machine. The parameters under Build time calculation only affects the estimate within Netfabb, while changes to the Tray settings affect the generated build data used by your machine.
Finalizing and using the new configuration
- Click Apply and select to create the configuration and return to the SLM 125 HL workspace with the configuration selected.
- Load a part onto the platform and select it.
- In the Current part section of the context view, select the new strategy from the dropdown.
The new strategy is now used for this part in any subsequent toolpath generation.
Top