
Examples of Computed Field Formulas
Arithmetic operations
Computed fields can be used to calculate the total cost of a change based on various costs provided by the user: COST_5 = COST_1 + COST_2 + COST_3 + COST_4
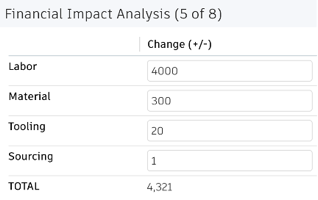
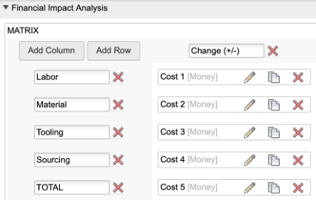
Use the coalesce function to round off null values to zero: coalesce(COST_1,0) + coalesce(COST_2,0) + coalesce(COST_3,0) + coalesce(COST_4,0)
Concatenation
A dimensions field can be used to display the concatenated values from dedicated fields: LENGTH||' mm x '||WIDTH||' mm x '||HEIGHT||' mm'

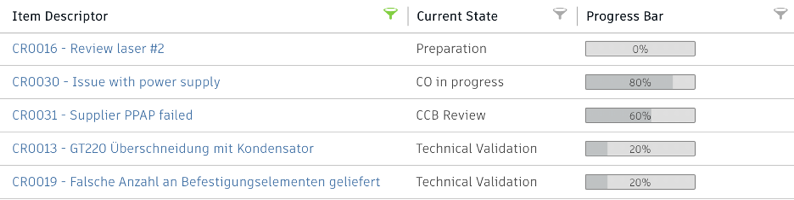
Conditions and embedded HTML
Use colors to render computed fields and indicate relevant states of a business process. This example requires a field STATUS_NAME to be updated after workflow transitions: item.STATUS_NAME = item.descriptor.workflowState
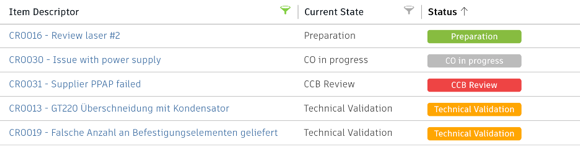
'<div style="border-radius:4px; height:20px; line-height:20px; text-align:center; font-size:0.9em;font-weight:600;width:140px;color:white;background-color:'||
CASE
    WHEN (STATUS_NAME = 'Preparation') THEN '#87bc40'
    WHEN (STATUS_NAME = 'Technical Validation') THEN '#ffa600'
    WHEN (STATUS_NAME = 'CCB Review') THEN '#ee4444'
    WHEN (STATUS_NAME = 'Fast Track') THEN '#ee4444'
    ELSE '#bbbbbb'
END
||';">'||STATUS_NAME||'</div>'
Stamp graphic
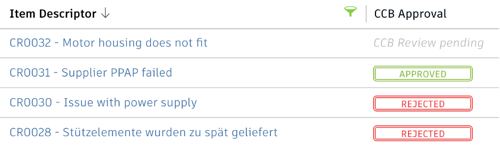
Stamped graphic can be used to indicate approval or rejection of a change with a style that looks like a stamp. This example requires a field to provide information about approval. This field could be set manually or by script. This given example uses field CCB_DECISION.
CASE
    WHEN (CCB_DECISION is null) THEN '<span style="white-space:nowrap;color:#bbb;font-style:italic;">CCB Review pending</span>’
    WHEN (CCB_DECISION = 'Approved') THEN '<div style="border-radius:4px;height:19px;line-height:15px;text-align:center;font-size:0.8em;font-weight:600;width:120px;color:#87bc40;border:3px double #87bc40">APPROVED</div>'
    WHEN (CCB_DECISION = 'Rejected') THEN '<div style="border-radius:4px;height:19px;line-height:15px;text-align:center;font-size:0.8em;font-weight:600;width:120px;color:#ee4444;border:3px double #ee4444">REJECTED</div>'
    ELSE ' '
END
Prioritization
This example can be used to better recognize the priority of requests indicated by color and graphics.

CASE
    WHEN (PRIORITY = 2) THEN '<span sort="4" style="font-size:1.2em;color:#eb4d4d;">■ ■ ■</span>'
    WHEN (PRIORITY = 1) THEN '<span sort="3" style="font-size:1.2em; color:#FAA21B;">■ ■</span><span style="font-size:1.2em;color:#e4e4e4;">■</span>'
    WHEN (PRIORITY = 3) THEN '<span sort="2" style="font-size:1.2em; color:#8fc844;">■</span><span style="font-size:1.2em;color:#e4e4e4;">■ ■</span>'
    ELSE '<span sort="1" style="font-size:1.2em; color:#e4e4e4;">■ ■ ■</span>'
END
Summarize assessment properties
This computed field example can be used to summarize assessment properties like priority, risks, and effort.

'<div style="float:left;margin-right:2px;
height:20px;width:20px;font-size:0.8em;line-height:20px;border-radius:50%;text-align:center;color:#fff;background:'||
CASE
    WHEN(PRIORITY = 1) THEN '#ffa600">2</div>'
    WHEN(PRIORITY = 2) THEN '#ee4444">1</div>'
    WHEN(PRIORITY = 3) THEN '#8fc844">3</div>'
    ELSE '#eee"></div>'
END
||'<div style="float:left;margin-right:2px;height:20px;width:20px;font-size:0.8em;line-height:20px;border-radius:50%;text-align:center;color:#fff;background:'||
CASE
    WHEN(RISK = 1) THEN '#ffa600">2</div>'
    WHEN(RISK = 2) THEN '#ee4444">1</div>'
    WHEN(RISK = 3) THEN '#8fc844">3</div>'
    ELSE '#eee"></div>'
END||'<div style="float:left;height:20px;width:20px;font-size:0.8em;line-height:20px;border-radius:50%;text-align:center;color:#fff;background:'||
CASE
    WHEN(EFFORT = 1) THEN '#ffa600">2</div>'
    WHEN(EFFORT = 2) THEN '#ee4444">1</div>'
    WHEN(EFFORT = 3) THEN '#8fc844">3</div>'
    ELSE '#eee"></div>'
END
Progress bar
Keep track of the progress of a business process by using a progress bar. In the example below, the field progress bar is required to be defined and the field would need to be updated during workflow transitions.
After passing the first transition, the field would be updated (item.progressbar = 10) to indicate that 10% of the business process is complete.
'<div style="padding:3px 5px 2px;
    font-size:0.8em;
    text-align:center;
    width:120px;
    background:linear-gradient (to right, #bfc2c3 0%, #bfc2c3 '||PROGRESS||'%, #dedede '||PROGRESS||'%);border:1px solid #8a8a8a;border-radius:2px;">'||PROGRESS||'%
</div>'
The progress bar can also be used to indicate planned vs. actual resource consumption.
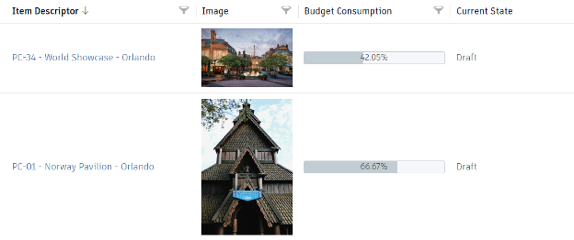
'<div style="min-width:90px;
    max-width:calc(100% - 20px);
    height:20px; line-height:18px;
    border-radius:3px; text-align:center;
    font-size:0.9em;
    background:linear-gradient(to right,#c2cdd3 0%, #c2cdd3 '||ROUND(((BUDGET_ACTUAL/BUDGET)*100)::numeric, 2)||'%, #f5f7fa '||ROUND(((BUDGET_ACTUAL/BUDGET)*100)::numeric, 2)||'%);border:1px solid #c2cdd3">'|| ROUND(((BUDGET_ACTUAL/BUDGET)*100)::numeric, 2) ||'%
</div>'
Duration and deviation calculation
Computed fields can be used to calculate duration and deviation from plan based on user defined start and end dates, as well as actual start and end dates: DATEDIFF('DAY', TARGET_START_DATE, TARGET_COMPLETION_DATE)

The deviation can be color-coded.

'<div style="border-radius:2px; height:20px;line-height:20px;text-align:center;font-size:0.9em;width:90px;color:white;background-color:'||
 CASE
    WHEN (TARGET_START_DATE is null) THEN '#bbb">?</div>
    WHEN (ACTUAL_START_DATE is null) THEN
        CASE
            WHEN (DATE_PART('day', NOW() - TARGET_START_DATE) > 0) THEN '#ee4444;">'||DATE_PART('day', NOW() - TARGET_START_DATE)||' days</div>'
            WHEN (DATE_PART('day', NOW() - TARGET_START_DATE) < 0) THEN '#87bc40;">'||DATE_PART('day', NOW() - TARGET_START_DATE)||' days</div>
            ELSE '#ffa600;">0</div>'
        END
    ELSE
        CASE
            WHEN (DATE_PART('day', ACTUAL_START_DATE - TARGET_START_DATE) > 0) THEN '#ee4444;">'||DATE_PART('day', ACTUAL_START_DATE - TARGET_START_DATE)||' days</div>'
            WHEN (DATE_PART('day', ACTUAL_START_DATE - TARGET_START_DATE) < 0) THEN '#87bc40;">'||DATE_PART('day', ACTUAL_START_DATE - TARGET_START_DATE)||' days</div>'
            ELSE '#ffa600;">0</div>'
        END
END
Highlight recent changes
Computed fields can be used to help users identify which records have changed recently.
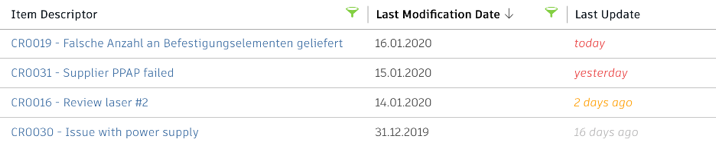
'<span style="font-style:italic;color:'||
CASE
    WHEN (DATE_PART('day’, CURRENT_DATE - LAST_MODIFICATION_DATE) > 10) THEN '#bbbbbb;">'||DATE_PART('day’, CURRENT_DATE - LAST_MODIFICATION_DATE)||' days ago</span>'
    WHEN (DATE_PART('day', CURRENT_DATE - LAST_MODIFICATION_DATE) <  1) THEN '#eb4d4d;">today</span>'
    WHEN (DATE_PART('day', CURRENT_DATE - LAST_MODIFICATION_DATE) <  2) THEN '#eb4d4d;">yesterday</span>
    ELSE '#ffa600;">'||DATE_PART('day', CURRENT_DATE - LAST_MODIFICATION_DATE)||' days ago</span>'
END
Remaining days
Computed fields can be used to calculate remaining days. Further, colors can be used to indicate delays and completed processes.
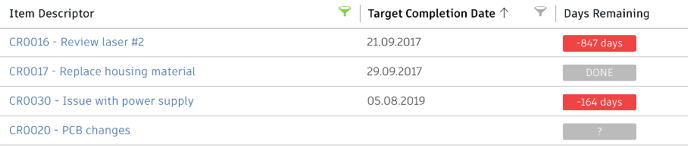
'<div style="border-radius:2px;height:20px;line-height:20px;text-align:center;font-size:0.9em;width:90px;color:white;background-color:'||
CASE
    WHEN (TARGET_COMPLETION_DATE is null) THEN '#bbb">?</div>'
    WHEN (PROGRESS < 100) THEN
        CASE
            WHEN (DATE_PART('day', TARGET_COMPLETION_DATE - NOW()) <  0) THEN '#ee4444;">'||DATE_PART('day', TARGET_COMPLETION_DATE - NOW())||' days</div>'
            WHEN (DATE_PART('day', TARGET_COMPLETION_DATE - NOW()) < 10) THEN '#ffa600;">'||DATE_PART('day', TARGET_COMPLETION_DATE - NOW())||' days</div>'
            ELSE '#87bc40;">'||DATE_PART('day', TARGET_COMPLETION_DATE - NOW())||' days</div>'
        END
    ELSE '#bbb">DONE</div>
END
QR code
Computed fields can be used to render QR codes, which can be used in printouts to access records on mobile devices easily. Enabling this would require DMS_ID to set upon item creation by script. The site name and workspace_ID in the URL would have to be modified to match your site.
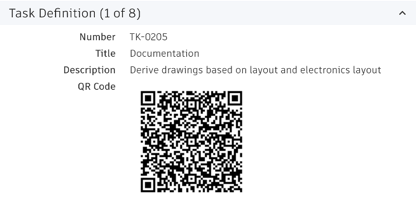
'<img src="https://chart.googleapis.com/chart?cht=qr&chs=180x180&chl=https://<tenantname>.autodeskplm360.net/plm/workspaces/2/items/itemDetails?view=full%26tab=details%26mode=view%26itemId=urn%60adsk,plm%60tenant,workspace,item%60adskdickmans,2,'||DMS_ID||'">'Gate approval process
Progress of a project through various phases and gates can be displayed visually and graphically.
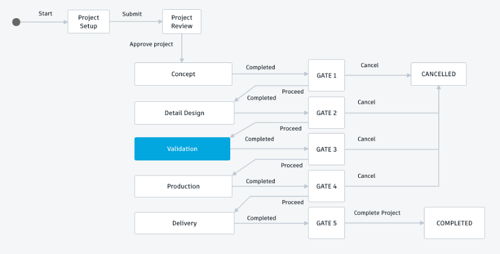
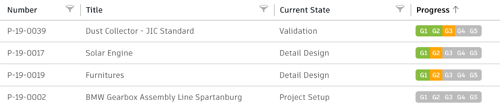
CASE
    WHEN (STEP = 99) THEN '<span style="color:#c2cdd3;font-style:italic;">Project cancelled</span>'
    ELSE
        '<div style="padding-left:3px;border-radius: 4px 0px 0px 4px;border-right:1px solid white;font-size:0.9em;line-height:20px;width:36px;height:20px;text-align:center;color:#fff;float:left;background:'||
        CASE
            WHEN (STEP = 0) THEN '#c2cdd3'
            WHEN (STEP = 1) THEN '#ffa600'
            WHEN (STEP = 2) THEN '#ee4444'
            ELSE '#8fc844'
        END
        ||'">G1</div><div style="border-right:1px solid white;font-size:0.9em;line-height:20px;width:36px;height:20px;text-align:center;color:#fff;float:left;background:'||
        CASE
            WHEN (STEP < 3) THEN '#c2cdd3'
            WHEN (STEP = 3) THEN '#ffa600'
            WHEN (STEP = 4) THEN '#ee4444'
            ELSE '#8fc844'
        END
        ||'">G2</div><div style="border-right:1px solid white;font-size:0.9em;line-height:20px;width:36px;height:20px;text-align:center;color:#fff;float:left;background:'||
        CASE
            WHEN (STEP < 5) THEN '#c2cdd3'
            WHEN (STEP = 5) THEN '#ffa600'
            WHEN (STEP = 6) THEN '#ee4444'
            ELSE '#8fc844'
        END
        ||'">G3</div><div style="border-right:1px solid white;font-size:0.9em;line-height:20px;width:36px;height:20px;text-align:center;color:#fff;float:left;background:'||
        CASE
            WHEN (STEP < 7) THEN '#c2cdd3'
            WHEN (STEP = 7) THEN '#ffa600'
            WHEN (STEP = 8) THEN '#ee4444'
            ELSE '#8fc844'
        END
        ||'">G4</div><div style="font-size:0.9em;line-height:20px;width:36px;height:20px;text-align:center;color:#fff;float:left;border-radius: 0px 4px 4px 0px;padding-right:3px;background:'||
        CASE
            WHEN (STEP < 9) THEN '#c2cdd3'
            WHEN (STEP = 9) THEN '#ffa600'
            WHEN (STEP = 10) THEN '#ee4444'
            ELSE '#8fc844'
        END
        ||'">G5</div>'
END
Star rating
Computed fields can be used to display star ratings. This provides a quick visual cue to the user and helps them understand the prioritization decisions.
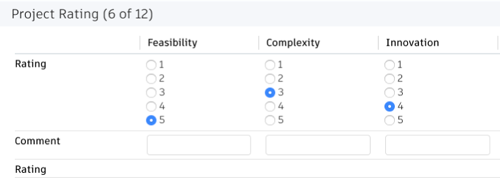
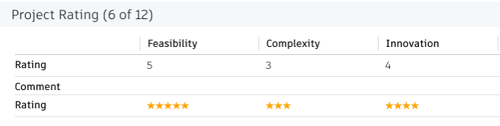
CASE
    WHEN (RATING_1 = 1) THEN '<span style="color:#ffa600">★</span>'
    WHEN (RATING_1 = 2) THEN '<span style="color:#ffa600">★★</span>'
    WHEN (RATING_1 = 3) THEN '<span style="color:#ffa600">★★★</span>'
    WHEN (RATING_1 = 4) THEN '<span style="color:#ffa600">★★★★</span>'
    WHEN (RATING_1 = 5) THEN '<span style="color:#ffa600">★★★★★</span>'
END
Styling links as buttons
Computed fields can help simplify the display of long URLs by turning them into buttons.
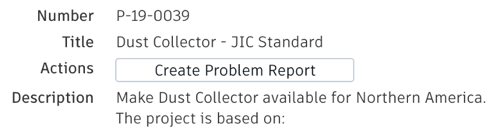
'<a style="border: 1px solid #bec8d2;border-radius:3px;padding:6px 20px;color: #0a131c;font-weight:600;line-height:32px;text-align:center;text-decoration:none !important;white-space:nowrap;" target="_blank" href ="https://<tenantname>.autodeskplm360.net/plm/workspaces/54/addItem">Create Problem Report</a>'