
To add a component:
- Click Wizard tab > Modify Molds panel > Component.
- In the Choose a Component dialog, click Manage custom catalogs to display the options.
- Locate the appropriate destination folder in the Custom Catalogs.
- Select a component from a standard catalog, or an existing custom catalog.
- Drag the selected component into the custom catalog as shown below:
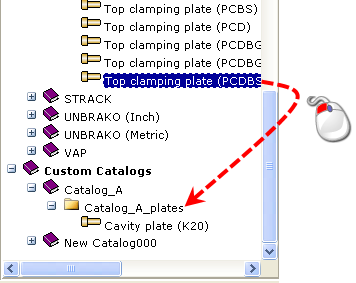
When a custom component is dragged from one custom catalog to another, the component is moved. To copy a component and leave the original untouched, hold down the Ctrl key and drag the component.
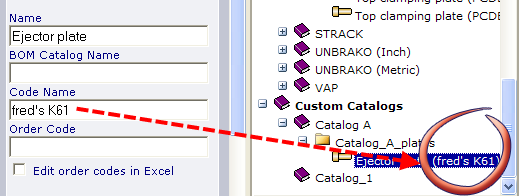
The details of the component are displayed under Manage custom catalogs.

- Enter a BOM Catalog Name to be displayed for the custom component in the Bill of Materials.
- Modify the Code Name as required. Any change you make appears in the Custom Catalogs tree.
- Leave Order Code blank to display the default order code.
Alternatively, customise the Order Code in one of the following ways:
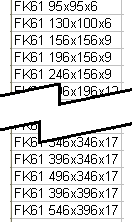
- Add a fixed Code Name. If you added FK61, all sizes of that component would have FK61 as the order code.
- Add a combination of a fixed and variable code. The variable part of the code uses the dimension parameters to create a unique code for each row.
For example: FK61 %L% x %M% x %S% would produce the following order codes.
- Select Edit order codes in Excel to edit the order code from within a spreadsheet.
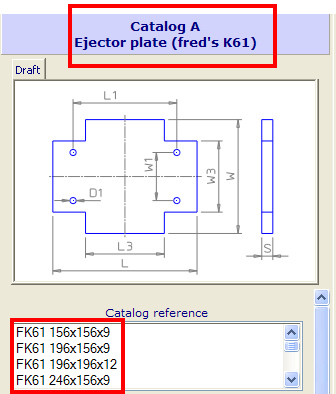
- Click OK to close the Choose a component dialog. The Component Wizard is opened in the normal way.
- Click Select from the Dimensions options in the Component Wizard. The customized catalog and order codes are displayed.
Tip: You can also select Copy an existing component and use the Destination folder and Source component options to create the component.
Note: Custom component FK61 is still linked to the original manufacturer's catalog. Any changes that are made by the manufacturer (for example a change in the sizes of the plates) will be automatically inherited by the FK61