
Create configuration items
The CAD plugin for SOLIDWORKS enables you to create items when registering part and assembly files that contain configurations into Upchain. Each selected configuration is registered to its own item and assigned an item number according to the item numbering rules configured by your Tenant Administrator.
Autodesk recommends you register your CAD files into Upchain as soon as possible so that file and attribute changes can be tracked and managed within one central location from the start. This also means your team members can begin collaborating on designs and associated work as well.
Before you start
File naming
Every [filename + file extension] must be unique in Upchain. This is to ensure consistency in the data, and so that CAD and drawing files are not accidentally mixed up between items. The extension is included in the item name, so you can register Part1.SLDPRT only once, but it is possible to also register Part1.SLDDRW, Part1.PDF, Part1.DWG, etc. to the same item or a different item.
By default, it is your responsibility to ensure every file name is unique before registering them into Upchain. However, your Tenant Administrator can configure the tenant property filename.pattern to specify how CAD files and drawings will be renamed upon registration. This gives your organization control and consistency over the naming convention of all CAD and drawing file names in Upchain. This also means you can register the same CAD file into Upchain since it gets renamed every time.
If your tenant's file naming rules include the item number, then Upchain uses the item number created for the active configuration in the CAD file at the time of registration.
Item types
By default, all assembly files are associated to an Assembly item type. All parts are associated to a Manufactured Item type. Once the items are registered into Upchain, you can modify the item type as necessary. However, if you have item numbering rules that are specific to the item type, then you won't be able to change the item number to align with the item type after item creation. In other words, the item number is set during item creation and cannot be changed afterwards. Click here to learn how you can set item types during or before item creation.
Configuration names
Every configuration must have a name. Configuration names cannot exceed 127 characters.
Before registering a CAD file that contains multiple configurations, you should ensure all configurations have a full and up-to-date data set ( ).
).
Register a CAD file with configurations
To register a CAD file that contains one or more configurations:
Open the CAD file in SOLIDWORKS.
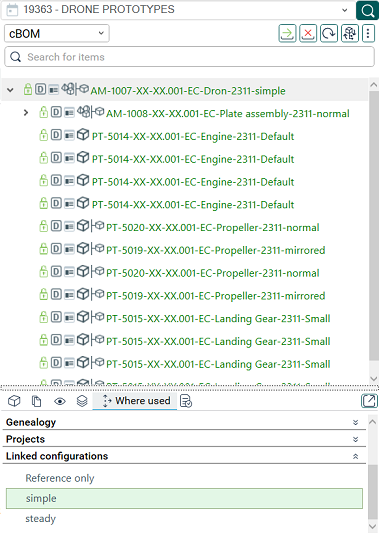
Click the BOM view icon (
 ) in the menu bar.
Select cBOM from the drop-down, if it’s not already selected.
Click the Refresh icon (
 ).
).Upchain references the CAD files currently opened in SOLIDWORKS and builds a hierarchical indented structure based on the active configuration of the open CAD file. All files show as 'Not registered'.
Right-click the top assembly in the cBOM and select Create Item.
The CAD Check in window opens.
Manage configuration registration in the CAD Check in window
The CAD Check in window displays a preview of the cBOM files on the left side and the eBOM items to be created on the right side. It shows a separate cBOM/eBOM tree for every identified configuration in the CAD file. By default, a green check mark appears beside every CAD file in each configuration tree to indicate that for each file, a corresponding item will be created, indicated on the eBOM side with AUTO(New Item).
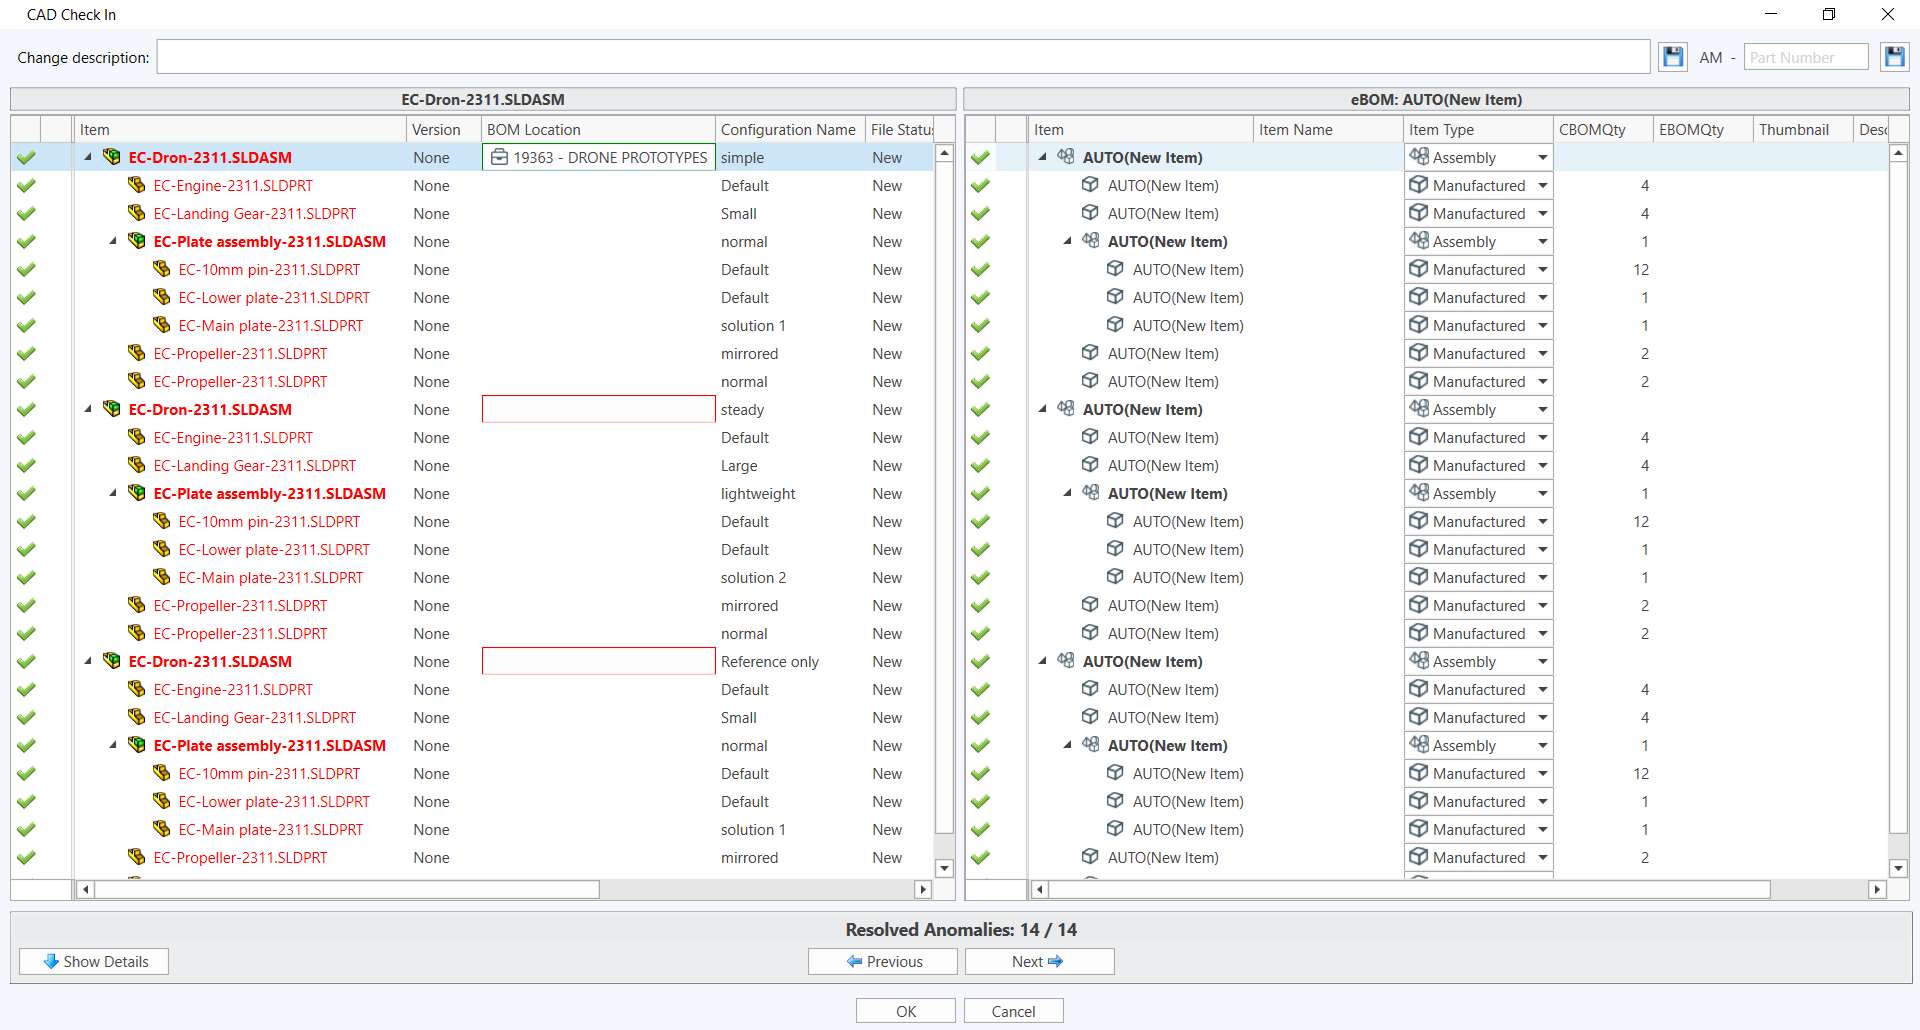
The cBOM side of the window contains a column displaying the Configuration Name (as saved in the CAD file) and another column named BOM Location for you to specify a location where each configuration item will be created.
The eBOM side of the window contains an Item Type column where you may choose what item type will be created for each component. You may choose a different item type for each configuration associated the same CAD file.
To complete the CAD file registration process:
Resolve all BOM anomalies for each configuration and component.
For each configuration, use one of the following methods:
- Confirm with a check mark (positive resolution) that you want to create an item for a specific configuration.
- Click the check mark to change it to an X (negative resolution) to register the configuration as a phantom.
Note: You must create an item for at least one configuration at the parent assembly level.For each component in each configuration, use one of the following methods:
- Confirm with a check mark that you want to create an item for the component.
- Click the check mark to change it to an X to register the component as phantom. All child items shared across each configuration display an appropriate check mark or X depending on whether an item is created for it in other configurations.
Note: All configuration anomalies must be resolved positive or negative. You cannot proceed with any configurations showing a question mark (?) beside them. Be sure to review the child components in each configuration to ensure you are creating items where necessary.
Choose a BOM location for all configurations for which you want to create an item:
Click the BOM Location field shown with a red border.
The project picker window opens.
Select the BOM Location in which you wish to place the new configuration item.
Click OK.
The selected location is displayed in the BOM Location field and now has a green border.
Repeat for every configuration being registered to an item.
Note: You must select a BOM location for all configurations you are registering to an item.(Optional) Change the item type from the default by selecting a different item type from the Item Type drop-down list.
Click OK on the CAD Check in window.
Upchain creates items for all selected configurations and their components and places them in their chosen BOM locations.
After registration
Once registration is complete, the newly-created items are locked (checked out) to you as shown with a green check out lock and green text. This is true for all configuration items since they all contain the same CAD file. This is so that you can make changes to any of the configuration designs or item attributes before checking the items in.
You now have a few options:
- If you want to make further edits to the CAD, you may do so now. To create a new file version of the CAD and remove the check out locks, right-click the top parent item and select Check in. This checks in all other linked configuration items as well.
- If you don't want to make further edits and simply wish to remove the check out locks from the items, right-click the item and select Cancel check out. If you wish to remove the check out locks for a parent file and all of its children, right-click the parent and select Cancel all check outs. All linked configuration items’ check out locks are removed as well.
Register an assembly that contains parts with their own configurations
When registering an assembly that contains parts that also have their own configurations, the part configurations that are registered to items during the assembly item creation process are only those explicitly used in at least one of the assembly configurations. Should you want to register all part configurations to items, you may do so at a later date. See this help topic on how to register additional configurations for a CAD file.
Furthermore, if two different assemblies are using the same part but a different configuration within that part, then when each assembly is registered, the items created for each part configuration are linked to each other in Upchain.
Register an assembly that has an associated drawing
A drawing can only be associated with one item. If the assembly has an associated drawing, it is registered into Upchain to the configuration item that was active at the time of registration. Click here to learn more about registering a drawing into Upchain.