
Connecting to the Autodesk Fusion MCP Server
Start here (2–5 minutes)
Step 1: Start Fusion
Launch Fusion and keep it running. The Autodesk Fusion MCP Server is hosted by Fusion and is only available while Fusion is open.
Step 2: Enable the Autodesk Fusion MCP Server in Fusion
- Open Preferences in Fusion.
- Navigate to General > API.
- Check the Fusion MCP Server (runs locally on this device) checkbox.
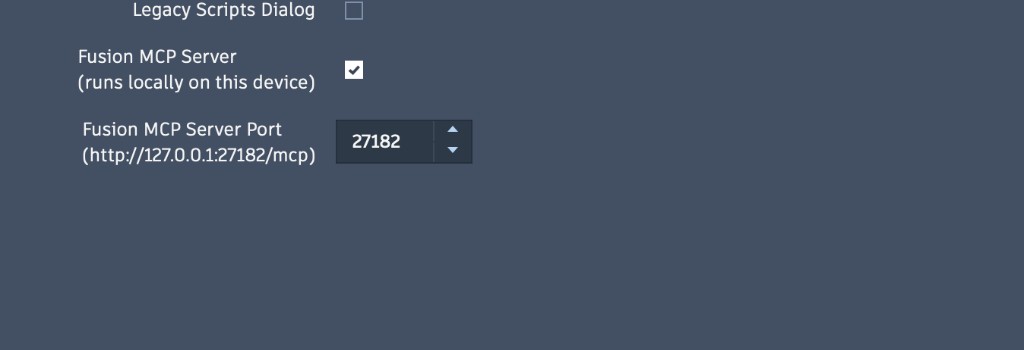
Once enabled, Fusion will expose a local MCP server endpoint at http://127.0.0.1:27182/mcp.
The default port is 27182. If you change the port in Fusion preferences, update the URL in your client configuration to match.
Step 3: Connect your client
Use the following URL to connect:
http://127.0.0.1:27182/mcpStep-by-step instructions for the clients below are provided in this topic:
| Client | How you connect |
|---|---|
| Claude Desktop | Install the Autodesk Fusion connector from the connector directory. See Using with Claude Desktop. |
| Cursor | Add the server URL to mcp.json. See Using with Cursor. |
| VS Code | Add the server URL to mcp.json. See Using with VS Code. |
Any other client that supports MCP over Streamable HTTP can connect to the same URL. Refer to that client's documentation for configuration steps.
Using with Claude Desktop
1) Open Claude Desktop connectors
- Open Claude Desktop.
- Go to Settings > Connectors.
2) Add the Autodesk Fusion connector
The Autodesk Fusion MCP Server is published in the Claude connector directory, so you install it from there. You do not need to add it as a custom connector, and you do not need to enter the server URL.
Select Add at the top right of the Connectors page, then choose Browse connectors.
In the directory, search for
Fusion.Select Autodesk Fusion, described as "Create, modify, and inspect CAD geometry in Fusion", and install it.
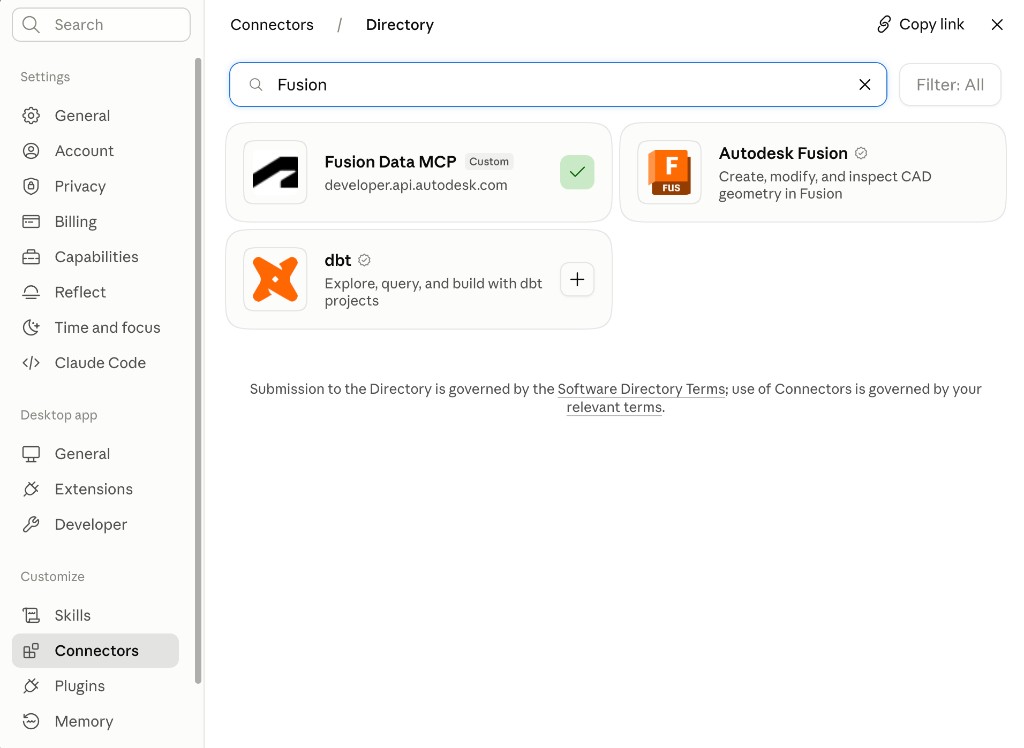
Do not confuse Autodesk Fusion with the Autodesk Fusion Data MCP Server. That is a separate cloud-hosted server for working with Fusion data, which you add yourself as a custom connector by URL and name yourself. If you have already added it, it also appears in the directory marked Custom, as in the screenshot above.
Once installed, Autodesk Fusion appears in your connectors list with the type Desktop.
3) Verify the connection
Start a new chat and try:
Create a 10 mm cube.If successful, Fusion will execute the command.
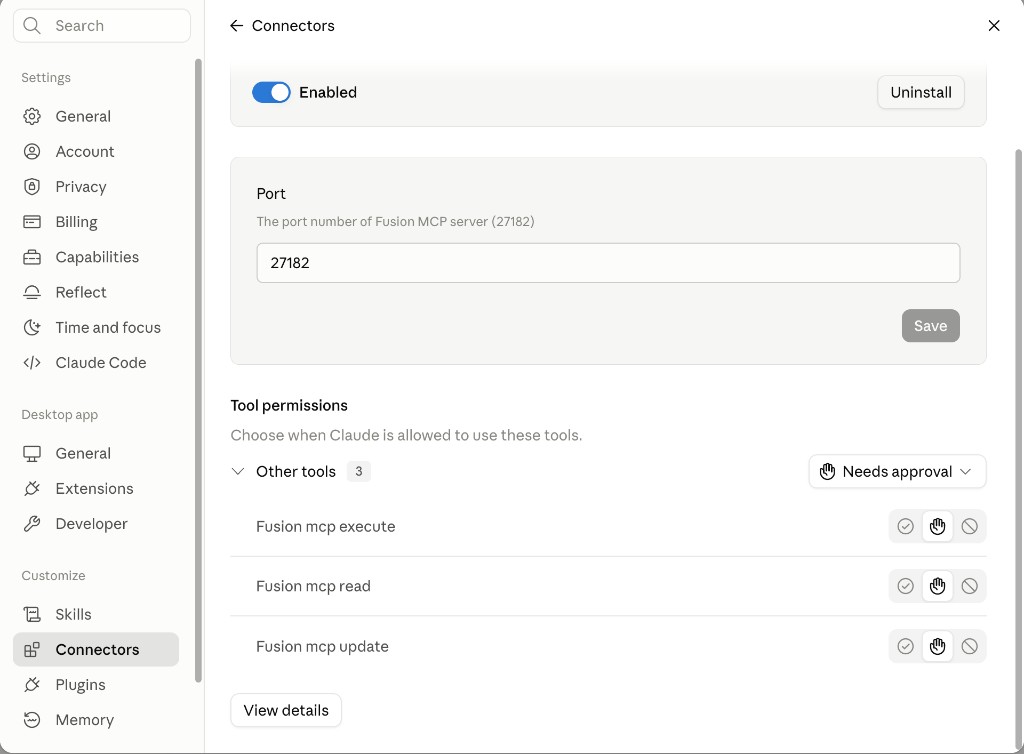
You can also verify in Settings > Connectors. Open the Autodesk Fusion connector and check Tool permissions. If the tool list is populated, Claude is successfully connected. If it is empty, the connection has not been established.
Using with Cursor
Cursor connects to the Autodesk Fusion MCP Server over Streamable HTTP using the local URL. There is nothing to install and no sign-in step.
1) Add the server to Cursor
Open the Command Palette and go to Cursor Settings: Tools & MCP, select Add Custom MCP, and add the following:
{
  "mcpServers": {
    "autodesk-fusion": {
      "url": "http://127.0.0.1:27182/mcp"
    }
  }
}
You can also edit the configuration file directly:
- All projects:
~/.cursor/mcp.jsonon macOS and Linux, or%USERPROFILE%\.cursor\mcp.jsonon Windows - One project:
.cursor/mcp.jsonin the project root
If you changed the port in Fusion preferences, replace 27182 in the URL with your port.
2) Verify the connection
- Make sure Fusion is running with the Autodesk Fusion MCP Server enabled, and that a document is open.
- In Cursor Settings > Tools & MCP, confirm that autodesk-fusion is listed and enabled and that its tools appear beneath it. If the server does not appear, restart Cursor so it reloads the configuration.
- Open a new chat in Agent mode and try:
Create a 10 mm cube.If successful, Fusion executes the command in your live session.
Using with VS Code
Like Cursor, VS Code connects over Streamable HTTP using the local URL. There is nothing to install and no sign-in step.
1) Add the server to VS Code
Open the Command Palette and run MCP: Add Server, choose HTTP, and enter http://127.0.0.1:27182/mcp. You can also edit mcp.json directly:
{
  "servers": {
    "autodesk-fusion": {
      "type": "http",
      "url": "http://127.0.0.1:27182/mcp"
    }
  }
}- One project:
.vscode/mcp.jsonin the workspace root - All workspaces: run MCP: Open User Configuration from the Command Palette
VS Code uses servers as the top-level key, not mcpServers, and each entry must declare type. A configuration block copied from Cursor or Claude Desktop is valid JSON, so VS Code accepts the file without an error but ignores the server entirely.
If you changed the port in Fusion preferences, replace 27182 in the URL with your port.
2) Verify the connection
- Make sure Fusion is running with the Autodesk Fusion MCP Server enabled, and that a document is open.
- Confirm that autodesk-fusion and its tools appear in the MCP server list. If the server does not appear, reload the window so VS Code re-reads the configuration.
- Switch Copilot Chat to Agent mode and try:
Create a 10 mm cube.If successful, Fusion executes the command in your live session.
If you run into issues, see Troubleshooting.