
Create text in a sketch
Learn how to use the Text tool to create text in a rectangular frame or text that follows a path in an active sketch in Fusion.
Add Text
Create text in a rectangular frame, enter lines of text or reference existing parameters, and format the text.
On the Sketch contextual tab, select Create > Text
 .
.The Text dialog displays.
In the Text dialog, select Text from the Type dropdown menu.
In the canvas, place the text frame:
- Click to place the first corner, then the opposite corner.
- Use the rotation manipulator handle to rotate the text frame, or specify the angle.
- Click to select any snap point on the text frame to change the point around which the text frame rotates.
In the Text dialog, enter text between two
'.For example,
'Example Text'.Optionally, type the name of an existing text parameter and select it to reference it in the expression. To string together an existing parameter and alpha-numeric text add a
+between the parameters.For example,
'Example Text'+ExistingTextParameter1orExistingTextParameter1+ExistingTextParameter2.Adjust additional settings to format the text:
- Font: Select a font from the dropdown list.
- Typeface: Add bold emphasis, italic emphasis, or both.
- Height: Specify text height in units.
- Character Spacing: Specify a percentage to increase the spacing between characters.
- Flip: Flip text in the horizontal, vertical, or both directions.
- Alignment: Select a horizontal and vertical alignment.
Click OK. The text displays inside the text frame in the canvas and a new text model parameter is created for that Sketch feature in the Parameters dialog.
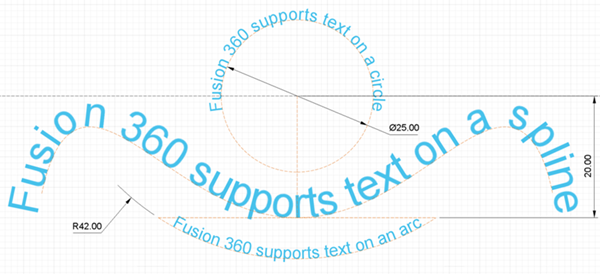
Add Text On Path
Create text that follows a path by selecting the path, entering lines of text, and formatting the text.
On the Sketch contextual tab, select Create > Text
.The Text dialog displays.
In the Text dialog, select Text On Path from the Type dropdown menu.
In the canvas, click to select a sketch curve as the Path for text to follow.
In the Text dialog, enter text between
'. For example,'Example Text'.Optionally, type the name of an existing text parameter to reference it. To string together an existing parameter and alpha-numeric text add a
+between the parameter name and the text string. For example,'Example Text'+ExistingTextParameter1.Adjust additional settings to format the text:
- Font: Select a font from the dropdown list.
- Typeface: Add bold emphasis, italic emphasis, or both.
- Height: Specify text height in units.
- Character Spacing: Specify a percentage to increase the spacing between characters.
- Placement: Place text above or below path.
- Fit to Path: Check to distribute text evenly along entire path.
- Flip: Flip text in the horizontal, vertical, or both directions.
- Alignment: Select a horizontal alignment.
Click OK.
The text displays along the path in the canvas and a new text model parameter is created for that Sketch feature in the Parameters dialog. If you change the path shape, the text adapts to the path.
Tips
- If you plan to use the Emboss tool to emboss text on a solid body, select a font that is not a single line font.
- When Type is set to Text , you can dimension and constrain the text frame to control its size and shape in relation to other sketch geometry.
- When Type is set to Text on Path
 and you modify the path later, the text will adjust along with the path. If the path is a circle, after you create the text, you can use the Move/Copy tool to rotate it around the center point of the circle to align it more precisely.
 - For best results, use a Latin font if you plan to Emboss, Extrude, or Explode the text.