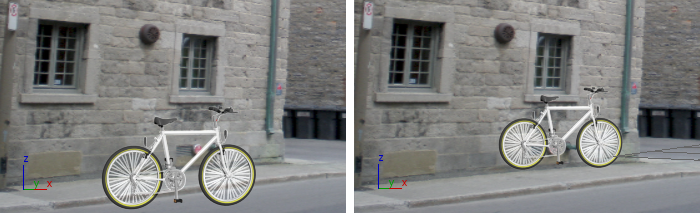
Uses a background image to orient a camera so that its position and field-of-view match the perspective of the image.
-
 Utilities panel > Utilities rollout > Perspective Match button > Perspective Match Controls rollout
Procedures
To set up a viewport so the view you see will match the rendering:
- Assign a background to a viewport.
You can also assign a background by dragging and dropping.
- If the Viewport Configuration dialog
 Background panel is not already open, open it and make sure Aspect Ratio is set to Match Rendering Output (this is the default choice).
 - Use the Material Editor to change the map's Mapping type to Screen.

To place the map in the Material Editor, open both the Material Editor and the Environment panel. Drag the Environment Map button and drop it on the active View (for the Slate Material Editor) or an unused sample slot (for the Compact Material Editor). When 3ds Max prompts you, be sure to choose Instance.
- In the Render Setup dialog Output Size group, choose an aspect ratio that is the same as the aspect ratio of the background image you plan to use.
- In the viewport with the background, choose Point-Of-View (POV) viewport label menu Show Safe Frames.
This ensures that the aspect ratio of the background, as it appears in the viewport, is the same as that of the image itself.
To match a camera to a background:
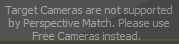
- (Optional.) Create a Free Camera and make the viewport with the background into a Camera viewport.. Tip: The Perspective Match controls also work in Perspective viewports. However, Perspective Match does not work with Target Cameras.
- Go to the Utilities panel. On the Utilities rollout, click Perspective Match.
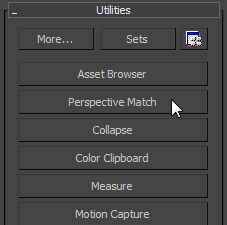
- On the Perspective Match Controls rollout, click to turn on Show Vanishing Lines.
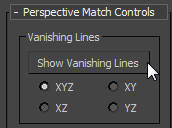
In the viewport, 3ds Max displays six vanishing-line gizmos.
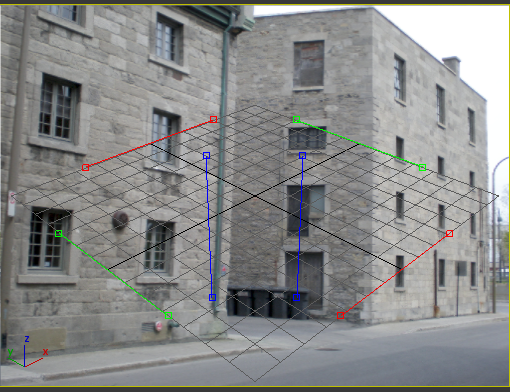
- Use the mouse to align the gizmos with the perspective of the bitmap.
Drag a gizmo to move it, or drag the gizmo's endpoint to resize it. The goal is to align the gizmos so they indicate the vanishing point (or points) of the bitmap scene. Arrange the red (X) and green (Y) pairs of gizmos so they appear to be at right angles to each other. Arrange the blue (Z) gizmos to align with vertical lines.

3ds Max adjusts the position of the camera so the scene perspective aligns with the background.
Tip: Depending on the background art, you might not need to place all six gizmos. The radio buttons in the Vanishing Points group let you display the gizmos for only two axes.While adjusting the perspective gizmos, you can change the size of the viewport, or
 maximize or minimize it.
 - Use the Camera Adjustments Horizontal and Vertical spinners to place the construction grid where you want it.
 Tip: 2D Pan Zoom mode can help you place the vanishing-line gizmos accurately.
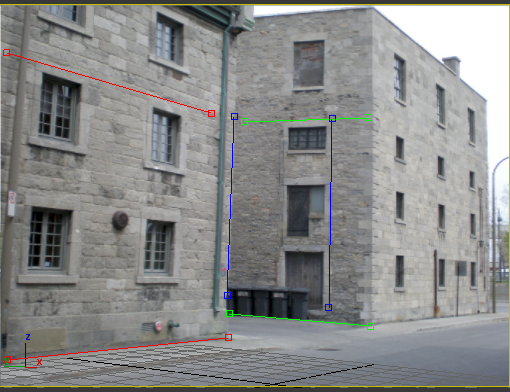
 - Click Hide Vanishing Lines when you are satisfied that you have matched the perspective of the background.

Now when you place objects in the scene, the camera's point of view makes the objects match the background.
- Use the other Perspective Match controls to refine the camera's position.
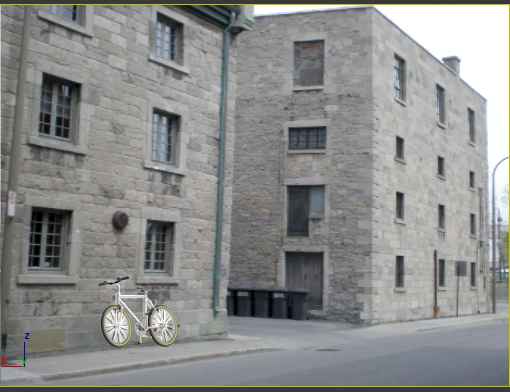
Bicycle geometry casts a shadow on an (invisible) object with the Matte/Shadow/Reflection material.
Interface
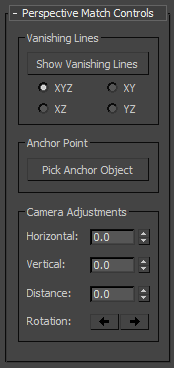
Vanishing Lines group
- Show/Hide Vanishing Lines
- Click to show or hide the vanishing-line gizmos and begin adjusting them. Important: The camera must be a Free Camera. If the viewport belongs to a Target Camera, 3ds Max displays a warning about that in the viewport.
- [axis-selection radio buttons]
- Let you choose the vanishing-line axes to display: either all three axes, XYZ (the default), or a pair of axes.
Anchor Point group
You can choose an object as the "anchor" of perspective matching. When you use an object as the anchor, Perspective Match distance and rotation use that object as the camera's pivot point.
 (Truck/Pan) to place the geometry against the background.
 - Pick Anchor Object
- Click to turn on, then click an object to make it the Anchor.
The button label changes to show the name of the object you picked. If you delete the object, the label reverts to "Pick Anchor Object."
Camera Adjustments group
You can Undo these operations.
- Horizontal
- Pans the construction grid horizontally.
- Vertical
- Pans the construction grid vertically.
- Distance
- Adjusts the distance of objects.
Perspective Match adjusts the distance simply by dollying the camera forward or backward.
Changing the Distance changes the size of an object relative to the background.
- Rotation
-
These buttons rotate the camera about the object you chose using Anchor Point
Pick Anchor Object. Except for the camera's location, this does not change the geometry of the scene. If you have not chosen an Anchor object, the camera rotates about its focal point, instead.
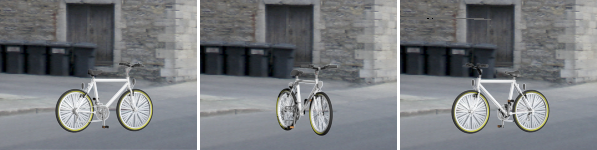
Rotating the camera changes an object's orientation against the background.
 [clockwise] Click to rotate the camera 90 degrees clockwise about the Anchor object.
  [counterclockwise] Click to rotate the camera 90 degees counterclockwise about the Anchor object.