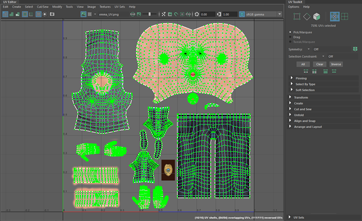
UV Editor new look and feel

UV Editor improvements
- Menu organization: The menus along the top of the editor have been re-organized for a more streamlined workflow. For more information, see UV Editor menu bar.
- Drag Select: It is now possible to drag select components either by activating Drag via Tool Settings or by holding Tab and dragging across them with the left mouse button.
- Grow Selection and Shrink Selection: You can now expand and contract the current selection in the UV Editor by Ctrl + right-clicking the current selection and selecting either option. See Select UVs.
- Texture selection: It is now easier to switch between textures applied to the selected geometry via the UV Editor's Texture menu. You can also instantly apply checker patterns for easier UV adjustments from here. For more information, see UV Editor Textures menu.
- Selection performance: Selecting and deselecting a high number of UVs on a dense mesh in the UV Editor is now significantly faster.
- UV selection consistency: The UV Editor now automatically converts your current selection to the appropriate one before applying certain commands. This saves you from having to perform these conversions manually. After performing these commands, the current selection returns you to your original UV selection. These commands include:
- Normalize
- Unitize
- Flip
- Rotate
- Grid
- Align
- Straighten UV Border
- Sew UV Edges
- Merge UVs
- Separate the selected UV into one for each connected edge
- Split UVs on multiple meshes: The Split UVs operation now works when multiple objects are selected at the same time.
- Improved visibility: When Display Image is enabled with Color Correction, but no texture is loaded, the background no longer changes color.
- Wireframe appearance: You can now modify the color and alpha values of UV shells in the UV Editor. For more information, see UV Editor View menu.
- Multicolor UV Shell display: You now have the option to shade UV shells different colors both in the UV Editor and the Viewport to better differentiate them. For more information, see the UV Editor View menu.
- UV Distortion transparency: You can now modify the alpha values of UV distortion display. For more information, see the UV Editor View menu.
- Finer dimming control: You can now control how much a texture is dimmed in the UV Editor with the Dim options.
- Selection Constraint: You can now narrow your component selection to something more specific, or select edge rings between texture borders using the Select Tool settings.
- Convert to Edge Ring, Contained Faces, or Face Paths now work in the UV Editor. For more information, see the Select menu.
- Prevent Negative Scale now works in the UV Editor. For more information, see the Scale Tool.
- Grid color and default values: You can now adjust the colors of the UV Grid. Additionally, UV Grid default values have been changed to better reflect modern UV workflows. For more information, see UV Editor View menu.
- Isolate Select HUD: The heads-up display now shows when you are in Isolate Select mode. You can toggle this on and off from the UV Editor View menu.
- Flip UVs cut UV edges: You can now control whether or not the Flip UVs command automatically cuts UV edges when flipping components on a UV Shell. For more information, see Flip UVs options.
Object selection mode and Component selection mode now consistent across the scene view and UV Editor
The UV Editor is now aware of the current selection mode in the scene view and vice versa. This means that you can continue selecting the same types of components while switching between the scene view and UV Editor seamlessly.
Cut and Sew edges in the Viewport
You can use the new 3D Cut and Sew tool to separate and attach UV edges directly on polygon geometry in the scene view. This not only saves you from having to go back to the UV Editor, but also allows you to perform these actions using geometry as reference points for cuts. For more information, see Separate and Attach UVs.
Bevel improvements
A post-process has been added to Bevel that makes the results more consistent, particularly when Chamfering is off.
Symmetrize Command
In addition to the Symmetrize Tool, there is now a Symmetrize command that you can use to symmetrize selected UVs. For more information, see Symmetrize UVs.
Previous live surfaces selection
A drop-down menu has been added to the Live Surface field that gives access to a history of other surfaces previously made live. For more information, see Set a live surface .
Multi-Cut enhancements on live surfaces
Cut edges now conform to a live surface once the cut is committed, including manual cuts, edge loop insertions, slices, and all associated modifiers. For more information, see Split polygons with the Multi-Cut Tool or Snap to a live surface.
Quad Draw enhancements
- Surface visibility: Quad Draw overlays are now more visible on live surfaces. You can also manually control the color and transparency. For more information, see Quad Draw Tool Options.
- Quad Draw on selected: Activating the Quad Draw Tool while an object is selected now uses that object for Quad Draw. You can use typical Quad Draw workflows to create new faces or place interpolated points on the surface. For more information, see Quad Draw Tool.
- New hotkeys: You can now press Ctrl + Shift + Q to activate the Quad Draw Tool or Ctrl + Shift + X to activate the Multi-Cut Tool.
Bridging components with symmetry
The Bridge command now recognizes symmetry. For more information, see Bridge Command and Activate or deactivate symmetry.
Viewport 2.0 enhancements
See What's New in General in Maya 2017 Update 3 for Viewport 2.0 enhancements for modelers.