To open the Time Editor Clip contextual menu
- Right-click an Animation clip in the Time Editor
Time Editor contextual menu options
Depending on the area of the Time Editor you right-click, different contextual menus appear with relevant options:
- Split Clip at Current Frame

- Divides the animation at the position of the playback cursor. You can divide a clip into many clips, each containing different segments of the animation that you can reuse and reorder. Splitting a clip in the Time Editor is non-destructive to the source animation.
-

- Trim Before/After


- Sets the clip in and out points so that only part of the original source contributes to the clip. See Trimming clips.
- Trim Before:
-

- Trim After:
-

- Scale Start/End to Current Frame
-
Note: This option is not available for Audio clips.
-

- Scales the clip to make it longer or shorter, slowing down or speeding up its animation, respectively. You can also scale a clip interactively by selecting Scale from the
Time Editor toolbar Edit menu and dragging either end of the clip.
Note: Scaling is different from trimming (changing the source's in and out values). Scaling a clip scales the weight curve along with the clip, but trimming the in/out points crops the clip independently of the weight curves. For more information, see Trim Clips in the Edit Time Editor clips.
- Clip Edge Edit Mode
- Activate the following nodes to perform the following actions interactively.
-
-
Trim

- Lets you set the in and out points of a clip so that only part of the original source contributes to the clip. Select
Trim from the
Edit Mode menu, and place your cursor at the left or right edge of a clip. Notice the change in cursor look. Drag the cursor to trim.

A negative number on top of the clip indicates the number of frames trimmed.
A white dot on a child clip indicates that it is trimmed because of the parent clip. The white dot does not appear if a child clip is too small to display.

A black dot on the trimmed clip indicates that there is animation outside the clip.
See Time Editor Clip symbols for more.
-
Tip: Trim mode is the default Edit mode for the Time Editor. You can also press E with a clip selected to activate Trim mode.
-
Scale

- Lets you speed up or slow down the clip's animation. Select
Scale from the
Edit Mode menu, and place your cursor to the left or right edge of a clip. Notice the change in cursor look. Drag the cursor to scale.

The scale percentage appears at the top of the clip.
Tip: You can also press R with a clip selected to activate Scale mode.Note: Special symbols appear at the trimmed or expanded edge of a clip to show the state of the animation contained inside. See Time Editor clip symbols for more -
Loop

- Lets you repeat a clip's animation multiple times sequentially. Select
Loop from the
Edit Mode menu, place your cursor at the left or right edge of a clip, and drag to loop.

To adjust the looping, click and drag the edges of the looped area of the clip. A Loop After value (0.3 in the above figure) appears to indicate the number of loops the clip contains. If you loop the left side of the clip, then it is the Loop Before value.
When you scale, trim, or loop a clip, the virtual border of a clip becomes the real border to perform all edit operations.
Tip: You can also press T with a clip selected to activate Loop mode. - You can set looping at clip start and end separately. See Clip Loop Before Mode/Clip Loop After Mode in the Time Editor in the Attribute Editor topic.
-
Note: You cannot split a clip once a Hold or Looping has been applied to it. Make it into a Group clip and split it instead.
-
Note: To use Animation layers with a looped clip, create a Group clip from it, and then add layers to the Group.
- Hold

- Lets you extend the last pose frame of a clip for a specified period of time. Select Hold from the Edit Mode menu, and place your cursor to the left or right edge of a clip. Notice the change in cursor look. Drag the cursor to the desired Hold length.
-
 Tip: You can also press Y with a clip selected to activate Hold mode.
 -
Note: You cannot split a clip once a Hold or Looping has been applied to it. Make it into a Group clip and split it instead.
-
Trim
- Delete
- Removes the selection from the Time Editor.
- Cut
- Removes the selection from the Time Editor and copies it to the clipboard to be pasted.
- Copy/Paste
- Duplicates/Pastes the selected object.
Note: The Copy/Paste options in this menu are specific to actions performed in the Time Editor. If you undo a Copy/Paste operation while the active window is not the Time Editor (for example, the Viewport), it will have no effect in Time Editor and vice versa.
- Group

- Groups the selected clips together into a single clip that you can edit as a whole. See Create Group clips.
- Ungroup

- Ungroups the selected Group clip and returns all clips inside the Group to their local time.
Note: If the track that contains the Group clip has no other clips, the track is deleted as well.Note: This option is only active when you select a Group clip.
- The hotkey for this action is Ctrl+Shift+G.
- Select Driven Objects
-
Note: This option is not available for Audio clips.
- Selects all elements that are grouped within the particular Clip/Group clip that are affected by the animation.
- This is useful when working with HumanIK rigs to make sure that all the affected animation controllers are selected, regardless of what HIK keying mode (such as Full Body and Body Part) is applied to the rig.
- For more information on working with Human IK character rigs, see Animate HumanIK charcters in the Time Editor.
- Make Animation Source Unique
-
Note: This option is only available when you use Time Editor Animation Sources for more than one clip.
- Sets the Animation Source for the selected clip as standalone, so you can edit the Animation for the selected clip without affecting any other clips that share the same Animation Source.
- For example, if you copy-paste a clip, the Animation Source is shared between them and duplicating animation curves would be performance inhibiting. Instead, this setting lets the Time Editor only duplicate the required data.
- One exception to using Make Animation Source Unique to create an independent clip is when you have multiple motion capture data performances (such as different Karate moves) stored in a single animation file. In this case, do not cut the Animation Source into multiple pieces. Instead, create a unique Animation Source that contains only the relevant segment by using in the Time Editor menu bar; this creates a separate iteration of the Animation Source.
- Extend Parent
- Resizes a Group clip to include the full length of a clip contained within it. See the Editing parent clips section in Edit animation in Time Editor.
-

- Graph Weight Curve

-
Note: This option is not available for Audio clips.
- Opens the animation clip in the Graph Editor to adjust the weighting. When two or more clips overlap in time and drive the same elements, you can mix them by setting weights that control their relative influence. See Modify Time Editor clips in the Graph Editor for information on using the Graph Editor to change clip animation.
- By adjusting the weight of a clip, you can control how much of an influence it has compared to the other clips in the resulting animation. The higher the mix weight, the more strongly a clip contributes to the animation. Mixing Group clips is an easy way to blend animation at an even higher level. See Key Time Editor clip weights for further information about clip weighting.
- Mute
- Activate this option to temporarily disable (muted) the clip. This is the same function as the Mute
 button in the
Roster.
- Ghost

-
A Time Editor Ghost is a simplified representation of the animated object that you use to preview the influence of each clip before crossfading, transitioning, and linear interpolation. Use Ghosts for guidance with blending motion capture animation files or to previsualize pose matches with matched poses (see Reorient a character's position with Relocate).
See Previewing animation with Time Editor Ghosts. -
- Enable
- Displays a clip ghost only for the selected clip.
Note: Activating Enable in this menu is not the same as activating the track Ghost
 button in the Roster. Click
Enable to show ghosts only for the selected clip. This lets you assign different Ghost colors for other ghosted clips on the track.
- Enable user defined ghosts
-
Toggles the display of User Defined Ghosts. See Create a custom Clip Ghost.
- Set/Edit User Defined Ghosts
- Opens the User Defined Ghosts dialog, where you can choose from different elements in the scene to represent the animation as a ghost. See Create a custom Clip Ghost.
- Reset Timing
- Moves the selected clip back to the 1st frame.
Note: If the selected clip is in a sequence of clips on a track, it moves to frame 1 on top of the other clips, creating a blend.
- Rename Clip...
- Lets you enter a new name for the selected clip.
Attributes
- Add/Remove Selected Attributes
- Adds/removes selected
Channel Box attributes to/from the clip.
Note: When you add attributes using this option, no animation is imported. Add Attributes only captures the current values and adds them to the clip.
Layers
- Create Override
- Creates an Override Layer for the clip. See Layer Clip Modes in the Add Layer Clips to the Time Editor topic.
- Create Additive
- Creates an Additive Layer for the clip. See Layer Clip Modes in the Add Layer Clips to the Time Editor topic.
- Create Transition
- Creates a bridging transition between the selected clips. See Create transitions between Time Editor clips for information on how to create transitions.
- Remove Transition
- Undoes any transitions created between the selected clips. See Create transitions between Time Editor clips for information on how to create transitions.
- Crossfade
- Lets you style your crossfades. Crossfades in the Time Editor are treated as animation curves. If an animation curve was already present for your clip, setting a crossfade curve overwrites it. See Create custom crossfades in the Time Editor.
Note: Crossfading can occur only if the two clips involved share one or more common attributes.Note: The default (non-custom) curves do not create a curve in the scene; they are implemented internally inside the clips. When you want to specify how two clips crossfade, use the Custom options instead.
- Choose from the following options:
-
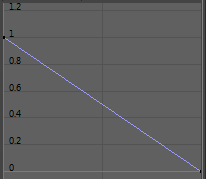
- Linear (default)
- A Linear crossade between two clips means the left Clip's value fades out linearly while the right clip's value fades in linearly.
- If represented as an animation curve, a linear crossfade would look like a diagonal line.
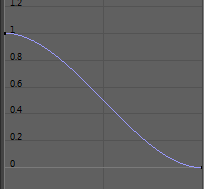
- Spline
- A Spline crossfade between two clips creates a smoother fade out and fade in between the clips. If represented as an animation curve, this crossfade would look like a diagonal line with a curve at both ends.
- Stepped
- A crossfade where the left clip's value is used through the transition.
- Stepped Middle
- A crossfade in which the value jumps from the left clip's to right clip's in the center of the transition.
- Choosing a stepped middle crossfade creates an abrupt transition, which means that halfway between the transition, the left clip suddenly changes to the right clip's value. If represented as an animation curve, the crossfade would look like a straight line that suddenly dropped away.
- Stepped Next
- A crossfade where the right clip's value is used thorough the transition.
- Custom
- Activates the Custom Crossfade option in the Crossfade section which lets you edit the crossfade as an animation cuvre. The first two options Linear and Spline are to provide a starting point on which you base your own modifications with the Edit Custom Curve option.
- Choose from the following options:
- Custom Linear
- Creates a crossfade curve as a straight line. See the description of Linear, above.

- Custom Spline
- Creates an crossfade curve that is smooth. The tangents of the curve are co-linear (both at the same angle), which ensures that the crossfade curve has a smooth smoothly entrance and exit. See the description of Spline, above.

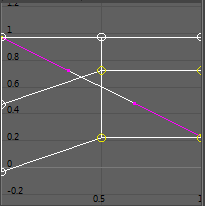
- Edit Custom Curve
- Opens the
Graph Editor so you can modify the current crossfade curve.
Note: This new curve replaces any curves that were previously in the Graph Editor.

- Retime
- Retiming options let you alter the timing of a clip. Time warping does not change the length of the clip while Speed curves do. See Change Clip Timings in the Time Editor for an explanation fo both types of curves.
-
- Create and Edit Time Warp
- Creates a Time Warp curve for the selected clip. See Create and edit Time Warps with the Time Editor for more information.
- Create and Edit Speed Curve
- Creates a Speed Curve for the selected clip. See Alter clip speed with Speed Curve for more information.
- Enabled
- Shows whether the clip has a Time Warp /Speed Curve active on it.
- Edit
- Opens the curve in the Graph Editor.
- Reset
- Undoes any changes to the Time Warp/Speed Curve, and restores it to its default state.
- Delete
- Deletes the Time Warp/Speed Curve.
- Convert to Time Warp
- Changes a Speed Curve to a Time Warp curve. See Change Clip Timings in the Time Editor for an explanation of the difference.
- Relocate
-
- Create Relocator
-
Creates a marker that you can use to move your animated character to another location. See Reorient a character's position with Relocate.
- Select Relocator
- Selects the Relocator for the selected track.
- Reset Relocator
- Restores the character to its initial position in the scene, but retains the Relocator marker so you can continue to relocate your character.
- Remove Relocator
- Deletes the Relocator from the scene.
- Match Relocators...
- Opens the Matching Options window. For information on how to match animation clips see Match poses with the Time Editor Relocators.
- Remap and create new clip for Namespace
- Provides a list of namespaces in the scene that you can remap your animation to. See Remap animation by Namespace.
- Bake
-
- Bake to New Clip/Bake to New Clip and Delete
-

- Merges the selected clip to a single clip, creating only the minimum number of keyframes necessary in the merged clip. Deletes the original animation, if specified.
- Once you have baked your clips, you can perform editing operations on it as if it were a single clip. See
Edit animation in the Time Editor.
Note: You can use Bake to new Clip with Group clips or multiple selected clips.
- For more information about Baking clips, see Bake Time Editor clips.
- Bake to Scene/Bake to Scene and Delete
- Merges the selected clip(s) to the scene. Deletes the original animation, if specified.
- Flatten Layers
-

- Merges all layers of the selected clip into a single layer. See Add Layer Clips to the Time Editor.
- For more information about Baking clips, see Bake Time Editor clips.
- Export Selected...
- Open
Export Selected
 to open the
Time Editor Export Selection options, where you can saves the selected clip(s) as Maya ASCII (.ma) or binary (.mb) files or create a thumbnail or playblast of your selected clip. For steps on exporting your clips, see
Export Time Editor clips.
- Export All Clips to FBX...
- Opens the Export All Clips to FBX Folder window so you can save out all the clips in the scene as individual .fbx files, named for their original clip name.
- Open in Local Time Tab
-
Note: This option appears in the Clip Contextual menu only if you right-click a Group clip.
- Opens a Local Time Tab to let you view the contents inside a Group clip before timing operators (that is, the original timing) imposed by the Group were applied. See Create Tabs for Group clips for information on creating Local Time Tabs and Global and Local Timing in the Time Editor for an explanation of Global and Local timing.