Use this general workflow to create site elements using Site Designer.
This workflow applies to soft terrain (building pads, berms, swales, mass grading, detention ponds), feature lines (toposurface contours and graded lines), streets, curbs (including parking lot islands), retaining walls, sidewalks, and parking lots.
Soft terrain elements and feature lines modify the toposurface by automatically placing new points and adjusting existing points. For streets, curbs, sidewalks, retaining walls, and parking lots, Site Designer modifies the toposurface and adds elements representing the hardscape to the model. Host lines define the position of these elements. Special Site Designer families control the geometry of the elements and modify the toposurface as appropriate.
- Working in the site plan or a 3D view, use the
Revit Model Line or Detail Line tool to create geometry for the host line of the site element.
- Parking lots require closed loops. Other types of site elements can use closed loops, single lines, or multi-segment lines.
- For a street, sidewalk, or retaining wall, the host line represents its center line.
- For a soft terrain element that is not a closed loop, the host line represents its center line.
- For a curb, the host line represents the curb face.
If you plan to make multiple site elements of the same category, you can create geometry for all of them now. Then you convert each line into a site element individually, specifying the family, type, and other characteristics for each.
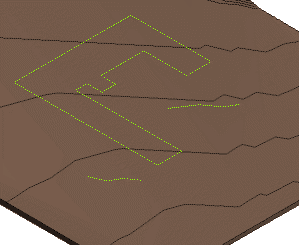
The following example shows sample host lines for a building pad and 2 swales.

- Click
Site Designer tab
 Locate panel, and click the tool for the element to add to the toposurface.
The Locate dialog displays for the selected element category.
- Complete the fields as follows:
- Family. Select a family from the list, or click the Browse button to select a family to open in the project.
- Type. Select a family type for the new element.
- Name. Specify a unique name for this element.
- Elevation. Specify whether the site element follows the existing terrain (Relative Elevation from Toposurface) or cuts into the toposurface to maintain a constant elevation (Constant Elevation). Enter the distance above (a positive number) or below (a negative number) the toposurface.
These elevation parameters do not apply to retaining walls, parking lots, or curbs.
- Segment or Chain. Indicate whether the site element should use the entire host line that you will select (Chain) or only the selected portion of it (Segment).
- Create a copy. (Optional) When creating an element, Site Designer automatically hides its host line. If you want the host line to remain visible and available for reference in the model, select this option. Site Designer creates a copy of the host line to use as the basis for the site element.
- Use an Existing Host Line. Select this option (instead of Draw Host Line) so you can use existing geometry as the host line for the site element.
The Locate dialog for some element categories have additional or different fields. Complete them as appropriate.
- Click Insert.
- In the drawing area, select the geometry that you created using the
Revit Model Line or Detail Line tool in Step 1.
If you selected Chain in the Locate dialog, Site Designer uses the entire line or loop as the host line for the element. If you selected Segment, it uses only the selected segment as the host line.
Site Designer uses the host line to create the site element, adjusting the underlying toposurface if needed.
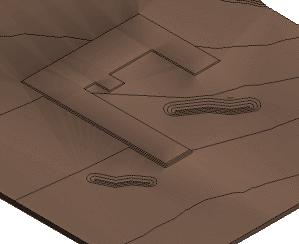
Note: You can only select one line or closed loop at a time. The following image shows multiple soft terrain elements, which were created individually.
The Locate dialog redisplays.
- To create another site element of the same category, repeat the process.
To exit the Locate dialog, click Close.