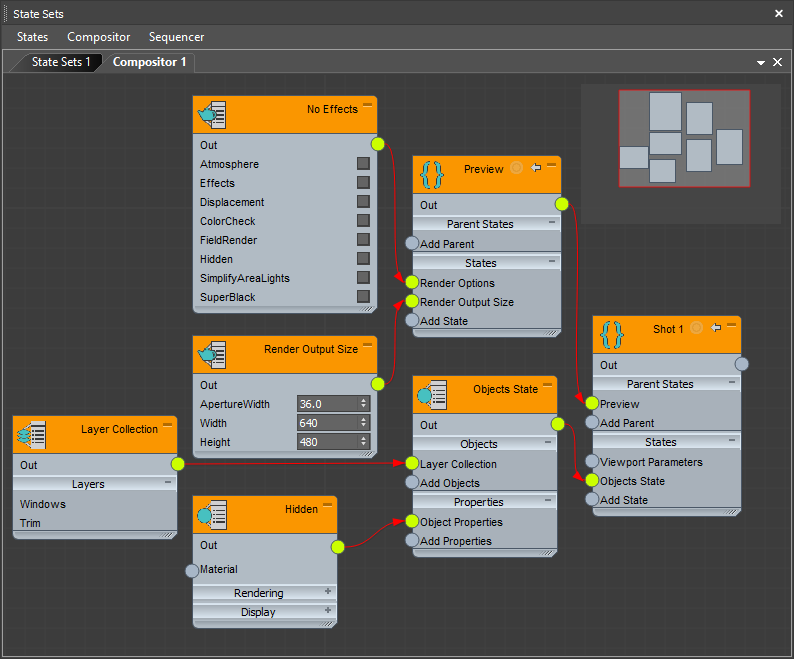
Compositor View is an optional panel in the State Sets interface that displays a schematic of states that can output rendered images (not including the Objects state). Actions that can be performed include rewiring components, color correction, linking with external compositors such as Adobe After Effects, and more.

Compositor View panel with nodes shown in the active view
Using a Node-Based Workflow
The Compositor View user interface uses Slate, the same SDK used in other node-based features such as MCG and the Slate Material Editor. Using the Slate SDK allows for future toolkit expansion.
Note: Scenes created with earlier versions of 3ds Max that used an older Compositor View may not behave as expected, so it is best to use this feature only with scenes created in 3ds Max 2018 or higher.
Using a node-based workflow, you can set specific properties for each state. This workflow operates in parallel to the record-based workflow where you set the parameters to change directly in the 3ds Max UI. A node-based setup provides several advantages over the recording method, including:
- The ability to directly set parameters for states and instance between them;
- A visualization of what parameters have already been set for individual states, as well as for parent states and instanced parameters;
- An easier process for adding and removing state parameters.
There are currently approximately thirty nodes available for creation. While these nodes focus on render pass functions, they are not limited to that purpose. The example shown below, for instance, is a node-based workflow used to Freeze and XRay items on top of a desk. By using similar techniques, Compositor View can be very helpful for general scene management.

Working and Navigating in Compositor View
Use the following methods to work with nodes:
- To select a node, click it directly in the active view. To select multiple nodes, drag a selection or use Ctrl+click.
- To move selected nodes, drag them across the active view.
- To delete selected nodes, press Delete or right-click and choose Delete.
- To resize a node, drag its bottom-right corner. If the node contains a thumbnail, you can drag horizontally, vertically, and diagonally, and the thumbnail scales while retaining correct proportions. If the node has no thumbnail, you can scale it horizontally only.
- To minimize a thumbnail to the node's title bar, double-click the image. Double-click the minimized thumbnail to restore it to the previous size.
- To wire two connectors together, drag between them. Typically you do this between the output connector on the right side of one node and the input connector on the left side of the other node.
- To delete a wire, either drag one end away from the connector and drop it in an empty area of the window, or right-click the wire and choose Disconnect Edge.
- To clean up the arrangement of nodes, choose Auto-Layout Nodes from the Compositor menu or the right-click menu.
- To expand or collapse a node or parameter group on a node, click the button in the top-right corner: + to expand or - to collapse.
Use the following methods to navigate the active view:
- To zoom in or out, scroll the mouse wheel.
- To pan, click the middle mouse button and drag.
- To move the view, click or drag in the shaded area in the top-right corner known as the Navigator (or Radar).
- To close Compositor View, click the X button in the top-right corner.