Use this procedure to add a component to a detail component database and create a blank size table to which you can then add rows representing the sizes in which the component is available. When you add a component, the values you specify on the General and Parameters tabs of the New Component dialog box are used to create one or more recipes for drawing the component in different views. Each recipe specifies the type of jig, or drawing routine, for placing the component in a specific view. The recipe may also contain information pertaining to layer and hatch pattern.
Note: This procedure can be used to add components to the default imperial and metric detail component databases supplied with the software, or to populate databases that you create.
- Click

 .
.

- Click
 to enter edit mode.
- Select a database from the Current detail component database list.
- Expand the root node and group/subgroup nodes as necessary until you can select the node to which you want to add a component table.
- Click
 .
.
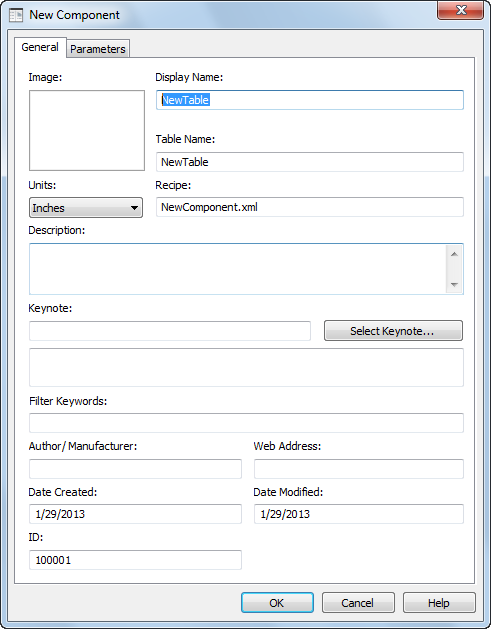
The New Component dialog box is displayed.

- On the General tab, specify the following values as applicable for the component you are adding:
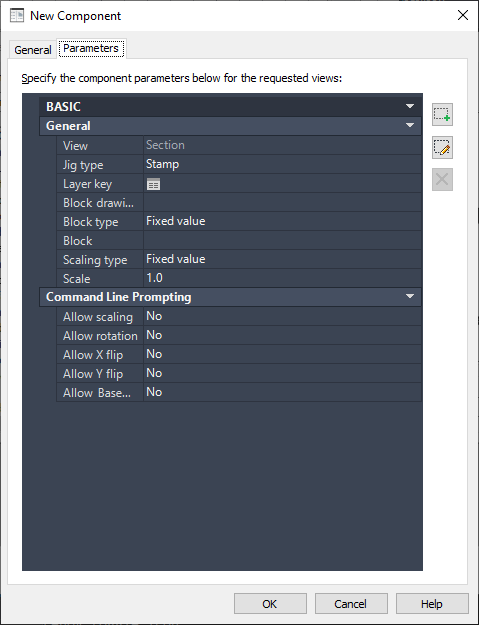
Value Name Description/Instructions Image Right-click the Image box, and click Specify Image to browse images available for the selected group in the location specified by its Path Key value. The image you select will be displayed on the Image tab of the Detail Component Manager when this component is selected. Display Name Enter the name you want displayed for this component in Detail Component Manager. Table Name Enter the name of the size table for this component. Units Select a unit from the drop-down list. Recipe Enter a name for the RecipeSpec XML file to contain the recipes you specify for drawing this component. Description Enter the description you want to display for this component on the Information tab in the Detail Component Manager. Keynote Click Select Keynote to browse for or create a keynote to be the default for this component. Filter Keywords Enter a comma-delimited list of keywords to be used in searching for this component. Author/Manufacturer Enter the name of the person or other entity responsible for this component. Web Address Enter the URL for the author/manufacturer. Note: The ID property on the General tab is a read-only value identifying a particular Groups table in the selected database. These values are assigned automatically as groups are added to a database. - On the Parameters tab, if desired, select a jig type other than the default (Stamp) for the default Section view, and then specify parameter values to define the component according to instructions referenced in the table following the illustration below. You can also change the default view by renaming it (click
 ), or you can create additional views by clicking
 . Any views you create or rename are then available from the drop-down list.
Note: You can specify only one jig type for each view.
- Click OK.
You can now add a table row for each available component size. You can also add, edit, or delete columns as needed.