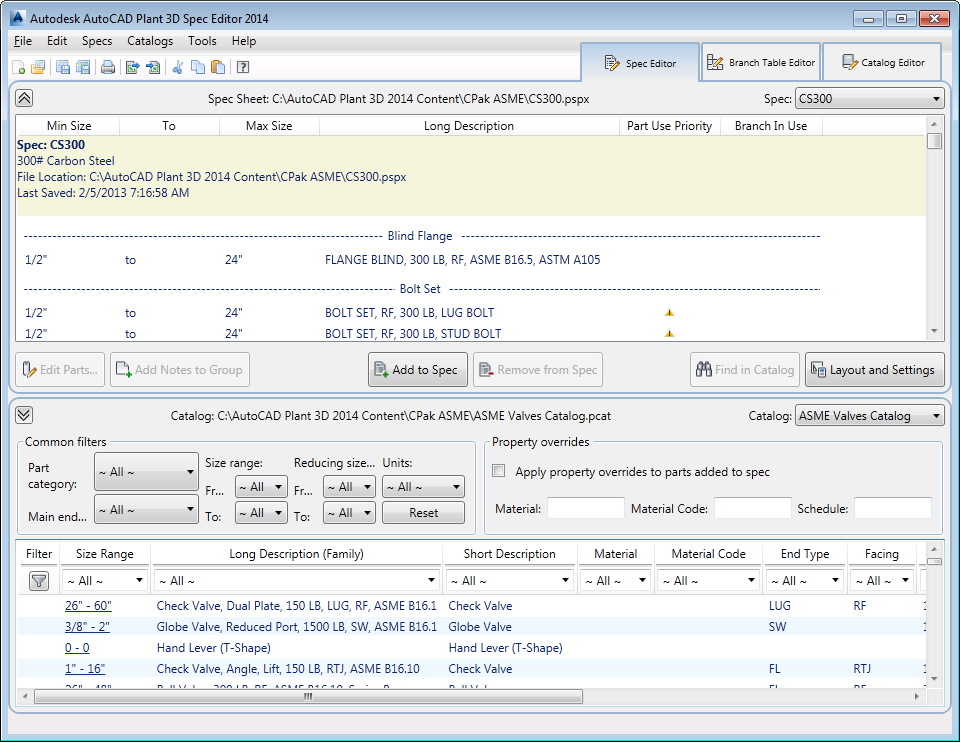
Creates and modifies spec sheets.
Using the Spec editor, you can add parts from a catalog to create a spec sheet. You can then specify which fittings to use when routing for a specific pipe size.

You can modify catalogs only in the catalog Editor. The Catalog Browser that appears in the Spec Editor tab is Read-only.
Spec Sheet
- Min Size
-
Displays the smallest size that is included in the spec for the part. You can use the Part List Tab (Edit Parts dialog box) to change the size range.
- Max Size
-
Displays the largest size that is included in the spec for the part.
- Part Use Priority
-
Sets the order that parts are used based on part size.
 A warning icon displays when a size conflict exists and priority has not been set.
 A green circle displays when size conflicts are resolved.
Right-click in the column to display the Part Use Priority dialog box.
- Branch in Use
-
 Displays a check icon if a part is used in the
Branch Table.
- Edit Parts
-
Displays the Edit Parts dialog box.
- Add Notes to Group
-
Displays the Add Notes To Group dialog box.
- Add to Spec
-
Adds the parts selected in the Catalog window to the spec. If you have Property overrides set, the parts added to the spec use the override values.
When you add parts to the spec, all part sizes in the part group are included. You can use the Edit Parts dialog box to specify a size range in the spec.
- Remove from Spec
-
Deletes the selected parts from the spec.
- Find in Catalog
-
Locates the selected part in the catalog. The catalog that contains the part is made current and a column filter is set. You can clear the filter to display all parts in the catalog.
- Layout and Settings
-
Displays the Spec Editor Layout and Settings dialog box.
Catalog Browser
- Apply property overrides to parts added to spec
-
Sets property values to use when adding a part from the catalog to the spec sheet. Property overrides provide a quick way to set the properties for the parts added to the spec.
The override properties are Material, Material Code, and Schedule. In AutoCAD Plant 3D toolset, you cannot specify other property types to override.
- Reset
-
Removes all common filters.
- Clear Filter
-
Removes column filters, including the description filter set with Find in Catalog.