Use this sample study type with Generative Design in Revit to generate alternatives for the placement of objects in a defined space, such as trees in a park or people in a building lobby.
The left image shows an outcome in Generative Design. The right image shows the outcome when it's integrated into the Revit model.
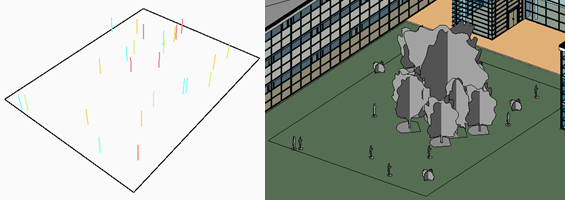
This study generates a series of scenes with selected elements. It places the elements in clusters that imitate the organic positioning of random elements in a space. By using this study type, you can quickly generate multiple scenes without needing to place each element manually.
In this topic
Goals
This study is intended to be used with the Randomize method. However, you can choose another generation method.
If you choose Optimize, you can set the following goals, selecting Minimize or Maximize for each:
- Average distance to center of room
- Average cluster spacing (the average amount of space between clusters of placed elements)
- Number of elements
Accessing the study type
In the Create Study dialog, the study type is available from the Autodesk Samples folder.
To open the study type in Dynamo, navigate to this folder:
- %PROGRAMDATA%\Autodesk\AECGD\Revit\Samples <release>\<language-locale>
If you can't find the study type in that location, you can download it using the following link. The ZIP file contains the DYN file and its Dependencies folder. Unzip (extract) its contents to a folder on your computer.
Preparing the model
During the process of creating the study, you'll select the target room, family instances (such as desks), and obstacles. To create a study of this type, the Revit model must contain the following:
- A room where the elements will be placed.
For an outdoor area, use room separators to define its boundaries, and place a room element in the area.
- One or more obstacles.
The room must contain at least one element that may obstruct placement of the entourage, such as a column in a building or a lamp post in a park. If the room does not contain any natural obstacles, add one in a corner of the room.
To prepare the model
- Open the
Revit model.
If desired, you can download and use rac_advanced_sample_project.rvt with this study type.
- Open a view that contains the target room.
For example, in rac_advanced_sample_project.rvt, open the 01 - Entry Level floor plan.
- To make it easier to select elements in the model when creating the study, turn on
visibility in the view:
- for room reference lines
- for elements to be placed and obstacles to be avoided (such as categories for Entourage, Furniture, and Planting)
For example, for rac_advanced_sample_project.rvt, type VG to open the Visibility/Graphic Overrides dialog. Then expand categories to turn on visibility for the following: Lines > Room Separation; Rooms > Interior Fill and Reference; and Planting.
- Locate or create the room where you want to place objects.
For example, in rac_advanced_sample_project.rvt, create an outdoor room by using room separators to define the boundaries in the entry area outside the building. Then place a room element in the area.
- Place one or more individual elements that are obstacles to be avoided when placing entourage.
For example, for a study that places people in a park, trees and lamp posts might be obstacles.
In rac_advanced_sample_project.rvt, the existing trees are obstacles. If desired, you can add more elements, such as lamp posts and benches.
Inputs
When creating a study, you can specify the following inputs.
Select
- Select room: In the Revit model, select the target room.
- Select family type to place: In each drop-down, select one instance for each family to be placed randomly about the room.
- Select obstruction elements: Select the elements to be considered as obstructions when placing the entourage. In this case, you must select each individual obstruction element; you are not selecting a family instance to represent all elements of that type. After selecting these elements, click Finish on the Options Bar.
Choose variables
- Total number of elements to place: The study varies the number of elements placed, using the selected family instances.
- Number of clusters: The study places clusters of elements using organic positioning across the room. Select the check box to vary the number of clusters placed.
- Random seed for placement: This value drives the generation of the randomized cluster locations for each outcome.
- Spacing per cluster - minimum, maximum: How close together should the element clusters be? Indicate whether you want the minimum spacing and maximum spacing to vary during the study.
If you want these values to vary in the study, select the check boxes. To use a constant value, clear the check box and use the slider to set the value.
Outputs
Each outcome displays the following outputs:
- Average distance to center of room: The average distance (in project units for the Revit model) of each placed element to the midpoint of the defined space.
- Average cluster spacing: The average amount of space (in project units for the Revit model) between each cluster of placed elements.
- Number of elements: The number of elements that were placed in the room for the selected outcome. If you chose multiple families, it represents the combined total of instances for the selected families.
Geometry visualization
The following is a sample outcome for placing different types of elements in a room. It is a 3D view of the room showing an abstracted representation of the placed elements.
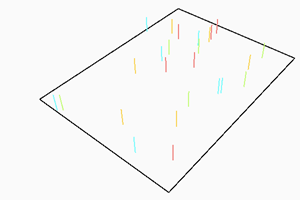
The room boundary appears as a black outline. The placement of the elements is indicated by the vertical lines, using a different color for each family.
When viewing the outcome in the Details pane of the Explore Outcomes dialog, you can drag the 3D view to see the elements from different angles.
To see it in a 3D view of the model, you must integrate the selected outcome into the model.