
The preset sculpting tool settings are an excellent starting point for most sculpting operations, but you can also edit the Tool Settings to suit your needs.
To edit the sculpting tool settings
- Do one of the following:
- Double-click a sculpting tool on the Sculpting shelf.
- Select
Mesh Tools > Sculpting Tools and click
 beside any of the tools.
- In the
Tool Settings window that appears, edit the settings to modify how the sculpting tool affects the surface of the model. See
Sculpting tool settings.
Tip: Click Reset at any time to reset the tool to its default properties.
The Size and Strength settings control the radius of the tool cursor and how much influence it has when pushing or pulling vertices on the surface of a model.
The circular outline that appears when the cursor is above a model indicates the brush Size as well as the area in which the Falloff occurs.
- (Optional) Click the pin icon
 to save the
Brush Size setting for the selected tool.
to save the
Brush Size setting for the selected tool.
(All the other tools' unpinned Brush Sizes share the same value.)
Brush
- Size
-
Sets the radius of the tool.
Hotkeys: B + drag or middle mouse button (MMB)-drag left/right to adjust the brush size. B + MMB-drag left/right or Ctrl + MMB-drag left/right to adjust the brush size from 0.
Tip: Click the pin icon to save the
Brush Size setting for the selected tool. All the other tools' unpinned
Brush Size settings share the same value.
- Size Units
- Lets you set the size of sculpting tool using screen space or world space units. By default, size is measured in world space units (for example, a default Size of 100 = a radius of 100 centimeters). When Screen Pixels is selected, size is measured in screen space based pixels.
- Strength
-
Determines how much the tool affects the surface. Depending on the tool, this value represents either a percentage of the maximum power available or a height expressed in world space units.
Hotkeys: M + drag or MMB-drag up/down to adjust the brush strength. M + MMB-drag up/down or Ctrl + MMB-drag up/down to adjust the brush strength from 0.
- Smooth Method
-
Specific to the Smooth Tool. If the object has blend shape deformers, this specifies whether to smooth all target shapes or just the one currently in Edit mode in the Shape Editor. For more information on blend shape deformations, see Shape Authoring.
- Twist
-
Specific to the Grab Tool. Rotates vertices on a mesh using the brush radius and falloff. The direction of the rotation is determined by the Grab Tool's Direction setting. The tool's brush ring turns white when Twist is active.
Hotkeys: Ctrl-drag left/up to rotate in a counterclockwise direction. Ctrl-drag right/down to rotate in a clockwise direction.
- Direction
-
Specifies the direction vertices move when affected by a tool:
- Center Normal
-
Moves vertices in the direction of the normal of the face directly under the center of the tool.
- Averaged Normal
-
(Default) Moves vertices in the direction of the average of the normals of all affected faces.
- Vertex Normal
-
Moves each vertex in the direction of its own normal.
- Forward
-
Moves vertices in the direction of the stroke.
- Right
-
Moves vertices perpendicular to the direction of the stroke.
- X
-
Moves vertices along the world space X-axis.
- Y
-
Moves vertices along the world space Y-axis.
- Z
-
Moves vertices along the world space Z-axis.
- Camera
-
Moves vertices toward the camera.
- Screen
- (This is the default setting for the Grab brush.) Moves vertices along the screen plane.
- Invert
-
Inverts the function of the tool. For example, if the primary function of the tool is to pull vertices up, its inverse is to push vertices down. Not all tools have an inverse function. The tool's brush ring turns white when Invert is active.
Hotkey: Ctrl
- Paint Method
- Specific to the Freeze Tool and Mask Tool. Determines how frozen/masked areas are applied to the model.
- Paint
-
(Default) Applies freezing while simultaneously smoothing the edges of the frozen areas.Note: In Maya 2016, Paint was called Paint & Smooth.
- Smooth
-
Switches the current brush from applying freezing to smoothing any existing freezing.
- Symmetry
-
Reflects a stroke from one side of a model to the other, along the specified axis. See Sculpt using symmetry.
Note: The Symmetry setting persists when you reopen your scene.
- Off
-
Strokes are not reflected.
- Object X
-
Reflects strokes across the local space X-axis.
- Object Y
-
Reflects strokes across the local space Y-axis.
- Object Z
-
Reflects strokes across the local space Z-axis.
- World X
-
Reflects strokes across the world space X-axis.
- World Y
-
Reflects strokes across the world space Y-axis.
- World Z
-
Reflects strokes across the world space Z-axis.
- Update Plane
- Specific to the
Flatten,
Wax,
Scrape,
Fill, and
Amplify tools. Recalculates the underlying tool plane for each stamp update in a stroke. When on (default), the tool adheres to the curvature of the sculpted surface. When off, the underlying plane is determined by the initial stamp and remains fixed for the duration of the stroke.
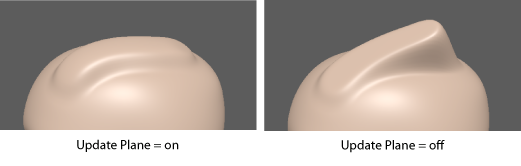
- Whole Stroke
- Specific to the
Flatten,
Wax,
Scrape,
Fill, and
Amplify tools. Continuously recalculates the underlying tool plane for each vertex affected during a stroke, creating a more planar effect throughout the stroke.
Whole Stroke is only available when Update Plane is on.
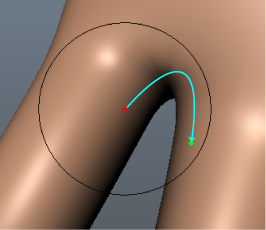
- Grab Silhouette
-
Specific to the Grab Tool. When on, the tool grabs the front and back sides of the mesh silhouette together to modify it evenly. For better control, use an orthographic view (top, side) when applying this tool. This option is off by default.
- Follow Path
-
Specific to the Grab Tool. Makes the mesh follow the path of your stroke as you pull extensions out with a sweeping gesture. Stroke more slowly to extend the mesh further. When off, the Grab brush pulls extensions out along a straight line. This option is off by default.
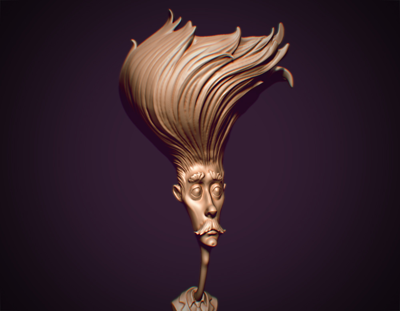
Image courtesy of Andrei Cirdu
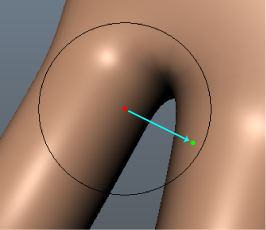
- Constraint
- Specific to the
Relax,
Smear,
Pinch, and
Grab tools. Ensures that the selected tool does not lift or depress the surface while sculpting a mesh. For example, when
Constraint is set to
Surface, you can use the Grab tool to slide edges along a surface without deforming the shape of the mesh.
Note:
 If a live surface is defined when you activate these brushes, they automatically snap to the live surface and
Live Surface is displayed as the
Constraint. See
Set a live surface.
If a live surface is defined when you activate these brushes, they automatically snap to the live surface and
Live Surface is displayed as the
Constraint. See
Set a live surface.
- Unfreeze All
-
Specific to the Freeze Tool. Removes all of the freezing on the selected meshes.
Hotkey: Shift + U
- Invert Frozen
-
Specific to the Freeze Tool. Reverses the frozen and unfrozen parts of the active mesh.
Hotkey: Ctrl + Shift + I
- Flood
-
Paints the respective effect over the entire active blend shape target.
- Unmask All
-
Specific to the Mask Target Tool. Removes any masks on the active blend shape target.
- Invert Mask
-
Specific to the Mask Target Tool. Swaps masked areas for unmasked areas on the active blend shape target.
- Spacing
-
Controls the stamp frequency/continuity on a stroke. Depending on the Size and Falloff settings for a tool, the Spacing can be set to a higher value to refine the tool behavior and improve the appearance of the stroke. The default setting is 6.25 and ranges between 0 and 100. The higher the setting, the more gaps appear on the stroke, depending on the tool settings.
- Buildup
- Controls how quickly the brush deformation grows to reach its maximum strength in a single stroke. For example, if the Buildup value is 100, the maximum strength is reached immediately when you start a stroke. If the Buildup value is 10, it takes many passes over an area to build up to the maximum strength."
- Steady Stroke
-
Helps to produce a smoother stroke by filtering mouse/stylus movement. When on, a vector displays on the tool cursor and no stroke appears until you drag a distance equal to the length of the vector. The length of the vector is set by the Distance setting. See Produce smooth tool strokes.
- Distance
-
Sets the length of the Steady Stroke vector on the tool cursor.
Falloff
Lets you specify how the tool effect diminishes from its center point to its outer edge. The falloff is represented as a curve that can be edited. See also Adjust sculpting tool falloff.
- Falloff Type
- Falloff controls how the sculpting tool's strength diminishes from the center of the brush towards its outer edge. The sculpting tool assigns a falloff value to each vertex within the brush's radius depending on its distance from the center point. The farther a vertex is from the center point, the more falloff is applied. The following falloff types use different methods to measure this distance, and produce unique results.
- Surface/Volume
- (Default) Surface/Volume is a combination of the other two falloff types. To determine which vertices to affect, the brush walks along the surface until it reaches the end of the surface or the edge of its radius, whichever comes first. To determine the falloff values of each vertex, the brush draws a straight line from the center of the brush to each vertex.
- Surface
- The brush measures distance by starting at its center point and walking along the surface to find vertices. It searches for vertices until it reaches the end of the surface or the edge of the brush's radius, whichever comes first. Vertices are assigned a falloff value depending on how far away they are from the center point. Surface falloff is useful when you want the sculpting tool to conform to a surface. For example, you can separate the upper lip from the bottom lip on a character's face using this falloff type.
 Note: Sculpting with Surface falloff may result in a slower performance than sculpting with the other falloff types.
 - Volume
-
The brush measures distance by drawing a straight line from the center of the brush to each vertex within the brush radius. Vertices are assigned a falloff value depending on how far away they are from the center point. Volume falloff affects all the meshes that are within the brush radius, even if there is no bridge between separate meshes.
- Falloff curve
- Controls the profile (cross-section) of sculpting tools. The falloff curve determines how the tool strength diminishes from the center towards its outer edge. Depending on how you set the falloff, your sculpt strokes can feather off gently, blending smoothly with the surrounding surface, or appear with a sharp edge. See Adjust sculpting tool falloff.
- Snap to Grid
-
Constrains points to the Falloff curve grid.
- Reset Curve
- Resets the falloff curve to its default shape.
- Save Custom Curve
- Saves the current falloff curve to the Custom Curve presets in the Tool Settings.
- Preset Curve
- Lets you quickly set the Falloff curve by selecting from frequently used shapes.
- Custom Curve
- Lets you quickly set the
Falloff curve by selecting from custom shapes.
Ctrl-click a custom curve image to delete it.
Stylus
- Min Brush Size
-
Specifies how small the tool is when the lightest pressure is applied to the pen, expressed as a percentage of the tool’s Size setting. For example, a Min Brush Size % of 100 indicates there is no size variance, regardless of the pressure applied.
- Min Brush Strength
-
Specifies how weak the tool strength is when the lightest pressure is applied to the pen, expressed as a percentage of the tool's Strength value. For example, a Min Brush Strength % of 100 indicates there is no strength variance, regardless of the pressure applied.
Stamp
Stamps modify the strength of the sculpt brush according to the gray scale values in the stamp image. The darker the overall values the lower the strength of the tool. Not all sculpt brushes work with stamps. See Sculpt using stamps.
- Use Stamp
-
Turns on the selected stamp for the tool. Use Stamp auto-activates whenever a stamp image is selected.
- Image
- Displays an image of the currently selected stamp. Double-clicking the stamp image opens the
Sculpting Stamps folder in the
Content Browser. You can also drag and drop any of the stamp thumbnails from the
Content Browser into the Image slot.
Right-clicking the stamp image lets you select from the following options: View Image (in the Content Browser), Refresh Image, Import Stamp, Pick Stamp, or Clear Stamp.
- Import
- Imports an image from file and loads it as a stamp for the currently selected sculpt tool. See Save images for stamps.
- Pick Stamp
- Opens the Sculpting Stamps folder in the Content Browser. Right-click the stamp image to apply it to a sculpting tool.
- Orient To Stroke
-
When on, the stamp orientation follows the direction of your brush stroke.
- Flip Horizontally
-
Flips the stamp image horizontally.
- Flip Vertically
-
Flips the stamp image vertically.
- Rotate
-
Rotates the stamp image clockwise.
- Draw Method
- Specific to the Imprint tool. Sets how the stamp image expands outward from where you click-drag to apply it.
- Continuous
- (Default) When on, the stamp image is applied repeatedly along the stroke path.
- Scale Image From Center
-
When on, the center of the stamp is anchored where you click, and the image scales from the center.
- Scale Image From Side
- When on, the edge of the stamp is anchored where you click, and the image scales from the side.
- Randomize
-
Turns the Randomize options for the tool stamp on or off.
- Rotation
-
Randomizes the rotation of the brush tip dynamically through the stroke.
- Scale
-
Randomizes the size of the brush tip dynamically through the stroke.
- X Position
-
Randomizes the horizontal position of the brush tip dynamically through the stroke.
- Y Position
-
Randomizes the vertical position of the brush tip dynamically through the stroke.
- Strength
-
Randomizes the strength of the brush tip dynamically through the stroke.
- Horizontal Flip
-
Randomly flips the position of the brush tip along its X-axis dynamically through the stroke.
- Vertical Flip
-
Randomly flips the position of the brush tip along its Y-axis dynamically through the stroke.
Display
- Orient brush to surface
-
Orients the tool cursor display (in the 3D View) along the normal of the face under the center of the tool's radius. This setting Influences cursor display only, and does not influence the effect of the brush on the surface.
- Show frozen / mask
- When on (default), displays areas of the mesh that are frozen with the
Freeze Tool or masked with the
Mask Target Tool. See
Freeze regions on a model.
Note: Per-face shader assignments and per-vertex colors are not visible when Show Frozen is on.
Wireframe Display
- Show
- When on, the model's wireframe is displayed while you sculpt.
- Alpha
-
Controls the transparency of the wireframe.
- Color
- Allows you to choose the color of the wireframe.