Learn about the Copy Design interface.
Copy Design is now a modeless dialog with a toolbar: It can now remain open while you use the Vault client for other commands as well as add files to be copied.
Shortcut keys are available for all options in the Copy Design dialog.
Toolbar

The toolbar consists of five menus - File, View, Actions, Options, and Help menu.
|
Export |
Export to a desired location. Specify the location and format in the Save as dialog. |
 Add Files |
Add the files that you want to copy to the main view. See Copy Design–Add Files for more information. |
|
Clear Root Node |
You can remove the node and all children from the dialog using the Clear Root Node option from the right-click menu. This option is only available if you select the root node. |
|
Execute Copy |
Once everything is configured, click Create Copy to begin the copy operation. Before you perform the copy operation, Copy Design checks the file name duplicates and user permission for the folder. |
|
Exit |
Click to exit the Copy Design dialog. |

|
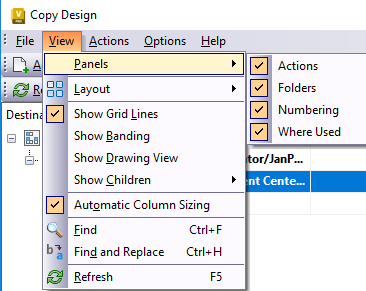
Panels |
Select which panels you want to display in the Copy Design dialog. |
|
Layout |
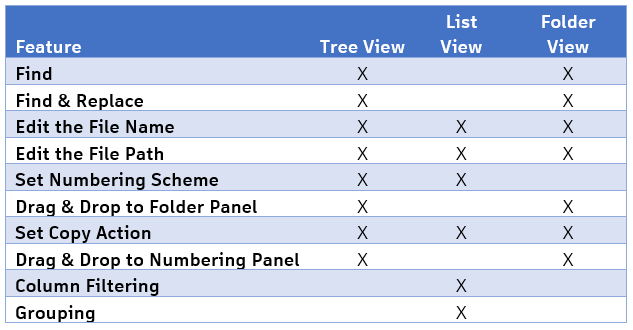
Customize how the main grid looks. You can select from three views:
 |
|
Show Grid Lines |
Select to toggle the display of grid lines on or off in the grid. |
|
Show Banding |
Select to toggle the display of alternating color bands on or off in the grid.
|
|
Show Drawing View |
By default, the selected model and any associated drawings are copied. When Drawing View is turned on, the view mode displays all associated drawings and you can configure the copy operation based on the drawings. Drawings are now visible in the Documentation folder. Display it by selecting the Tree View. Note: A status of
Auto indicates that the drawing linked to the file receives the same action as the associated file. For example, if a file is marked for copy, the associated drawing receives the same new file name and save location during the copy event.
|
|
Show Children |
Select whether to show or hide the model attachments and library files in the copy view. By default, all library files and attachments are set for copy. However, you can assign different copy actions to children files by displaying them in the Copy Design view. In the Show Children menu select which types of children files to show by choosing one or both of the following check-boxes:
|
|
Automatic Column Sizing |
Select to toggle whether or not columns adjust automatically to fit within the available view area. |
 Find |
Select to find the text. You can search for the text in the main grid or the numbering panel. |
 Find and Replace |
Enables you to find a desired text and replace it with a desired one. You can perform the operation in the main window or the numbering panel. |
 Refresh |
Refresh the Copy Design main view to see the most recent changes to files or the design structure. Note: If dependent files are cloaked, the following message displays: "Some of the children of the added object are inaccessible." An administrator must provide access to the dependent files. After obtaining access, refresh the Copy Design main view.
|
|
Copy All |
Select Copy All to designate all files in the main view for copy. |
|
Copy Top Nodes |
You can copy multiple design trees with one command. Selecting Copy Top Nodes sets all top level components to copy. |
|
Copy |
Select to copy selected files from the main grid. Hold the Ctrl key to select multiple files at once. |
|
Copy To |
Select to copy selected files from the main grid to a specified location. Hold the Ctrl key to select multiple files at once. See Copy To for more information. |
|
Copy Branch |
Enables you to copy a complete branch with all files maintaining the original folder structure. |
|
Copy Branch To |
Enables you to copy a complete branch to a specific folder maintaining the original folder structure. |
|
Reuse |
The file is reused without creating a copy. This is a great way to minimize duplicates of a file that must be used in more than one location of a design. Reused files are not renamed with any assigned numbering scheme and retain all original properties. |
|
Reuse All |
Applies the reuse action to all the files in the main grid. |
|
Reuse Branch |
Applies the reuse action to the selected file and the entire file structure beneath it. The specified files are reused in the destination structure and no copies are created. |
|
Replace |
Replaces the selected file with another file. The name of the copied file changes to the replacement file's name. The same file can be copied to multiple locations. Note: The pending copy of a file can be used as a replacement.
See Replace for more information. |
|
Exclude |
Sets the Exclude action on the selected files. This action can only be used on parent documentation files. If this is set on any other file in the structure, that file will be reused during the copy operation. The files that are marked with a status of Exclude are not copied or reused. |
|
Go To |
After the Copy operation, you can open the Source Folder, or Destination folder using the options in the right-click menu. |
|
Numbering Schemes |
Select Numbering Schemes to set which naming schemes are valid for use in your copy design configuration. You can also set the default numbering scheme. See Copy Design–Numbering Schemes for more information. |
|
Action Rules |
Select to create, edit, and delete rules that apply to your copy operations. Each Rule Set contains a number of file behavior and property settings that can be applied to the copied file based on the source file. See Copy Design–Action Rules for more information about creating and editing rules. |
|
Automatically Copy Parents |
When Automatically Copy Parents is turned on, the parent of each copied component is also copied. Note: Disabling this option results in source assemblies being edited to include the new copied part.
|
|
Link Drawings with Models |
When selected, the drawing connected to a model is copied to the same location and shares the same new file name as the model. The Auto action is set on the drawing. Note: If more than one drawing is associated with the model, the copy process will prompt with an error stating that both drawings cannot have the same name, and the copy process will not execute. Exclude or rename one of the drawings to resolve the error.
|
|
Remove All Attachments |
When selected, all attachments are removed from the newly created files. By default, all file attachments will get attached to the new file. |
|
Remove BOM Objects |
When selected, the BOM information inside of the newly created files will be removed during the copy operation.
Note: These files will not be able to be assigned to an item until they are updated inside of the CAD application.
|
|
Select References |
By default, all component references are copied. When Select References is turned on, you can choose which references of a component are copied. Note: Multi-select is not enabled when using Select References view. Any reference that is selected must have a unique action.
See Select References for more information about creating and editing rules. |
Main View Grid
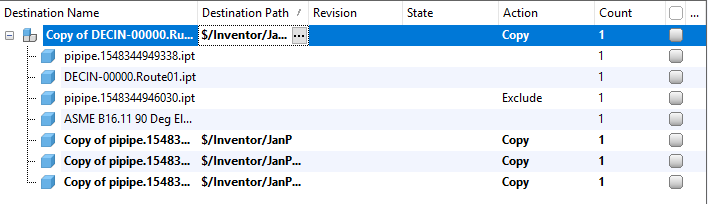
The main Copy Design view shows the name of the files available for copy, destination folder, the action that will be performed on the file, the revision and state of the file, and how many instances (Count) of the file occur within the current list.
You can also manage copy actions and customize the view from the main view.
Navigation Panel
Simplify your copy design interface by undocking panels, changing the docking location, or turning off panels so that they do not display.
There are four different navigation panels.
|
Where Used  |
The Where Used panel lets you track the origin of the copy objects and their destination. Since you can replace existing files with uncommitted instances of files that are being copied, this means that the copied instance may have numerous destinations. Use the Where Used tab to make sure that the files are being copied to the right locations. See Where Used Panel for more information. |
|
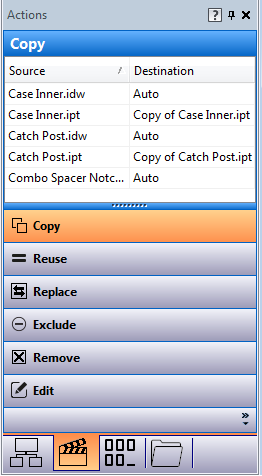
Actions  |
The Actions Panel lets you review which operations are assigned to be performed on files in the main view. Once you have configured the files in the main view, you can use the Actions Panel to filter the files based on their assigned operation. Assigned operations include copied, reused, replaced, excluded, removed, or edited. Note: You can also set action operations by dragging and dropping files from the main grid onto the desired operation button in the Actions Panel.
See Actions Panel for more information. |
|
Numbering  |
The Numbering Panel lists all of the files selected for copy. It also shows the original and new name for each selected file. The grid displays the renaming options based on available numbering schemes. In the Numbering Panel grid, you can edit certain fields and individual numbering schemes. See Numbering Panel for more information. |
|
Folders  |
The Folders Panel lets you review the source and destination folders for the copy design operation. This is a great way to verify that the necessary files are selected and will be copied to the correct location. You can group selected files for operations based on the folder location. You can also drag-and-drop files between folders or from the main grid to perform a copy. See Folders Panel for more information. |
Hide or Show Panels
- In the Copy Design dialog, click View > Panels.
- Select the panels that you want to show in the Copy Design interface.
Dock or Undock Panels
- Select the title bar of a docked panel and drag it off the main grid to undock it.
- Double-click the title bar of an undocked panel to automatically redock it.
Configure Docking Preferences
- Right-click on the title bar of the panel and select one of the following:
- Float to undock the panel and move it anywhere on the Copy Design screen.
- Dock to redock a panel that was previously set to Float.
- Auto Hide to automatically collapse the panel when it is not in use. The icon appears to the right side of the interface and can be clicked to open up the panel.
- Close to close the panel and hide it from view.