This topic gives a second example of how the ML Deformer simulates deformation animation from one deformed object on another object. You can also create an ML Deformer using the Deformer Attributes widget (Deformer stack), which is useful if you have a rig already set up as it avoids the work transferring the deformation target mesh. See Create an ML Deformer.
To illustrate the process, this scene has two meshes, a static mesh (Disc 1) and one with a Cluster deformer (Disc 2). We will train the ML Deformer with the animation from Disc 2 so we can use it on Disc 1. Disc 2 is the Target deformation, meaning it is the goal of what the ML Deformer is simulating.
Disc 1 is a static mesh (Disc 1) and (Disc 2) has a Cluster deformer.
Sample ML Deformer animation in the Content Browser
To add an ML Deformer to geometry
- Select the object that you want to receive the deformation. In this example, Disc 1.
- Select Deform > ML Deformer in the Animation (F4), Rigging (F3), or Modeling (F2) menu set to add an ML Deformer to Disc 1.
- Open the Attribute Editor ML Deformer tab and pin the tab.
- Select the geometry with the deformation (Disc 2), and in the
Attribute Editor, right-click the
Target Geometry column in the
ML Deformer table and select
Replace Target with Selected.
- Switch to the Attribute Editor Control Collector tab and expand the Add Controls table.
- Select
Disc 2, the Target, and choose the attributes that you want to control the deformation in the
Attribute Editor
Add Controls list
Scalars Tab. (The
Matrices tab is used for when you have a deep joint hierarchy. See the
Matrices tab section in the
ML Deformer Control Collector attributes topic.)
Ctrl or Shift + click to select multiple or all attributes and click the Add (
 ) button at the top right of the list. For this example, as the animation is only on the Y-axis, we select only the
translateY attributes.
) button at the top right of the list. For this example, as the animation is only on the Y-axis, we select only the
translateY attributes.
 Note: You can also right-click and choose either Add Selected or Add All.
The attributes are added to the Connected Controls list, below the Add Controls list.
- Set
Min and
Max values for the deformation training. In this example, the
Min and
Max values are set to -50 and 50 because in the example this is a good representation of the animation that we want to simulate.
Tip: You may need to expand the Attribute Editor window to view the Min and Max columns.
- Select the Target geometry (Disc 2). In the
Attribute Editor
ML Deformer tab, click
Export Training Data…
 to open the
Export Training Data window, where you can configure what animation from the Target geometry is used for the
ML Deformer. (You can also right-click the
ML Model column, and select
Export Training Data… from the
ML Model
contextual menu in the
ML Deformer attributes topic.)
to open the
Export Training Data window, where you can configure what animation from the Target geometry is used for the
ML Deformer. (You can also right-click the
ML Model column, and select
Export Training Data… from the
ML Model
contextual menu in the
ML Deformer attributes topic.)
- In the
Export Training Data window, set the following parameters:
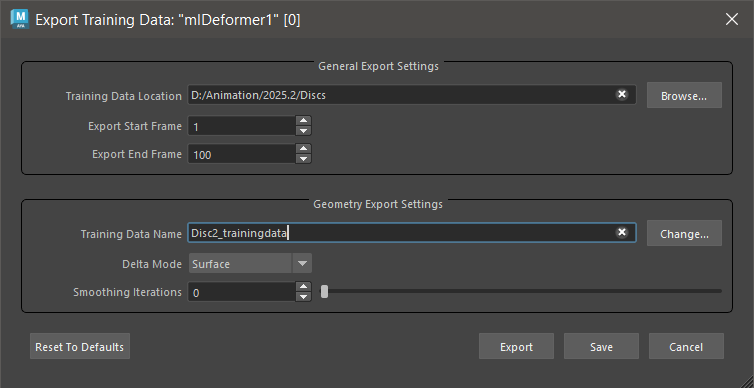
- Training Data Location: Browse to where you want to save your training data and create a folder for it.
- Export Start/End Frame: Set the range of frames to capture from the Target geometry deformation.
- Training Data Name: Choose a name for the data.
- Click Export. The Target object (Disc 2) animation is exported as training data.
See ML Deformer Export Training Data window for a detailed explanation of each setting in this window.
- In the
Attribute Editor
ML Deformer tab, click
Train the Model…
 to open the
Training ML Deformer window. The
Training Data Location field shows where the training data and model are found.
to open the
Training ML Deformer window. The
Training Data Location field shows where the training data and model are found.

You can also right-click the ML Model cell in the ML Deformer Attributes list and select Train Model….) See ML Deformer Training Settings for a detailed explanation of each setting in this window.
- In the
Training ML Deformer window, set the following:
- Output ML Model Name: Choose a name for your trained model.
- Activate Preload Data: to speed up the training (at the cost of memory usage).
- Click
Train.
Two Python windows appear. You can track the progress of this and any other ML Training in the ML Deformer Job Monitor
 . When you see the message
[ML Deformer] Training complete in the Python window, the training is finished.
. When you see the message
[ML Deformer] Training complete in the Python window, the training is finished.
 Important: When you click Train, you may be prompted to download and install external Python modules. By default, the install path of the extra modules is <MAYA_APP_DIR>/mlDeformer/<ml_deformer_version>/Lib/site-packages. If you need to download these modules manually and/or install them to a custom location, see Install Python libraries to train the ML Deformer.
- In the ML Deformer Attribute Editor tab, right-click the ML Model cell in the ML Deformer table and select Select Model > <your model>.
- Turn on
Enabled in the
ML Deformer tab so that the
ML Deformer
applies the learned deformations.
Like other deformers, you can adjust the Envelope setting to reduce the effect of the ML Deformation.