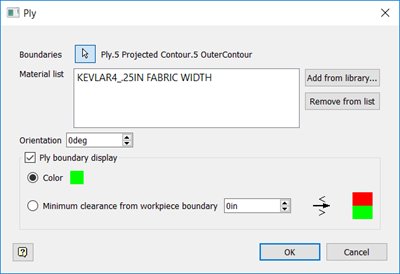
A ply is a layer of material that you apply to a surface to build your object.
- Select a layup in the
TruPlan browser.
The ply will be created in this layup. If no sequence exists, one will be created for you containing the new ply.
- Click Ply
 on the
TruPlan ribbon.
The Ply dialox box opens.

- Click the
Boundaries selection arrow
 and select the projection that will define the boundaries of the ply.
Generally this projection is from a curve on to the workpiece surface of the layup in which you are creating the ply. You can select multiple projections, but they must all be onto the same surface.
- Click
Add From Library and add a material to the ply.
The material library contains materials that can be used for exploring different strategies for the ply. The packaging values associated with the material you pick will be the only packaging values allowed in the strategies you create for the ply.
- Set the
Orientation.
This is the angle of the ply with respect to the direction of the layup that the ply is a part of.
- Select whether to show the ply boundary; you can adjust boundary properties.
- Color: paints the ply boundary in the color you specify in the swatch.
- Minimum Clearance From Workpiece Boundary: Paints sections of the boundary in the colors you specify, depending on whether the distance between the ply boundary and the workpiece boundary falls below a threshold value. Usually you set this value to the band width or tape width.
- Click OK.
- To create a surface offset for the ply, right-click it in the
TruPlan browser and select
Include Surface Offset.
Alternatively, you can enable surface offset for the ply in its strategy. This requires less disk space, but could impact performance if you create many such offsets.