
Garbage Mask Menu Settings
Timeline Quick Menu Settings
Garbage Mask Quick Menu selector
Select which menu to display.
Mask Selection box
Apply changes to the selected mask or all masks.
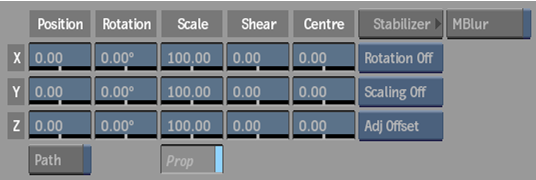
Garbage Mask General Settings
Regenerate button
Enable to get dynamic updating of your mask as you make changes.
X Position field
Position the X axis.
Y Position field
Position the Y axis.
Z Position field
Position the Z axis.
Path button
Enable to animate the position of the axis using a spline drawn in the scene.
X Rotation field
Rotate the X axis.
Y Rotation field
Rotate the Y axis.
Z Rotation field
Rotate the Z axis.
X Scale field
Scale the X axis.
Y Scale field
Scale the Y axis.
Z Scale field
Scale the Z axis.
Proportional button
Enable to constrain proportions while scaling.
X Shear field
Shear the X axis.
Y Shear field
Shear the Y axis.
Z Shear field
Shear the Z axis.
X Centre field
Centre the X axis.
Y Centre field
Centre the Y axis.
Z Centre field
Centre the Z axis.
Stabilizer button
Opens the Stabilizer menu where you track reference points in a clip.
Tracking Rotation option box
Select Rotation Off for one-point tracking, Rotation On for two-point tracking, Rotation Inv to invert the rotation data.
Tracking Scale option box
Select Scaling Off for one-point tracking, Scaling On for two-point tracking, Scale Inv to invert the scaling data.
Adjust box
Select Adj Offset if the mask is parented to one axis. Select Adj Axis if the mask is parented to a hierarchy of objects. Select Adj Tangents to have the tangents for the selected points adjusted while the points are tracked.
Motion Blur button
Enable the blur effect for the selected axis (Motion Blur must be enabled in the Setup menu).
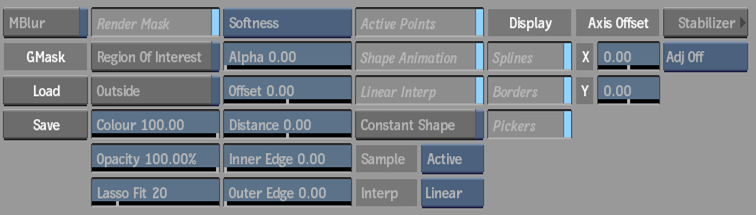
Motion Blur button
Toggles the blur effect for the selected geometry (Motion Blur must be enabled in the Setup menu).
Load button
Loads a garbage mask setup.
Save button
Saves a garbage mask setup.
Render Mask button
Enable to see the mask and its effect on the image.
Region of Interest button
Enable to reveal the matte of multiple garbage masks.
Outside button
Enable to apply the effect to the part of the image outside the mask.
Colour field
Set the blend between the outgoing and incoming image inside the mask.
Opacity field
Set the transparency of the mask.
Lasso Fit field
Set the number of points used in the freehand part of the mask.
Edge Softness box
Select an edge softness method. Select Softness to create a uniform gradient around the mask edge, or select Tracer to key out details around the mask edge. Different settings appear based on the selection.
Alpha field
Set the transparency of the softness from the mask edge.
Offset field
Set the position of the softness border from the mask edge.
Clean button
Enable to apply the clean algorithm to reduce random noise and artefacts.
Clean Effect field
Displays the level of cleaning to apply. Editable.
Pickers button
Enable to display two pickers to perform luma and chroma analysis of the area inside and outside of the mask and derive localized edge keys from this information.
Picker Size field
Displays the size of the pickers. Editable.
Distance field
Specify the area over which the Inner and Outer Edge adjustments have an effect.
Inner Edge field
Smoothen the softness gradient towards the inside of the mask edge.
Outer Edge field
Smoothen the softness gradient towards the outside of the mask edge.
Active Points button
Enable to use all points as a reference for the mask. Disable at a specific frame to mute picker values previously sampled at another frame.
Shape Animation button
Enable to animate a mask using the Shape channel.
Linear Interpolation button
Enable to use linear interpolation of the mask border between keyframes. Disable to use rounded interpolation. This button is active when the Shape Animation button is enabled.
Constant Shape button
Enable to modify the mask's shape without setting keyframes.
Sample Status box
Select how picker values are sampled. Active resamples picker values at every frame (the default). Passive disables resampling for one or more frames. This box is active when the Shape Animation button is disabled.
Interpolation Mode box
Select the type of interpolation between keyframes when the Sample Status box is set to Active.
Splines button
Enable to display inner and outer splines of the mask.
Borders button
Enable to display inner and outer borders for advanced softness.
Pickers button
Enable to display elements that allow for detailed chroma and luma analysis when refining a detailed key.
X Axis Offset field
Offset the mask from its X axis.
Y Axis Offset field
Offset the mask from its Y axis.
Stabilizer button
Opens the Stabilizer menu where you apply tracking data to selected vertices.
Adjust box
Select Adj Tangents to have the tangents for the selected vertices adjusted while the points are tracked.
Add button
Click to add a gmask axis or geometry node.
Node Type box
Select whether to add an axis or geometry node.
Close button
Click to close the mask shape automatically.
Object Node Name field
Displays the name of the selected object node.
Previous Node button
Click to scroll to the previous similar node.
Next Node button
Click to scroll to the next similar node.
Garbage Mask Node Setup Settings
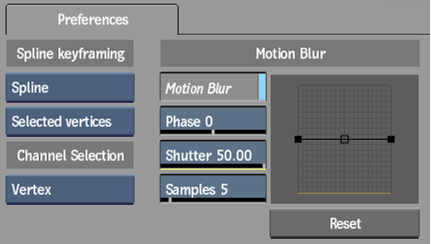
Spline Keyframing box
Select the parameters to use when animating a Garbage Mask spline. When Shape Animation is disabled in the Garbage Mask general settings, then the Spline & Tracer, Spline and Item options become available.
Vertex Keyframing box
Select the conditions under which parameters are applied to specified vertices in the mask.
Channel Selection box
Select which channels are selected in the Channel Editor when you select one or more vertices.
Motion Blur button
Enable to apply motion blur to garbage masks that can be used to match the movement of objects in a clip.
Phase field
Displays whether the motion blur is based on the movement before or after the current frame. -100 places the motion blur before the frame; a value of 100 places it after the frame.
Shutter field
Displays the duration of the motion blur at each frame. Editable.
Samples field
Displays the number of samples taken at each frame to create the motion blur. Editable.
Motion Blur curve
Displays the transparency of the samples that create the blur effect. Drag the curve or its handles to edit it gesturally.
Reset button
Resets all motion blur controls and disables the Motion Blur button.
Icons button
Enable to display garbage mask splines and axes.
Transparency field
Displays the transparency of garbage mask splines and axes. Editable.
Show Border button
Enable to display the Softness Offset wireframe border, defined in the Shape menu.
Show Border colour pot
Select the colour for the Softness Offset wireframe.
Wireframe colour pot
Select the colour of garbage mask splines.
Control Points colour pot
Select the colour of garbage mask control points.
Pickers Display colour pot
Select the colour of the pickers.
Transparency field
Displays the transparency of nodes in the schematic. Editable.
Auto Insert button
Enable to automatically insert a node when dragged between two connected nodes. When disabled, press Shift to auto insert.
Auto Tangents
Enable to create tangents for new points.
Scale Setup button
Enable to scale the mask. Use when you have a resolution mismatch between the clip and its applied mask.