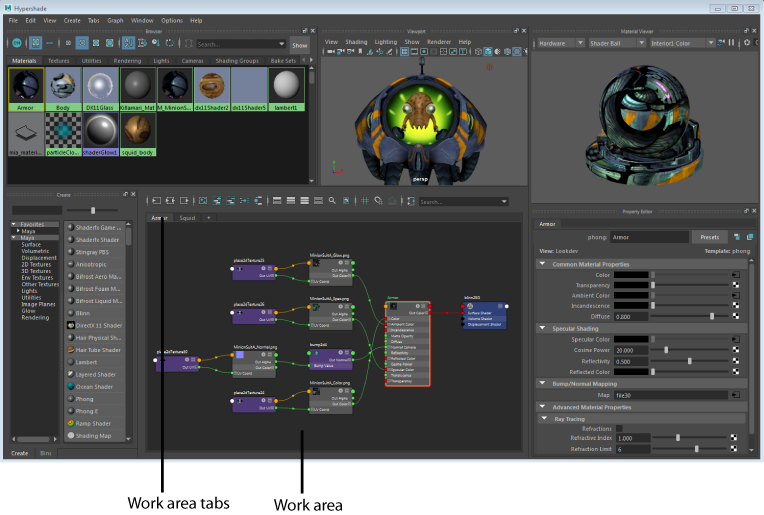
Create your nodes and build your shader network in the Hypershade work area. The work area is the panel at the bottom of the Hypershade, between the Create tab and the Property Editor. The Hypershade work area is similar to the Node Editor, and allows you to do the following:
- Create nodes by clicking a node in the Create tab. Alternatively, you can also click Tab and enter the type of your node, or drag and drop a node from the Create tab to the work area.
- Connect nodes by dragging connection lines or by using shortcuts such as middle-mouse dragging a node onto another.
- Nodes can be displayed in the same view modes as in the Node Editor: simple, connected, full, and custom. In the Hypershade, nodes appear in custom mode by default when they are created.
- Search for a specific attribute (or filter out attributes) in a node by clicking
 in the work area toolbar to display the search field for the node.
- Filter out node types from your graph by right-clicking and selecting the node types that you want to include from the
Show > Objects submenu of the marking menu. By default, cameras, shading groups, and shading nodes are shown.
You can also filter nodes by name in the filter field text box of the work area toolbar. Use * as a wildcard.

To clear filters, click
 . When no filters are applied, the icon appears as grey
 .
.
- Create multiple tabs and graph a different network in each tab.
Click + beside the right-most tab to create a new tab. Right-click any tab for its Close Tab, Duplicate Tab and Rename Tab menu options. Left or middle mouse drag to re-order tabs.
Your tabs are retained when you close the Hypershade and when you save your file.
- Edit your shader graph using the toolbar options such as add selected nodes to graph, rearrange graph, and so forth. The Hypershade and Node Editor share most toolbar options.
- Toggle the
grid background on and off by clicking
 in the work area toolbar. Snap your nodes to grid by clicking
 .
.