
Use the Power Features Clearances page to create a customized set of Power Features clearances that are applied across all the component catalogs. The clearance set that you select is then used by the Component Wizard.
- Select File > Options > Application Options > Manufacturing >
Toolmaker > Power Features Clearances.
The first time the dialog is displayed, Defaults is automatically selected in the Use drop-down list.

- Click
 to display the
Create clearance set dialog:
to display the
Create clearance set dialog:
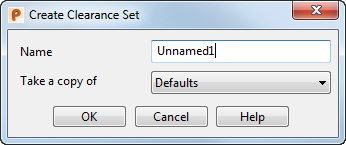
- Enter a new Name for a new set of clearances; for example, My_Clearances.
- From the Take a copy of drop-down list, select the set of clearances to use as the template for the new set of clearances. Initially, Defaults is the only option.
- Click OK to return to the
Options
dialog.
My_Clearances
is now automatically selected.

- From the Power Feature Name drop-down list, select a Power Feature to be modified. The dimensions that are displayed depend on your selection
- Select the required Units from the drop-down list, and enter new values to modify the clearance dimensions as required.
- Click
OK. The new clearance set called
My_Clearances
is created. It is a customized version of the original
Defaults
clearance set.
My_Clearancesis saved to a file called ClearanceSet_My_Clearances.xml. Hover the mouse over the selection in the drop-down list to see the location of the file.
The Component Wizard now uses ClearanceSet_My_Clearances as the clearance set until you create a new set or select a different set from the drop-down list.
To rename, delete or locate a clearance set:
- In the Power Feature Name drop-down list, select the required clearance set.
- Select either:
 to display the
Rename clearance set dialog, and enter the new
Name.
to display the
Rename clearance set dialog, and enter the new
Name.
 to remove the clearance set from the drop-down list.
 to display the
Select Clearance Set dialog, and navigate to the clearance set.
to display the
Select Clearance Set dialog, and navigate to the clearance set.