
The Smart Surfacer dialog is used to create a surface automatically using the best solution from the available surface creation methods.
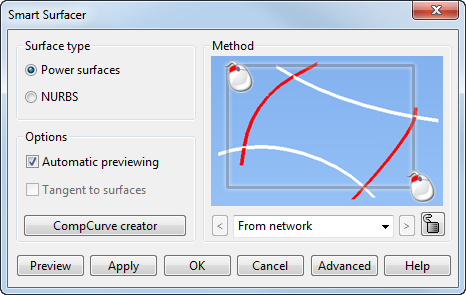
Surface Type
- Power surfaces — This option is automatically selected to create a power surface from the selected items, except for the
Fill-In surface creation method which is a NURBS surface.
If a fill-in surface fit is outside the working tolerance, Fit:- 0.abcd is displayed in red next to NURBS. To change the fitting, click Advanced.
- NURBS — Select this option to create a NURBS surface from the selected items. This is only available for From Network and From Separate creation methods.
Options
- Automatic Previewing — Select this to preview the results of the surface creation method automatically.
- Tangent to Surfaces — When the selected curves have surface dependencies, select this option to create a surface that is tangent-continuous to the surrounding surface.
- CompCurve Creator — Select this option to display the
Create Composite Curve toolbar, and dynamically create additional composite curves during surfacing:
- Use the
Composite Curve toolbar to create the composite curve.
Tip: See Creating a composite curve by tracing in the Wireframe Modelling section.
- To create another composite curve, press and hold the Shift key and select further wireframe objects.
As new composite curves are added to the current selection or to the current surface, Smart Surfacer automatically uses the optimum surface creation method to create a new surface from the new selection of wireframe items.
- Use the
Composite Curve toolbar to create the composite curve.
Method

 — Click to cycle through the optimum surface creation methods. The following surface creation methods can be selected:
- From Network
- From Separate
- Fill-in
- Drive Curve
- Two rails
- Plane of Best Fit
- From triangles
- Network over triangles
- Developable (currently under development)
If the automatically surface creation method is not the one you want, you can force a different method by selecting it from the drop-down list.
Note: An error message is displayed if the forced surface creation method is not possible for the selected items.- Click the
Lock
 button to set a default method of surfacing. A locked method is always used, unless the method is not applicable to the selection.
- Using the
Previous
or
Next
buttons will cancel the lock when multiple methods are available for your selection.
- Selecting a method from the drop-down list in the Method area will cancel the lock if that method is different to your locked method.
- Using the
Previous
- Click Preview to preview the results. You can make changes and preview multiple times.
- Click
Advanced to display the options dialog for the current surface creation method.
Note: See the topic on each creation method for details.
When using the From Network, From Separate or Drive Curve method, the Create a guide button appears on the advanced options dialog. Use this option to create guide-curves whilst using the Smart Surfacer, as follows:
- Click the Create a guide button. The button changes to Finish The Guide.
- Click the positions on the wireframe to create the new guide curve. Guide-curves can only snap to the primary creation curves of the wireframe.
- Select Finish The Guide to complete the new guide curve creation.
The new guide curves are added to the selection automatically.