
Importing images
Jump to Mobile or Windows 10
This articles deals with the importing of image and files.
- If you're looking for how to import brushes, see Loading brushes.
- If you're looking for how to load custom brush icons, see Importing brush icons.
- If you're looking for how to load textures, see Importing textures.
- If you're looking for how to load sequenced images, see Importing FlipBooks.
Do you have a grid, templates, reference image, want to trace something, or something else you'd like to add to SketchBook Pro? If so, import the image. Once imported, lock the layer, add layers, and build up your sketch. You can import as many images as you have available layers and your device will support.
- If you would like to drag and drop images into SketchBook Pro, see How to drag and drop files into SketchBook.
Importing in SketchBook Pro Desktop
To import sketches of various formats:
- Select
 and flick toward
  .
. - Press Cmd+O for Mac or Ctrl+O for Windows.
- Select File > Open.
Importing an image using Import Image
In your SketchBook Pro preferences, the is an Import Image option. By default, when you add an image, a layer is automatically created and the image is added to it. This is super handy. But, what if you’ve been drawing on a layer and you import an image? Well, without Add Image: Import into a new layer enabled, the image could cover what you drew. This is why we created this option and it is enabled by default. However, if you prefer for a layer not be be created, say because you have a limited number of layers available, then disable this option.
- In the Layer Editor, tap
 to browse for an image.
 - Select an image and tap Open.
Open a sketch stored on iCloud
For Mac App Store users, access a project stored on iCloud from anywhere and with any machine.
- If you aren’t logged into iCloud or can't access iCloud, in your device's Settings, select General > Storage & iCloud Usage > Manage Storage > SketchBook > Documents & Data.
- Select File > Open.
Remove a project from the SketchBook Pro iCloud Gallery
For Mac App Store users, select a file and tap [X] Delete.
Importing in SketchBook Pro Mobile
For additional information on importing, see Importing to the Gallery.
From the Gallery, to import an image, tap  and select either:
- For iOS users, Import to Gallery, New from Image, New from iTunes, or Scan Sketches.
- For Android users, New from Image, New from Camera, or Scan Sketches.
Importing on Android for handheld device users
Import Image takes an image from your camera or device and adds it to a new layer, above the last.
In the toolbar, tap
 , then Import Image.
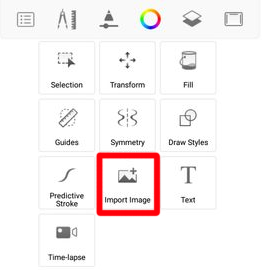
Select an image for import from either somewhere on your device or using your camera.
Use the Import tools to position, scale, rotate, mirror, and/or flip the image.
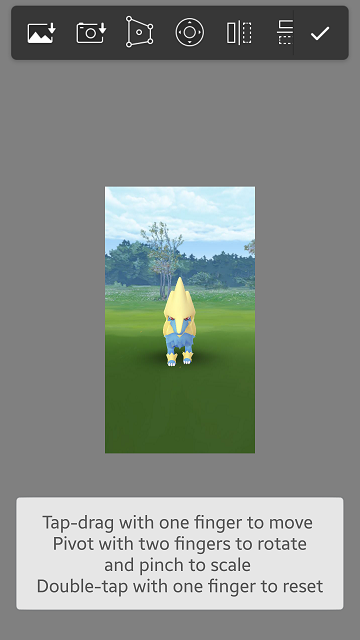
When satisfied with the placement and size, tap the arrow.
Importing on Android for tablet users
In the toolbar, tap
. If you don't see Import Image in the toolbar, tap-drag to the left to expose more tools.
Tap
, then  to help reposition the image.
Use the Import tools to position, scale, rotate, mirror, and/or flip the image:
- Tap-drag the canvas to freely move in any direction.
- Tap
 to nudge the content one pixel at a time, by tapping an arrow or tap-drag from the middle to move in any direction or on an arrow to move in that direction.
 - Tap
 to flip the image vertically.
 - Tap
 to flip the image horizontally.
 - Tap
 to rotate the image counter-clockwise.
 - Tap
 to rotate the image clockwise.
Tap
 to accept the changes or x to decline.
Importing on Android from the Gallery
- Tap
 , then select
  .
. - Tap the Untitled Folder bar along the top of the Gallery.
- Tap
 , then
  New from Image.
 - Select either the Files or Documents folder, then
 .
. - Scroll down, tap Dropbox or another source, and tap an image to import it.
Importing on iOS
Use the Import tools to rotate, position, flip, and scale your imported image.
To help reposition the image:
- For iPhone users, tap , then Import Image.
- For iPad users, tap .
- For iPhone users, tap
Use the Import tools to position, scale, rotate, mirror, and/or flip the image:
- Tap-drag the canvas to freely move in any direction.
- Tap
 to distort the content by tap-dragging the handles and moving the bias in the center.
 - Tap to nudge the content one pixel at a time, by tapping an arrow or tap-drag from the middle to move in any direction or on an arrow to move in that direction.
- Tap to flip the image vertically.
- Tap to flip the image horizontally.
- Tap to rotate the image counter-clockwise.
- Tap to rotate the image clockwise.
Tap the checkmark to accept the changes or x to decline.
Importing on iOS to the Gallery
Is there an image in another app you’d like to bring into SketchBook Pro? Use Import to Gallery to do it.
- Open Photos.
- Select the image you want to bring into SketchBook Pro.
- Tap
 Export.
 - In the top row, scroll to find SketchBook Pro.
- Tap the SketchBook Pro icon, then Import to Gallery. The image or images are imported to your Gallery.
Importing on iOS from the Gallery
Tap
, then select .Tap the Untitled bar along the top of the Gallery.
Tap
, then select from one of the following:- New from Image - Select either Import from camera, Import photo, or Browse and load an image into the canvas from somewhere on your device.
 New from iTunes - Select an image to load into the canvas from your iTunes folder.
 Scan Sketch - Scan your real-world image, bring it into SketchBook, and continue working on it wherever you are.
Tap Done.
Importing in SketchBook Pro Windows 10
Wondering how to add an image into SketchBook Pro? What about what types of files are supported? Well, there are two ways. You can use Open or Add Image.
How to open a sketch
What kind of files can you open? TIFF, JPEG, png, PSD, BMP, and GIF.
- When your sketch dimensions are bigger than those of your screen, the canvas zooms out to fit to the screen.
- When your sketch dimensions are smaller than those of your screen, the canvas created is actual size (100%).
Select >  Open.
Open.
How to use Add Image
You can import JPEG and png files into this version of SketchBook Pro.
- In the toolbar, select
 Add Image.
 - Find the image you want (ensure the file format is supported).
- Select Open.
INFORMATION: Use Transform to help with placing and resizing your image.