- Click


 .
. - In the Data Sources panel, do one of the following:
- To add data from a file-based data source:
- Click
 (Add File Data Source).
 - Click the appropriate category for your data (for example, SHP or Raster).
- Open the file containing the data.
- Click
- To add data from a database:
- Click
 (Add Database Data Source).
 - Select the Connection Type (Oracle, MySQL, etc.).
To use an open source provider, select Generic and then select the specific Provider.
- Enter the credentials and data specification required by this provider. Note: For a generic file-based provider, specify the folder name as the connection string. You can import multiple data sources in that folder at one time.
- Click
- To add data from a file-based data source:
- Double-click the new data source to configure it.
- Click Type and select the appropriate category for your data.
Properties specific to the selected type display at the bottom of the Common tab. See the other import procedures for information on properties specific to a particular data type:
- If the Common tab appears, you can change the name, description, and lifespan settings.
Lifespan specifies the period when the data is valid.
- For each model property that appears, map a data source property (if possible).
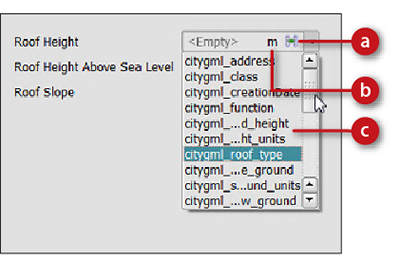
a. Opens the Expression Editor
b. Opens unit of measure
c. Selects a property to map.
- In the Style group, set the property that will determine the default style for this feature class. Do one of the following:
- Specify a property to vary the style depending on the value of that property.
- Click
 to open the Style Chooser where you can specify a single style for all features in this feature class. For more information, see To define style rules.
- If prompted by an alert symbol, change the coordinate system of the incoming data on the Geo Location tab.
Specify the coordinate system of the incoming data (not the coordinate system of the model). If the imported data uses a different coordinate system than your model uses, InfraWorks 360 will transform the data to the model's coordinate system.
- Click the Source tab to import a subset of the data or set draping options.
- For Source Filter, define the subset using an expression. See Use Expressions.
- For Draping Options, if the data lies on the terrain, select Drape.
If this data lies under the terrain, select Set Elevation. If there is a single property that represents the relationship between the data you are importing and the elevation of the terrain, select it from the list. To modify a property to accurately represent the elevation, click
 and enter an expression.
 - Specify how closed polylines in the source data will be treated in the model.
If you select this check box, closed polylines are converted to polygons. Leaving the check box unselected will treat a water feature as a river, for example, while selecting it will treat it as a pond or lake.
- Optionally, add a tooltip for this data source.
A tooltip displays at the top of the right-click menu for the data. For more information, see Create Tooltips During Data Import.
- Click Close & Refresh to apply your changes and see the effects in the model.
If you cannot see the data in your model, regenerate the model from its data sources.
Advanced Tips
If the location or name of a file data source changes, click  to update the information.
Advanced users can specify Geolocation settings.
- Generally, InfraWorks 360 can position the incoming data automatically, based on the data itself. To control the positioning manually, enter x, y, z coordinates for the Position settings, or click Interactive Placing to position the data in the model using your mouse.
- To adjust projections for project specifics (for example, false easting/northing), enter an arbitrary offset to the data using the Offset X, Y, and Z fields.
Advanced users can use the Table tab or refine the import using scripts.
- The Table tab displays your current settings for all properties in this data store in tabular format. You can use expressions to format the data that appears in this table. See Overview of Creating Expressions. You can also use the Table tab to map properties from your original data store to the current properties. To change the values for these properties later, use the Properties palette.
- Use the Script tab to specify advanced import settings using JavaScript. See Use Scripts During Import.
After import, you can change some settings:
- To change configuration settings later, in the Data Sources panel, select the data source and click Configure. You cannot change the type for the data source after initial configuration.
- You can set up styling rules, which map the values of the Rule Style property to individual styles.
- You can override the style for an individual feature, or a set of features. For features that you style with 3D models, you can change the spacing and variance of the instanced models using the Properties palette.
- You can create tooltips for an entire feature class, or for a selection set.