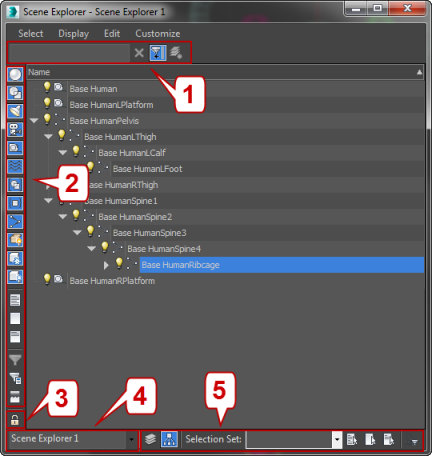
The Scene Explorer has various toolbars for finding and selecting items and setting display filters. By default these are displayed as upper and lower toolbars. Additional toolbars are available to the left of the table.

Interface
The following illustration serves as a map of the standard Scene Explorer toolbars when Layout (on the Customize menu) is set to the default: Vertical and all general toolbars are active. If Layout is set to Horizontal, the same toolbars are grouped together near the top of the Scene Explorer dialog. In the illustration, each toolbar is outlined in red for clarity.

The standard Scene Explorer toolbars:
1. Find toolbar
2. Display toolbar
3. Tools toolbar
4. View toolbar
5. Selection toolbar
Find toolbar
On by default.
- [Find]
- Entering a search phrase in this field, on the left side of the toolbar, shows and highlights search results in the list in real time; non-matching objects are temporarily removed from the list. Note that the list contents are also subject to filtering by the Display toolbar settings (see following).
By default, Scene Explorer uses a simple text-search method, but you can alternatively use regular expressions by turning on Select Menu
 Find Using Regular Expressions.
  Remove Filter
- Clears the Find search field and restores the original list contents.

 Toggle Display Toolbar
- Opens and closes the Display toolbar (see following).
-
 Create New Layer
 - Adds a new layer to the scene. Assigns any selected objects to that layer, and then deselects them. Available only when Sort By Layer mode is active (
 ).
). The new layer is automatically selected (
 ), so any objects created subsequently are assigned to that layer. Also, you can rename the new layer immediately after creation by typing on the keyboard. To rename a layer subsequently, double-click the name slowly and use the keyboard.
 If an existing layer is highlighted when you use Create New Layer, the new layer is added as a child of the selected layer.
For more information about layers, see Using Layers to Organize a Scene.
Display toolbar
Off by default.
Provides buttons that let you toggle the display of various categories of scene elements in Scene Explorer. To open this toolbar, click  (Toggle Display toolbar) on the Find toolbar (see preceding) or choose Customize menu
  Toolbars
  Display.
When on, the toolbar is positioned vertically on the left-hand side of the Scene Explorer window. Its buttons let you choose the type of objects that appear in the Scene Explorer listing. When a filter button is on (highlighted background), its object type appears in the list; when off (gray background), Scene Explorer doesn’t list that type of object.
The object types are:
-
 Display Geometry
 -
 Display Shapes
 -
 Display Lights
 -
 Display Cameras
 -
 Display Helpers
 -
 Display Space Warps
 -
 Display Groups
 -
 Display Object XRefs
 -
 Display Bones
 -
 Display Containers
 -
 Display Frozen Objects
 -
 Display Hidden Objects
The next three buttons manage the object-type buttons.
-
 Display All
 - Turns on all display filters; that is, display of all object types is enabled.
-
 Display None
 - Turns off all display filters; that is, display of all object types is disabled.
-
 Invert Display
 - Toggles display of all object types; those that were enabled are disabled, and vice-versa.
The last three buttons on the Display toolbar control advanced filtering and cell editing.
-
 Enable Advanced Filter
 - Activates the filter specified with the Advanced Filter dialog.
-
 Configure Advanced Filter
 - Opens the Advanced Filter dialog, which lets you set up and use complex Boolean filter terms.
 Display Missing Plugin Objects Only
- Displays only objects that rely on one or more plug-ins that aren't available in the running version of 3ds Max.
Tools toolbar
Off by default.
-
 Lock Cell Editing
 - When on, prevents you from changing any names, settings, and so on. All selection functionality remains intact.
View toolbar
On by default.
The View toolbar appears in the bottom-left corner of the Scene Explorer dialog and shows the name of the current Scene Explorer. It also provides two lists of Scene Explorers: active and default. Choosing any of these replaces the current Scene Explorer with the one you choose.
- Active - Whenever you open a new Scene Explorer, it remains available subsequently in the scene, even if closed, and appears on the active list. This list opens when you click the arrow at the right end of the toolbar.
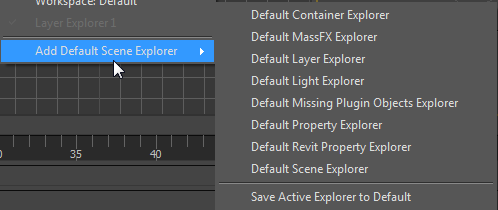
- Default - Clicking Add Default Scene Explorer at the end of the active list opens a submenu with a range of default Scene Explorer setups for working with lights, object properties, and more.

- [drop-down list]
- Use the drop-down list to choose a different active, closed Scene Explorer, or click in the text field to edit the name of the current Scene Explorer. Note: The names of workspace Scene Explorers, one of which is docked by default in each workspace, are not editable.
- Add Default Scene Explorer
- At the end of the active list on the View toolbar is Add Default Scene Explorer, which opens a submenu listing various Scene Explorer setups designed for use with containers, MassFX, and so on. Choosing any of these converts the current Scene Explorer to the specified setup.

- Save Active Explorer to Default
- This command, available from the end of the Add Default Scene Explorer submenu, opens a file dialog for storing the definition of the current Scene Explorer to an INI file. You can open this definition subsequently with the Load function on the Manage Scene Explorer dialog.
Selection toolbar
On by default.
 Sort by Layer
- Lists scene contents by layer. Enables editing layers and contents by dragging object and layer icons within the listing.
 Sort by Hierarchy
- Lists scene contents by object hierarchy. Enables editing hierarchies by dragging object icons within the listing.
- Selection Set
- If any object-level named selection sets exist in the scene, use this list to choose one. This selects all objects in the set. Note: After you choose a selection set from this list, its name persists in the Selection Set field even after you change the current selection. To create a new selection set, first make a selection, then enter a name for it in the Named Selection Sets field on the main toolbar.
-
 Select All
 - Highlights all objects.
-
 Select None
 -
Deselects all objects and removes highlighting from the selection in the Scene Explorer.
-
 Select Invert
 -
Toggles all highlighting; highlights non-highlighted objects and vice versa.
-
 Filter Selection Set
 -
When on, the Scene Explorer listing includes only members of the active selection set.