Use this procedure to edit a custom profile of a railing component.
- Select the railing with a custom profile you want to edit.
- Click
 .
. 
This command is available only if you have profile-based components in the railing.
- Select the component you want to edit. Note: If you have difficulty selecting the correct component, switch to another view that makes the selection easier. For example, to select a bottom rail, switch to a Model view.
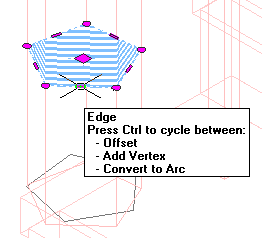
You have begun an in-place editing session, depicted by the magenta-colored grips and light blue hatch of the temporary in-place editing profile, as well as the faded color of other objects in the drawing. Note that while you are editing in-place, you have limited access to other commands in the drawing. Before working on other objects, you should first end the in-place editing session.
- Use the grips or the ribbon in order to make any of the following changes to the profile:
If you want to… Then… use grips to edit the profile move the edge or vertex grips as needed. The Edge grip has three edit modes: Offset, Add Vertex, and Convert to Arc. The default mode is Offset, which offsets the selected edge in a direction that is perpendicular to the midpoint of the edge. Depending on the shape of the profile and the edge you choose to modify, neighboring lines are extended or trimmed, and new lines are added as necessary.
Use the Add Vertex edit mode to add a vertex to the selected edge, and create a new edge. If the selected edge is an arc, the new edge is an arc as well.
Convert to Arc changes the selected edge to an arc and stretches the midpoint of the edge. The edge grip for an arc also has a Stretch mode, so that you can stretch the midpoint of the edge after it has been converted to an arc.
add a vertex to the profile - Grips: Select an Edge grip, and press Ctrl to switch to the Add Vertex edit mode. Move the edge to the desired location, and click; or enter a value, and press Enter.
- Ribbon: Click Edit In Place tab Profile panel Add Vertex
 , and then select a point to add.
remove a vertex from the profile - Grips: Select the Vertex grip for the vertex you want to remove, and press Ctrl to switch to the Remove edit mode. Move the cursor off the selected vertex, and click.
- Ribbon: Click Edit In Place tab Profile panel Remove Vertex
 , and then select a point to remove.
add a ring to a profile select the profile, and click Edit In Place tab Profile panel Add Ring  . Then select a closed polyline, spline, ellipse, or circle for an additional ring. Specify if you want to erase the source linework, and press Enter.
 remove a ring from a profile select the profile, and click Edit In Place tab Profile panel Remove Ring  . Then select the ring you want to remove. Note: You cannot remove the last ring from a profile.
replace a ring on a profile select the profile, and click Edit In Place tab Profile panel Replace Ring  . Then select a closed polyline, spline, ellipse, or circle for the replaced ring. Specify if you want to erase the source linework, and press Enter.
 - Save the changes to the profile:
If you want to… Then… change the existing profile definition to reflect the new shape click Edit In Place tab Edits panel Finish . 
create a new profile definition with the shape you have created click Edit In Place tab Edits panel Save As.  Enter a name for the new profile, and click OK. The in-place edit session closes and the new profile definition is available in the Style Manager.
 discard all changes on the profile and revert to the previous shape click Edit In Place tab Edits panel Cancel . 