Use this procedure to specify the display of custom block components for an individual railing in any of the display representations used for model views. If you are going to use custom graphics for a new component, draw the component and save it as a block before you start this procedure.
- Double-click the railing.
- On the Properties palette, click the Display tab.
- Under the General category, for Display component, verify that *NONE* is selected.
- For Display controlled by, select This object. Note: To apply your changes to all railings in the drawing, select Drawing default setting. To apply changes to all railings of this style, select Railing Style:<style name>.
- For Display representation, verify that the desired display representation is selected.
- If necessary, expand Object Display Properties
 Advanced, and for Custom block display, click
  (the number in parentheses indicates the number of blocks currently attached to the railing).
 - If you want to turn off the display of custom blocks for this railing without removing them, select Disable Custom Blocks.
- Specify whether to add, edit, or remove a block component:
If you want to… Then… add a new block component click Add, and then click Select Block, select the block, and click OK. edit an existing block component select the component to edit, and click Edit. remove an existing block component select the block, click Remove, and click OK. - When adding or editing a block component, specify the scale of the custom block:
If you want to… Then… use the block at its drawn size clear all options under Scale to Fit. scale the custom block to the width of the object to which it is attached select Width. scale the custom block to the depth of the object to which it is attached select Depth. scale the custom block to the height of the object to which it is attached select Height. lock the XY shape of the object select Lock Ratio. If the object is scaled in one direction to fit another criterion for Scale to Fit, the whole custom block is scaled equally. add the selected block to the railings between the selected components select Between Comp. Baluster, Fixed Post, and Dynamic Posts are the only valid component selections. - Specify the Mirror In direction, if necessary:
If you want to… Then… create a mirror of the component in the X direction, along the length of the railing select Mirror X. create a mirror of the component in the Y direction, across the width of the railing select Mirror Y. create a mirror of the component in the Z direction select Mirror Z. - Specify the location of the insertion point in relation to the object:
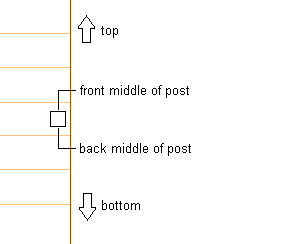
If you want to… Then… specify the location of the X insertion point select Left, Center, or Right for X. specify the location of the Y insertion point select Front, Center, or Back for Y. specify the location of the Z insertion point select Bottom, Middle, or Top for Z. Specify the post orientation relative to the up and down directions on a stair run in plan view as shown in the following illustration:
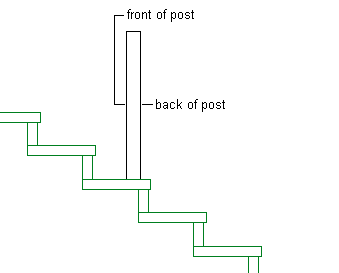
Specify the post orientation relative to the up and down directions on a stair run in elevation view as shown in the following illustration:
- Specify the insertion offset for the component in the X, Y, and Z directions.
- Specify the type of railing component that the block represents:
If you want to… Then… represent balusters with the block select Baluster for Component. represent fixed posts with the block select Fixed Post for Component. represent dynamic posts with the block select Dynamic Post for Component. replace the current baluster, fixed post, or dynamic post with the block select Replace. represent a guardrail with the block select Guardrail for Component. represent a handrail with the block select Handrail for Component. represent a bottom rail with the block select Bottomrail for Component. The two groups of components are mutually exclusive, so selecting an object from one column makes the other unavailable. You can select more than one object in each column to apply the block to each selected component. For example, you can use the same block for the fixed posts and dynamic posts.
- Specify where the block is applied to the components:
If you want to… Then… apply the block to all instances of the selected components select All for Attach to. apply the block to the first instance of the selected component, based on the direction the railing was drawn select First for Attach to. apply the block to the last instance of the selected component, based on the direction the railing was drawn select Last for Attach to. apply the block to a selected number of components select Selection for Attach to. The components are numbered in the order the railing was drawn, beginning with 1. - Click OK.
You can also specify custom block display properties through the railing’s context menu, as follows:
- Right-click the railing, and click Edit Object Display.
- Click the Display Properties tab.
- Select the display representation where you want the changes to appear, and select Object Override.
- If necessary, click
 .
. - Click the Other tab.
- Add, edit, or remove custom blocks as explained in the previous procedure.