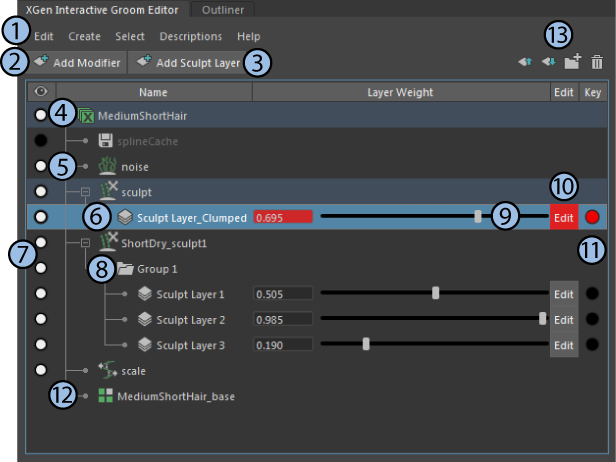
The XGen Interactive Groom Editor is your main tool for creating, editing, and managing modifiers and sculpting layers for interactive grooming.
To open the XGen Interactive Groom Editor:
- Click this
 icon on the
XGen shelf.
icon on the
XGen shelf.
- In the Modeling menu set: select .
|
1 - Menu commands |
See below for a list of all commands. |
|
2 - Add Modifier |
Select an interactive groom description and click this button to access the list of interactive groom modifiers that you can add to the description.
See Interactive grooming modifiers and Work with interactive grooming modifiers. |
|
3 - Add Sculpt Layer |
Select a Sculpt modifier and click this button to add a new sculpt layer. |
|
4 - Interactive groom description |
Represents each interactive groom description (xgmDescriptionShape) node in the scene. Select this node to add interactive groom modifiers. |
|
5 - Interactive groom modifiers |
Represents each interactive groom modifier on the descriptions. Select a modifier to edit its attributes and add sculpt layers (Sculpt modifiers only) . Drag and drop the modifiers or use the
 / /
 icons to change their order in the modifier stack, which changes their overall affect on the groom. icons to change their order in the modifier stack, which changes their overall affect on the groom.
|
|
6 - Sculpt layers |
Represents each sculpt layer belonging to a
Sculpt modifier. By default,
Sculpt
modifiers include one sculpt layer. Click Add Sculpt Layer to create more layers within a
Sculpt
modifier. Drag the layer slider control to set its weighting.
Drag and drop sculpt layers to add them to or remove them from groups. You cannot change their order or to remove them from the group. Combine the effects of selected layers by right-clicking and selecting Merge from the menu that appears. If you want to merge enabled layers only, select Merge Visible instead. Merged layers get added to a new layer named mergedLayer. See Work with sculpt layers. |
|
7 - Visibility |
Click the circle to toggle the effect of the modifier or sculpt layer on and off. You can also select multiple items and click the circle for one of them to toggle the visibility for all of them.
You can click the circle for a group to see the effect of all its sculpt layers on the hair. Weighting and editing are disabled when the visibility is off. |
|
8 - Groups |
You can organize sculpt layers into groups and subgroups. See the Group icon
 below for more information. below for more information.
|
|
9 - Weight |
Drag the slider to set the weight (influence) of that sculpt layer to a value between 0.000 and 1.000, or enter a value in the weight text box.
Right-clicking in the weight text box provides access to some standard Maya attribute options. |
|
10 - Edit |
Click the Edit button to enter edit mode for this sculpt layer. Modify the hair or fur using a grooming tool. |
|
11 - Key |
Click the Key icon
 to set a key on the selected sculpt layer's current weight value at this frame. to set a key on the selected sculpt layer's current weight value at this frame.
Right-click the key icon to open a menu with these commands: Key at current, Key at 0, Key at 1, or Remove key. |
|
12 - description_base node |
Represents the description's base (xgmSplineBase) node in the scene. See XGen interactive groom description_base node attributes. |
|
13 - Icons |
|
Interactive Groom Editor Menu Commands
Edit menu
-
Group creates a group with the selected descriptions or sculpt layers. You can also click the
Group icon
. See Create groups of descriptions and sculpt layers.
-
Delete deletes whatever is selected: descriptions, modifiers, sculpt layers, groups. You can also click the
Delete icon
 .
.
- Duplicate duplicates the selected modifiers.
Create menu
-
Interactive Groom Splines opens the
Create Interactive Groom Splines Options window, which lets you create interactive groom splines on the selected mesh object or selected faces of the mesh object.
See also, Create hair and fur using interactive grooming tools.
- Add Modifer provides access to the interactive groom modifiers that you can add to the description, the same as clicking the Add Modifier button.
- Add Sculpt Layer adds a new sculpt layer to the selected Sculpt modifier, the same as clicking the Add Sculpt Layer button.
Select menu
- Select Splines on Selected Face lets you select hairs generated on the selected faces of the bound mesh.
- Freeze Selected freezes hairs selected by the Select tool; same as freezing hairs with the Freeze tool. See Interactive Grooming Tools.
Description menu
- Transfer lets you transfer hair from a source interactive groom spline description to target mesh object. The source and target meshes do not need to have the same topology, so you can transfer hair to low or high resolution versions of your character mesh or to different mesh shapes. See Transfer interactive grooms from one mesh to another.
-
Preset lets you save your interactive grooms to preset files. Click Export to save the selected description as a preset and Import to apply a preset to the selected polygon mesh. See Save and load interactive grooming hair and fur presets.
-
Cache lets you save hair and fur created by interactive groom spline descriptions to Alembic cache files. You can then load the cache from a network location or local hard-drive into your scene at a later time.
See XGen Caching submenu.