The Collision Safe Boundary dialog creates a boundary that is limited by tool length. This enables you to use a short tool over the majority of the toolpath, followed by long tools, where necessary. The boundary can then be used to determine the long/short boundary between these toolpaths. The boundary defines the safe (non-colliding) region with the specified tool.
Click Boundary tab > Create panel > Collision Safe to display the Collision Safe Boundary dialog.
This dialog contains the following:
-
 Clone Boundary — Click to make a copy of the selected boundary. The new boundary is created with the suffix '_1'.
 -
 Lock — Click to lock the boundary so that its parameters cannot be changed. When a boundary is locked, the button changes to
  and all the parameter fields become 'read-only'. Click the button again to unlock the boundary. This is useful for protecting complex boundaries that may have taken some time to calculate.
 -
 — This icon shows the type of boundary you are creating; in this case a Collision Safe boundary.
 - Name — Enter the name of the boundary.
-
Holder clearance
 — Enter a specified “safe” area around the tool holder which is taken into account when checking for collisions.
 -
Shank clearance
 — Enter a specified “safe” area around the tool shank which is taken into account when checking for collisions.
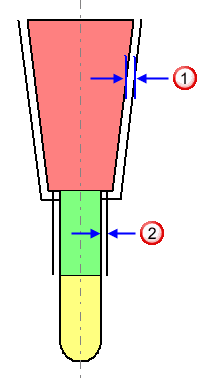
-
Tolerances — Use these option fields to specify the Tolerance and Thickness values used to create the boundary.
- Tolerance — Enter a value to specify the tolerance used when calculating the boundary. The value determines how accurately the boundary follows the underlying geometry.
- Thickness — Enter a value to specify the machining thickness applied when calculating the boundary. Use a single Thickness to apply the value as an offset to the tool in all directions.
- Axial Thickness — Enter a value to specify the machning thickness as an offset to the tool in the tool axis direction only. This controls the tip position of the tool used for machining relative to the actual tool.
- Use Axial Thickness — Select to specify an Axial Thickness. Selecting this option changes the Thickness field to Radial Thickness. Use a Radial Thickness to apply the value as an offset to the tool radially. This controls the size of tool used for machining relative to the actual tool.
-
 Thickness — Click to display the Surfaces tab of the Component Thickness dialog. The functions on the Surfaces tab enable you to specify the thicknesses of the different boundary surfaces.
-
Tool — Select the tool used by the toolpath.
To create a new tool, either select a tool from the list
 , or select an existing tool from the list on the right.
- Limit Boundary — Select to limit the boundary to an existing boundary.
-
Block — Select an option from the list to specify whether the tool is allowed outside the block or not.
-
 — When selected, enables the tool centre to move outside the block. It can only extend outside the block by up to one tool radius.
-
 — When selected, the tool centre is limited to the block edge.
-
- Allow boundary to be private — Select to create a boundary that could become a private boundary. The boundary becomes private only when it's linked to a toolpath or stock model. A private boundary is linked to a specific toolpath and cannot be used by any other toolpaths. To use the same boundary elsewhere you have to duplicate it.
-
 Information — Hover over this button to display private boundary information.
- Apply edit history on calculation — When selected, applies the list of edits to the boundary when it is recalculated. When deselected, the boundary is recalculated using the options on this dialog, but no edits are applied.
-
 View boundary edits — Click to display the Boundary Editing History dialog, which enables you to see all edits you have made to the boundary.
 - Apply — Click to calculate the boundary immediately, using the parameter settings from the dialog.
- Queue — Click to check that all the parameters used to calculate the boundary are acceptable. The boundary is added to the calculation queue and the dialog is closed. The boundary is calculated in the background when PowerMill would otherwise be idle.
- Accept — Click to store the boundary parameters. This closes the dialog without calculating the boundary. The boundary is calculated automatically when required.
- Cancel — Click to close the dialog without storing the boundary parameters.