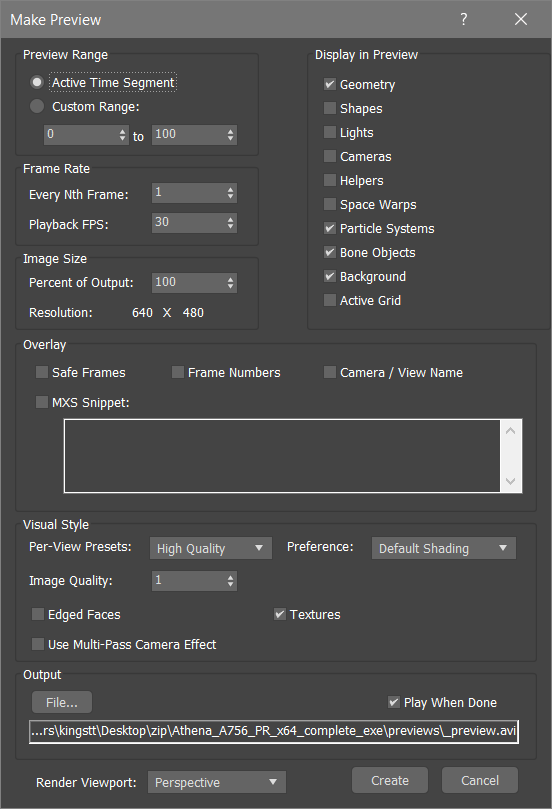
The Make Preview dialog lets you create an AVI file or custom file type preview of the animation in the active viewport. You can also render a preview to a specified device.
When the preview is complete, 3ds Max starts the Media Player with the preview _scene.avi file ready to play by default. If you don't want the Media Player to start, clear the Play When Done checkbox.

Preview Range group
- Active Time Segment
- Includes only the active time segment in the preview.
- Custom Range
- Includes only the frames specified in the range in the preview.
Frame Rate group
- Every Nth Frame
- Provides a regular sampling by including only every Nth frame (number you specify) in the preview.
- Playback FPS
- Specifies the playback frame rate in frames per second.
Image Size group
Sets the resolution of your preview as a percentage of the current output resolution. You set the output resolution on the Render Setup dialog. For example, if the rendering output resolution is 640x480, and you set Percent Of Output to 50, the preview resolution is 320x240.
Display in Preview group
- Geometry
- Shapes
- Lights
- Cameras
- Helpers
- Space Warps
- Particle Systems
- Bone Objects
- Background
- Active Grid.
Display in Preview group (Legacy viewports)
For legacy viewports (Direct3D or OpenGL), specifies the types of objects to include in the preview. Frame Numbers prints a frame number in the upper-left corner of each frame of the AVI file. Background includes the assigned viewport background in the preview.
Overlay group
- Safe frames
- Frame numbers
- Camera/View Name
- MXS Snippet
It is not possible to change the appearance (color, font size, etc.) of the overlaid output.
The MXS Snippet is MAXScript code that is executed for every frame of the preview, the output of which is overlaid on each rendered frame. For example, this statement adds a copyright statement and the current frame number:
print("(c)Example " + sliderTime as String)
There are no restrictions on the MAXScript that can be executed, but it should be limited to accessing frame and scene information for performance reasons.
Visual Style group (Nitrous viewports)
- Per-View Presets
- Options include High Quality, Standard, Performance, or DX Mode.
- Preference
- Sets how objects are rendered. Options include:
- Default Shading
- Wireframe
- Clay
- Facets
- Bounding Box
- Hidden Line
- Flat Color
- Model Assist
- Graphite
- Color Pencil
- Ink
- Color Ink
- Acrylic
- Pastel
- Tech
- Edged Faces
- Includes face edges in the preview.
- Use Multi-Pass Camera Effect
- Includes the effect of having multiple camera passes in the preview.
- Textures
- Includes textures in the preview.
Rendering Level group (Legacy viewports)
- [Rendering Level drop-down list]
- For legacy viewports (Direct3D or OpenGL), specifies the viewport rendering method to use in the preview.
Output group
- Play When Done
- When the preview is created, opens the Media Player and automatically plays the preview.
- File
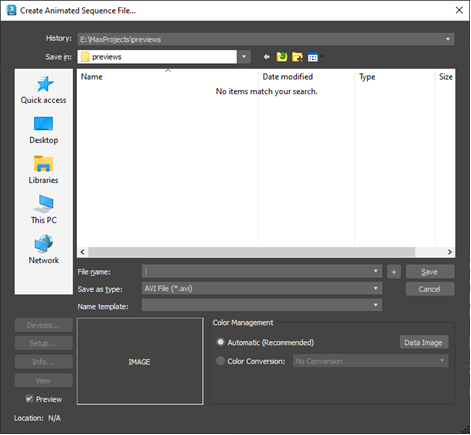
- Opens the Create Animated Sequence File dialog.

- File name
- Specify the file name. If you want a specific format, select it from the Name template list first.
- Save as type
- Specify the type of file to save. This list also serves as a filter.
- Name template
- Lets you choose a file name based on the 3ds Max scene and system settings, where:
- <scene> is the root name of the MAX scene file
- <camera/view> is the name of the active camera or viewport
- <mm> is the month
- <dd> is the day
- <yyyy> is the year.
- The text field lets you create new templates. Any text you enter becomes part of the name template. Up to 10 custom templates can be saved in addition to the default templates. Once the maximum number of templates has been saved, entering a new template causes the first custom template to drop off the list.
- Devices
- Lets you choose from the hardware output device; for example, a digital video recorder. The device, its driver, and its 3ds Max plug-in must all be installed on your system.
- Setup
- Displays controls for the selected file type. These vary with each different file format. Change the settings as necessary.
- Info
- Displays expanded information about a highlighted file such as frame rate, compression quality, file size, and resolution. The information here depends on the type of information saved with the file type.
- View
- Displays a highlighted file at its actual resolution. If the file is a movie, the Media Player opens.
- Color Management [OCIO color management modes only]
-
Controls how colors are converted from the rendering space when saving output files.
- Automatic (Recommended)
- Applies the output color transforms specified in your Color Management Settings, except for EXR and other formats that are typically linear in which case no conversion is applied. When Automatic is on, the transforms that will be applied are shown read-only under Color Conversion.
- Color Conversion
- Specifies the type of transform to apply to rendered output files.
- No Conversion: Saves the untransformed rendering-space values. This would be the best choice if the images will be processed further, but it's not usually appropriate for previews.
- Color Space Conversion: Lets you select a transform from the Color Space drop-down to convert colors from the rendering space to another one. For example, you can match the color space of specific files such as those from a digital camera if that space is available in the config file.
- Display / View Transform: Lets you apply any available combination of
Display and
View transforms to rendered images. When using
3ds Max's default config file:
- For a typical preview, set Display to sRGB and View to ACES 1.0 SDR-video.
- To emulate older workflows where colors above 1.0 are simply clipped, set Display to sRGB and View to Un-tone-mapped.
- You can use other combinations for specific purposes, for example, to bake in a photographic tone map like ACES 1.0 SDR-video for a different display such as DCI-P3 D65.
- Color Space
- When Conversion is set to Color Space Conversion, select a color space for rendered files. The list of choices depends on the config file. With 3ds Max's default config file, you can select any space that is supported for image inputs.
- Display
- When Conversion is set to Display / View Transform, select a display to encode rendered images for. The list of choices depends on the displays available in the config file.
- View Transform
- When Conversion is set to Display / View Transform, select a tone map. The list of choices depends on the view transforms available in the config file.
- Data Image
- Sets Color Conversion to Color Space Conversion and Color Space to Raw. This is typically used when rendering files that contain non-color data such as normals, motion vectors, and so on, but is not normally appropriate for previews.
- Gamma [Gamma Workflow color management mode only]
- Specifies how to handle gamma for the output.
- Automatic (recommended)
- Automatically determines the gamma based on the output format's bit depth. Low-dynamic-range images (8- or 16-bit) are assumed to have the standard sRGB gamma of 2.2, and high-dynamic-range (floating-point or logarithmic) images are assumed to use a gamma of 1.0 (no correction).
For most scenes, you should leave the gamma-handling set to Automatic.
- Override
- Uses the value you specify for the gamma.
- Data Image
- Activates Override and sets the value to 1.0. This is typically used when rendering files that contain non-color data such as normals, motion vectors, and so on, but is not normally appropriate for previews.
- Preview
- Displays a thumbnail of the selected file.
- Location
- Displays the full file path.
- Render Viewport
- This list shows the names of the currently visible viewports, letting you choose which viewport to render from within the Make Preview dialog.
- Create
- Creates the animation preview.
- Cancel
- Closes the dialog without creating or saving the preview.
