
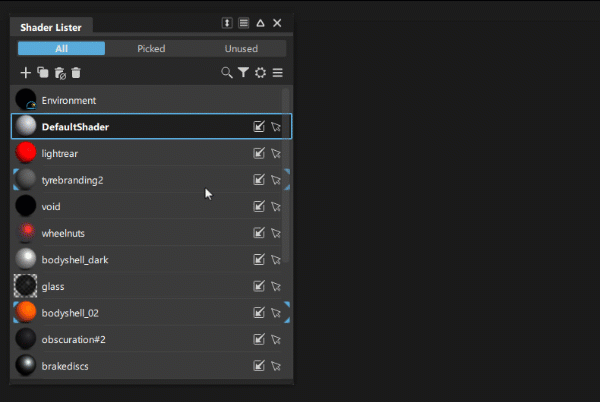
Shader Lister
![]() +
+ ![]() +
+ ![]()
Opens the Shader Lister, which lists the Alias shaders, VRED materials, and environment used in the scene. Use the lister to create new shaders and materials as well as edit existing ones.
It also provides quick access to the Shader Editor, Environment Editor, and Texture Editor.
Shaders and materials are descriptions of surface materials or effects that control what a surface looks like when it is rendered, such color, reflectivity, and roughness.
- Working with the VRED Renderer in Alias
- Working with Decals, Logos and Projecting Textures
- Truelight Materials Reference
In order for a surface to have the properties of a shader, you must assign the shader to the surface. You can assign a single shader to several different surfaces. You can also layer several shaders onto a single surface. By default, all surfaces have the DefaultShader assigned to them.
When you start a new scene, there is only the environment and one shader, the DefaultShader defined and assigned to all objects. You can create a shader based on the DefaultShader or light, or copy a shader or light that you have customized.
You can customize a shader by adjusting its parameters in the Shader Editor. Double-click on the shader preview ball to open the Shader Editor.
Related videos
Shader Lister icon bar
![]() - New - Creates a new shader based on the DefaultShader type (also available in the More menu).
- New - Creates a new shader based on the DefaultShader type (also available in the More menu).
![]() - Duplicate - Creates a copy of the selected shader and adds it to the shader list (also available in the context menu).
- Duplicate - Creates a copy of the selected shader and adds it to the shader list (also available in the context menu).
![]() - Delete Unused Shaders - Deletes any shaders that are not assigned to objects.(also available in the More menu).
- Delete Unused Shaders - Deletes any shaders that are not assigned to objects.(also available in the More menu).
![]() ,
, ![]() ,
, ![]() - Filters the lister view to display all shaders, shaders assigned to picked objects, or unused shaders.
- Filters the lister view to display all shaders, shaders assigned to picked objects, or unused shaders.
![]() - Delete - Deletes the selected shader (also available in the context menu).
- Delete - Deletes the selected shader (also available in the context menu).
![]() - Search - Lets you use keywords to search for shaders by name.
- Search - Lets you use keywords to search for shaders by name.
![]() - Filters -Displays shaders based on the selected criteria, such by type or selected object.
- Filters -Displays shaders based on the selected criteria, such by type or selected object.
![]() - Settings - Access the Shader Lister settings.
- Settings - Access the Shader Lister settings.
Show Preview - Turn the shader preview on and off.
Preview Model - Choose the shape for displaying shader previews in the lister and in the Shader Editor.By default, the preview model is a sphere.
Preview Size - Adjust the size of the shader preview.
Sort by - Lists the shaders either by the order they were creates or by alphabetical order.
Group by Type - Groups shaders sorted by Shader Type. For example Blinn, Phong, Lambert, and Light Source.
![]() - More - Access the shader More menu. See the Shader Lister More menu.
- More - Access the shader More menu. See the Shader Lister More menu.
Shader and material icons
VRED materials and Alias Shaders display different icons superimposed over their preview swatches to indicate their type and current state.
VRED-based materials
| Type | Icon | Preview |
|---|---|---|
| Material is in an assets library (linked) | ||
| Material is not in an assets library | No icon | |
| Being edited | ||
| Assigned to selected | ||
| Multi Pass | ||
| Layered | ||
| Switch | ||
| MaterialX | ||
| Empty Switch, Multi Pass, or Layered material | No icon | |
| MDL | ||
| Substance | ||
| X Rite | ||
| Unsupported material | No icon | |
| Environment |
Alias-based shaders
| Type | Icon | Preview |
|---|---|---|
| Assigned | ||
| Layered | ||
| Switch | ||
| Environment |
Shader Lister workflows
This section describes workflows for Alias shaders, including assigning shaders to surfaces and creating new shaders. For information on VRED material workflows, see Working with the VRED Renderer.
Assign a shader to a surface
There are different ways to assign shaders:
- Pick the surface(s) in a modeling window and use Assign Shader from the context menu on your chosen shader (or use the shortcut icon)
- LMB-drag the shader from the Shader Lister onto the geometry to assign to that surface only.
- MMB-drag the shader from the Shader Lister onto the geometry - all surfaces with the original shader get switched to the new shader.
- LMB-drag a shader from the Shader Lister onto a layer tab in the Object Lister or on the Layer Bar - all surfaces on the layer are assigned to that shader.
- LMB-drag a shader from the Shader Library onto the geometry.
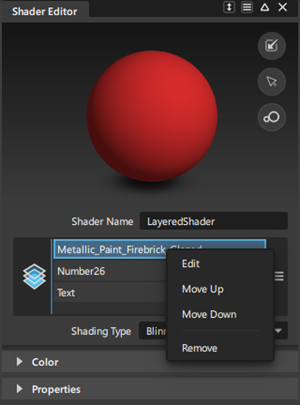
Creating a layered Shader
From the Shader Lister More menu, select New Layered Shader.
Drag-and-drop shaders onto the new layered shader. Typically, layered shaders have some transparency so that the shader below is visible.
Assign the shader.
Use the RMB context menu to edit the layer list:
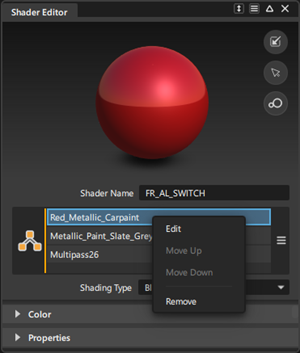
Create a switch shader
A switch shader contains a list of shaders. The selected shader in the list is the active shader, which is assigned to the objects the switch shader is assigned to. The other shaders in the list are alternatives. Select an alternative shader in the list to assign it to the objects.
Use switch shaders to quickly create variants with shading assignments.
To create a switch shader:
From the Shader Lister More menu, select New Switch Shader.
Drag-and-drop shaders onto the new switch shader.
Assign the shader.
Use the RMB context menu to edit the layer list:
Switch between shaders
- Assign the Switch Shader to objects.
- In the Switch Shader window, click the name of the shader you want to appear on the objects.
Replace Shaders by Name workflow
You can replace shaders in the scene with shaders or materials of the same name from a specified Shader Library of directory. For example, if your current scene contains imported geometry with non-Alias shaders, you can replace one or more of the shaders with Alias shaders or other materials. To replace shaders using the Replace Shaders by Name feature, both shader names must be identical. You can choose to replace all shaders used in the scene or select the shaders you want to replace.
In the Shader Lister window, select the shaders you want to replace.
If you want to replace all the shaders in the scene, you do not need to make a selection.
In the More menu, Shift-select Replace Shaders by Name.
In the Replace Shaders by Name Options, do the following:
Turn on Ignore # suffixes and merge if you want to merge incoming shaders with existing shaders that have the same base-name.
If you want to replace the selected shaders only, choose Selected from the drop-down list beside Replace Shaders by Name.
Otherwise leave this set to All to replace all the shaders.
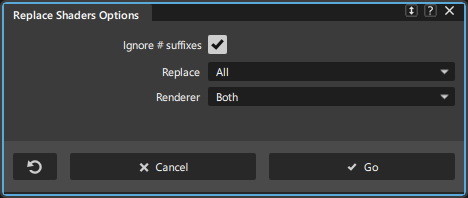
- Click Go.