
Assigning Random Colors to Primitives - Arnold for Maya

In this tutorial, we will cover how to assign random colors to different XGen primitives using a combination of expressions and the user data color shader.
Before you start this tutorial, it is advised that you also read the tutorial Controlling Primitives with a Texture Map which shows you how to define the scale of your XGen primitives.
Scene Setup
- First of all, you will need to export your model as an XGen archive.
- Create an XGen archive description and add the archive file. Assign a standard surface shader to the archive collection.
- Create a user data color shader and connect it to the color attribute of the standard surface shader.

user data color -> color attribute of standard surface shader
- Type color in the Color Attr Name of the user data color. We will use the same 'Color' name in the XGen description.

Add the name 'color' to the Color Attr Name in the user data color
- MtoA will not gamma correct the Ai UserData Color node. Therefore you will need to add a Maya Gamma Correct node in-between the Ai UserData Color node and the Color attribute of the Standard Surface shader as shown below. Change the Gamma RGB values to 0.454.

- Render the scene. The pills are black because the user data color default value is black. We need to connect it to the XGen description using the Custom Shader Parameters in XGen.

Pill archives are using the black Default Color of the user data color
- Increase the Density to around 20 to increase the number of XGen primitive archive pill models.
Custom Shader Parameters
- Click on the Preview/Output tab in Xgen and open up Output Settings. Underneath you should see the Custom Shader Parameters. This is where we will add our expression.
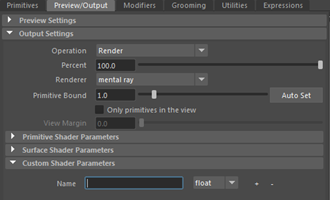
Custom Shader Parameters (bottom)
- In the Name text field, type the same name that was used for the Color Attr Name with the user data color. In this case, we used the word 'Color'. Change float to Color because this is the attribute that we want to change.

Custom Shader Parameters set to Color
Expression
- Click on the XGen Expression Editor icon
 to the right of our new 'color color' parameter and add the following text in the Expression Editor:
$a=[rand(0,1,$id),rand(0,1,$id+1),rand(0,1,$id+2)];#-1.0,1.0 $a ...where rand defines the RGB values between 0 and 1.

Expression in XGen Expression editor used to define RGB values from 0 to 1
- Render the scene. It should look like this:

- If we change the rand values to the following:
$a=[1,rand(0,0.5,$id+1),rand(0,0.5,$id+2)];#-1.0,1.0 $a ...we get something that has RGB values, but it has more of a red color and less green and blue.

- If we change the rand values to the following:
$a=[rand(0.5,1,$id),rand(0,0.8,$id+1),rand(0,0.8,$id+2)];#-1.0,1.0 $a ...the pills have more variety of colors because the red color value is between 0.5 and 1.

Sliders
- Rather than having to keep typing in values in the XGen Expression Editor, we can create some sliders which we can use to adjust the RGB colors more easily. Add the following text in the XGen Expression Editor.
$minRed = 0.000; $maxBlueGreen = 1.000; $a=[rand( $minRed,1,$id),rand(0,$maxBlueGreen,$id+1),rand(0,$maxBlueGreen,$id+2)];#-1.0,1.0 $a You should see two sliders appear. They can be used to interactively preview the colors generated. This saves us from having to test render the scene each time we make a change!

XGen Expression Editor with funky new sliders
That is the end of this tutorial. Have fun playing with XGen's expressions!
Thanks to Pedro Fernando Gómez for his assistance with XGen.