Analyzing Drainage Systems
Using the drainage analysis workflows helps make informed decisions while designing hydraulic models, ensuring high-quality outcomes.
The drainage analysis tools are an innovative solution created with the needs of civil designers like you in mind. We understand the challenges in your current workflows that provide adequate results. This new set of tools helps make your drainage analysis processes as seamless as possible, eliminating the need to frequently switch between different tools and interfaces, and significantly enhances productivity.
To Open the Analysis Tool
Select an element of the drainage system (such as a catchment, pipe, structure, or pond).
Click Analyze tab > Design Panel > Analyze Drainage System
 . The Analysis Criteria tool opens as a palette in the drawing area.Note: If the Analysis Criteria tool does not open, review the errors and warnings displayed at the Command Line.
Refer to the Drainage Analysis Workflow to continue.
The Analysis Criteria User Interface
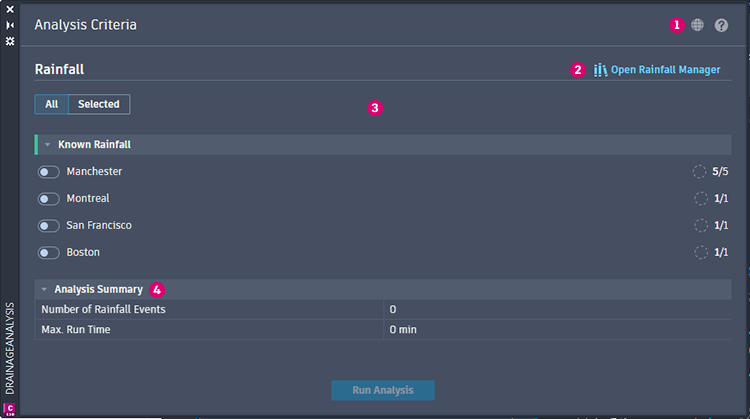
The beginning Analysis Criteria user interface allows for specifying rainfall data to test the current drainage system. If Rainfall Sets have not been configured for the project, you will only be able to open the Rainfall Manager from the interface. Rainfall data is required to begin the analysis process.

- Server Region Settings. Specifies a geographically specific server for cloud processing. Learn more.
- Rainfall Manager. Opens the rainfall manager to edit and select individual rainfall events. Learn More.
- Project Rainfall Sets. A list of currently configured rainfall sets to apply and test the drainage system. Learn More.
- Analysis Summary. Displays the total number of Rainfall events applied to the drainage system and the largest specified maximum run time of the events.
